Simulating Soft-boxes with UberArea Lights
I have some experience in photography and I know that studio photographers usually use soft-boxes or umbrellas for portrait lighting. They give soft light without harsh shadows that still looks very 3 dimensional and is flattering for portraits.
I found commercial products that added mesh lights that would simulate soft-boxes, like for example http://www.daz3d.com/shop/inaneglorys-photo-studio-3
That product looks very nice with lights to simulate beauty dishes as well as soft-boxes, but then I discovered that Daz Studio includes an UberArea light. There are presets to add area lights of various shapes, the plane and the disc being most useful for simulating a soft box. There has been a lot of discussion about portrait lighting, for example here http://www.daz3d.com/forums/discussion/1201/, but I could not find any reference to using UberArea lights to get soft-box like lighting.
Now the UberArea lights are a little weird. They are actually light emitting shaders on a surface, so you have to control them from the surface tab rather than as a light. There is some documentation on them here: http://www.omnifreaker.com/index.php?title=UberAreaLight
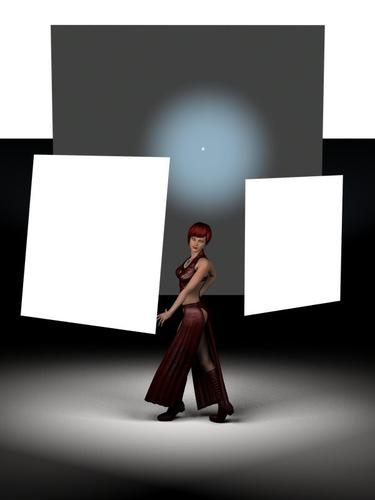
I decided to try to test this with a simple portrait lighting setup. The images below show the resulting render and a setup picture to show you how the area lights were placed. In studio lighting you usually place the lights 3-6 ft from the subject. You want the soft-box to look large to the model. If you place the soft-box far away, you will get hard lighting (sharply defined shadows).
For this picture I have a primitive plane set vertically well behind the model as a backdrop. The primitive plane is grey and is emitting ambient light so I don't need to light it. There is a light blue spot light near the back drop plane that is illuminating the light blue around the models head. The key light is camera left. I scaled this UberArea plane a little larger and the intensity is about 2x the intensity of the fill light which is camera right.. I used the UberArea light fall off feature so that the UberaArea lights do not illuminate the background. You can see the range of the UberArea light illumination on the black ground plane in the setup picture.
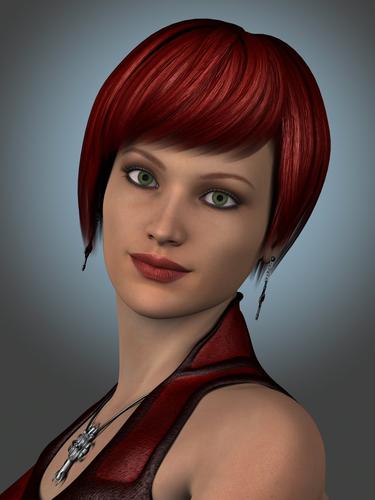
With the UberArea lights the "Samples" parameter controls the quality. The default value of 8 usually gives you noisy renders. The render below was done with samples set to 32 and the shading rate set to 0.2. It still may have some noise in the shadows. Render time was about 24 mins for 1600x1200.
I am pretty happy with the lighting and 3 dimensionality of this image. I'm surprised there has not been much discussion of this kind of lighting.


Comments
Hi Mark :)
You'll probably find much more discussion about using this type of Soft box lighting rig in the Carrara forums.
Carrara can use IES lighting profiles from lighting manufacturers, it has Shape lights, like your planes, plus,. "Anything glows" which makes any object into a light source,.
There's also HDRI for scene lighting, and reflection. plus Global illumination / Ambient Occlusion, and caustics.
you also have lens flare, and other light effects which you can adjust, as well as light gel's, and barn doors for spots.
This image is from some time ago, but it's lit using a couple of hemispheres, ..with anything glows lights.
I'm sure lots of other people use similar lighting. Carrara is not free like DS. I have heard it does a better job of lighting and rendering than DS. It should do a better job.
I just didn't realize you could get this kind of lighting in DS unless you bought one of those mesh lighting kits.
I am new in the 3d rendering world, though I have some experience in photography. I really don't know what IES or HDRI stand for. I have been able to figure out that AO means Ambient Occlusion and have read some on that, but still don't really understand all of it. There are threads in the archive forum that discuss it with example pics, but the pics seem to be gone.
There was discussion on the subject of Area Lights but its in the old forum.
Inane Glory's lights are sets of lights using the Arealight shader, they are are very good light sets, which also come with 3 backdrops and lots of textures for those.
Inane Glory really knows his lighting and his light sets produce excellant results without the trial and error of setting lights up yourself, especially if like me you haven't got a clue what you are doing most of the time.
The studio light sets also give ou easier control over the mesh lights.
When Arealight shader is applied to a plane(for Example) only one side wil give off light, IG's light sets make it very simple to see which way the light is pointing.
HI :)
IES is the (Illuminating Engineering Society) ...in simple terms, Manufacturers of light bulbs, such a Philips, GEC, etc.
whenever a new light bulb type is manufactured, it's tested to show the light intensity at different points,. and that data is made available in a text format. (IES)
The file is the measurement of distribution of the light's intensity.
It's used in 3D to re-create real world lighting,.. in a 3D situation,. such as an architects Pre-building "visualisation".
the Lights which the customer will be using, in the real building,. will all have IES Profile's, which can be freely downloaded and used in a program that supports IES lighting.
HDRI is (High dynamic range imaging)
Essentially it's an image format,. (32bit or greater) which can be used as the source for the lighting, and reflections in your scene.
For example,. you take a series of images at different camera settings, then combine the different images with different light ranges into a Panorama image which can be opened in the 3D program,. and all of the scene lighting and reflections can come from the HDRI file.
Hope it helps :)
It is used by most 3D software as an 'environment' map...
Basically, by using the image to define the 'worldspace' in which your scene exists, the render engine can calculate all the lighting based on the bright/dark areas of the image to simulate the lighting in that image in the 3d space of your scene. 3Delight, is a 'biased' renderer, so it's calculations take 'short cuts' when doing this, while an unbiased renderer, like Luxrender, don't take those short cuts...they treat each value as if it were an actual light ray at that specific intensity. Both methods can get to same 'place' but it's the how they get there and how soon that differs. Any image format can be used...but the higher dynamic range the image has, the more 'real' the lighting will be.
Hi Mark
you've just described my starting setup for almost every render I do!
Though I find a default material on a backdrop doesn't contribute enough to get a 3 point setup.
I usually add a distant light (200% of the key light) directly opposite the camera aimed at the back of the head as the hairlight.
But that's the good thing about 3D you can put lights right in front of a camera which a photographer could never do.
I often use a setup more common for product visualisation: With the big area lights facing each other and another overhead mainly lighting the backdrop. (The cyclorama is just a quick hack in Hexagon.) Although its mostly aimed at creating even lighting, messing about with the light colour gets some interesting results.
People are turning to other renderers before giving Uberenvironment a chance. Even with a single area light and setting UE to 'GI (bounce)' can give some good results, like the teapot below.
On my machine, that makes for a very long render...actually, anything with UE increases render times. Non UE solutions, with ShaderMixer/ShaderBuilder/RSL shaders put into DS or so on can often do the same things as UE, without the tremendous increase in render time. There is a scripted point cloud based AO render, included in DS 4.5, that does nice things very fast...and 3Delight can do a lot more light based things with a point cloud than just AO.
The number of options to explore is rather large and finding the right combination of lighting isn't a simple procedure, most people won't want to go that far into it, but the results can be very rewarding.
A little more on HDRI, since it has this odd reciprocal relationship between its use in CG imagery and photography. HDR stands for High Dynamic Range. The idea is that when your eyes see a scene with lots of bright light and deep shadow, you manage to take in the whole thing - the dynamic range of brightness values your eyes can process is far wider than the 'millions of levels' range of a typical image file (or digital photo). It is possible to create HDR photos by taking three bracketed ordinary digital photos; the dark exposure brings out the details in the highly-lit areas such as clouds or near the sun; the brighter settings bring out the details in shaded areas. Software (sometimes built into the camera nowadays) can merge the information in the three images into an HDR image file. In such a file, light values can range from 0 to absurdly high numbers represented in floating point (i.e., scientific notation) representing an absolute brightness (rather than 'white' meaning ''maximum pixel value'). Of course, to display such an image, you have to convert these ranges back to the sort of ranges a (normal) computer monitor uses, and this is done by 'tonemapping' software, which can be tweaked in various ways for different effects. Some HDR photos you find online have been tonemapped in a somewhat unnatural way and look oddly like CG images.
Now, suppose you have an HDR image of a whole scene mapped onto a skydome-type sphere. This can be used by software like Studio as a representation of the illumination coming from every direction into the scene - and because the bright areas can be _very_ bright, they can cast shadows into the less well-illuminated areas. Meanwhile, a tonemapped JPG of the scene can be mapped onto the skydome to create a background for the render that exactly duplicates the objects in the scene that are illuminating it from the HDR version. I don't think I said that as clearly as I should, but I hope you get the idea. HDR stuff is pretty neat stuff from both the photography and CG standpoint.
That's true, but Mark's 24 minutes doesn't sound too bad.
...I bet 23 minutes of that was on the hair. :lol:
That's true, but Mark's 24 minutes doesn't sound too bad.
...I bet 23 minutes of that was on the hair. :lol:
In the image above that rendered in 24 minutes, I did NOT use a UberEnviroment light at all. There are only 3 lights, the two UberArea lights and one spot light to add color to the background. I used the fall off feature of the UberArea lights to cut off the light behind the model. I assumed this saved ray tracing the light from the UberArea lights back to the backdrop plane. I made the backdrop plane be grey ambient light emitting. This was not done to light anything up, just to give it a little color.
Yes, the hair was a large part of the rendering time, but not 23 minutes. If I put a longer over the shoulder hair on her, I would guess the render time would be quite a bit longer. I also have a fairly fast computer.
I have some experience in photography. A camera just records light. Great portraits require good lighting. A photographer has a choice. He can either find good natural light and pose his subject there or he can create his own good light. Many times it is very difficult to find really good natural light outdoors, so most professional photographers learn how to create their own or modify natural light to get the effect they want to achieve.
In 3D rendering, it seems that good quality rendering requires good lighting too. The lights used in 3D are not constrained by the laws of physics that govern real lights, so you are able to do things you cannot do with real lights. The UberArea lights are extended light sources, similar to softboxes or umbrellas used in photography. I have some understanding how to do portrait lighting with softboxes. Spot lights behave similar to real spot lights, and I can see how to use them.
The UberEnviroment light does not behave like any real light, and I'm still rather confused about how to adjust and control it. For portraits like this, I don't think I need it and I didn't use it. There was kind of dummy light that got added when I added the UberArea light, but it is just added to stop DS from adding its default lighting to renders. I deleted one of the two dummy lights. I should be able to delete the other one as long as I keep the real spot light on the background.
Uber...anything.
I did a quick test last night.
UberArea light, single pane, single Genesis. The pane was 1 yd, square and was directly behind Genesis. No other lights.
Render time of about 1.5 minutes.
Switched over to using the DzAreaLight (a shaderbuilder 'sample')...same setup and roughly the same levels.
Render time right about a minute.
No, the DzArea doesn't have the same level of control as the Uber, but more often than not, by NOT using Uber, I can shave a decent amount off the render times. On a faster machine, the difference is probably less noticeable, but there will probably still be one.
There's just something about the Uber code that makes it slower.
Yes, Uberenvironment is not a light in itself. Think of it as adding more features to any existing lighting in your scene.
The basic lights are based on shaders highly optimised for speed not accuracy. The complex interactions of lights and surfaces are simplified into discreet properties and some behaviours are discarded completely.
Uberenvironment puts some of those discarded behaviours back into the lighting calculation.
I set up this test scene, you can decide for yourself if you need UE.
Here is the scene without and with UE:
There are 3 main 'behaviours' that UE puts back.
Most obvious is the Radiosity, light bouncing off everything. So much light I actually had to turn down the intensity of the Area Light to 80%.
(It was on 200% with no UE.)
Second and closely related is the Ambient Occlusion, where it realises that as angles of corners get tighter the less light gets into the creases and crevices.
Thirdly, and probably the most computationally intensive is the Indirect Light Transfer. Its not just the brightness of the light that effects its surroundings its also the colour. The way the blue and red spheres are colouring the scene in their vicinity etc.
These 3 together are Global Illumination (GI) but often people just switch on radiosity and call that GI.
Thanks everyone, some really good stuff here, time for me to start rendering again methinks ;)