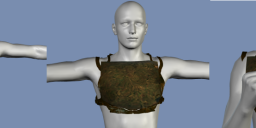
G1M4 DreamQuest Chest Piece.
 Blackbirdx61
Posts: 300
I've asked a good few Questions here this week, so I thought I would share the results so far. I'm Moding the S37 Dreamquest Armor at Renderosity for use with a male toon. https://www.renderosity.com/mod/bcs/dreamquest-armor-for-v4/83298/ The Bikini top is silly enough on v4 but on a male toon; still the rest of the set looks real good and serious.
I flattened a cube down to a plate then bent/tweeked it into shape Hex b4 Welding. The Result looks real good imported, but does not yet move smoothly with the toon. I'llHave to figure how to get that better; and those Sharp corners need hammering down. I'll be using the piece for Orc/Gnoll Armor. I think it has a nice Salvaged look to it. So for a hamhanded first try at Hex. Im pretty happy with results, so far!


Comments
Congrats!
You'll have to adjust the rigging, obviously, in order to get it to deform well when posing. (I don't know if you're using DS or Poser.) One thing to consider - In regions like around the shoulders, towards the bottom of the chest, around the neck, basically anywhere there is going to be substantial deformation when the figure is conformed to a posing figure, you want to increase the mesh density so that the mesh deforms smoothly. It's difficult to tell from your pics what the density is, but if you find the model "tearing" or "crinkling" a lot around joint areas and you can't correct it by editing the joints AND you notice the mesh isn't very dense, there... Then, it's time to take it back into your modeller and add some verts to those areas so the deformers have something more to work with. :) (Note: In Hexagon, under "Vertex modeling" , you can use the Connect and Edge tools without destroying the UV. (You can also Sub-D.) But, if you add a lot of geometry using those tools, you may want to consider remapping, anyway. But, it's nice to be able to use these sorts of tools without having to remap. Your mileage may vary, though. )
PS - Tip - Always add the next "child bone" down from a bone that is represented with a group in the model. You can only add neighboring child bones and their deformers to bones that are represented by a group in a conforming figure model and have them actually effect anything in the mesh. These somewhat group-orphaned bones will still have their deformers effect geometry in groups they are a direct child of. ie: Collar bones will effect Chest and Shoulder groups in a model, even if there is no group in the model associated with them, but only so long as there is a chest or shoulder group present in the model. So, if you find that the collar groups don't deform at all when the shoulders are posed and it makes things look a bit weird, add the shoulder bones to the cr2. This is particularly necessary in M4/V4 rigs, by the way, in the regions around the top of the torso. Basically, anything covering a majority of the chest should have the neck, right and left collar and abdomen bones added to it. For myself, with that model, I'd also add the hip bone. Why? Because it helps greatly with scaling issues and morphforms if you add them, since it's the primary "parent" bone of the rig. Without it, scaling and morphforms won't have a common anchor relative to the rig and the conformed figure will tend to jump up/down a bit or otherwise not morph well. (Hip bones and all their children down to the toes, for this rig, are also, IMO, necessary for shoe figures in order for them to conform well. Just a note. :) )
Nice job! Keep up the good work and show us a finished version when you can!