[Launched in Store] - Carrara EnviroKit - Woodlands [commercial]
 Dartanbeck
Posts: 21,655
The first in a series of Carrara EnviroKit products: Woodlands
Designed with the idea of helping artists quickly generate an outdoors scene or enhance existing scenes.
For those starting with a clean slate, there are several presets that are ready to render the way they are, but are actually empty and mostly flat around the zero coordinates area, so that ruins, buildings or whatever is needed can be added and used easily.
The Kit also includes each piece separately to be brought into existing scenes as well as a "Base Scene" which is a simple base setup lake and stream with surrounding terrain, environmental setup of lighting, clouds, animated water, etc., without any plants or other parts.
More information to come soon. The following images are as follows, from top to bottom:
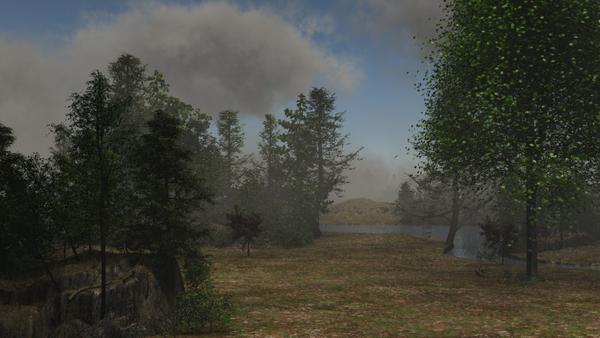
Image One - Basic Preset Day
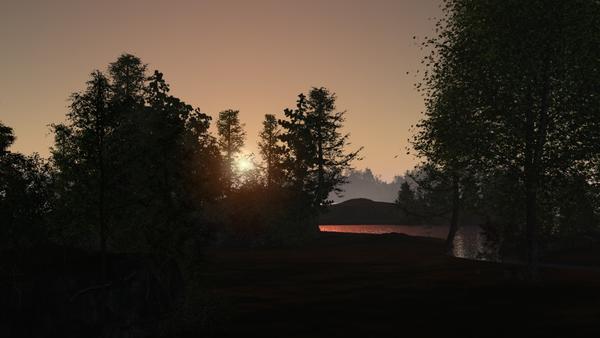
Image Two - Basic Preset Sunset
Basic Presets have the Clouds, but are not made visible, and the terrain shaders are procedural
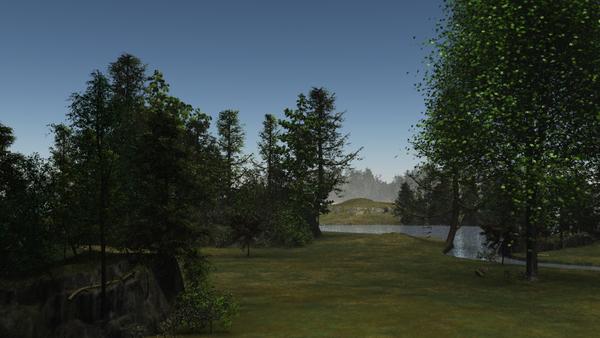
Image Three - Enhanced Preset Day
Image Four - Enhanced Preset Sunset
Enhanced Presets use Volumetric Clouds and detailed texture maps in the Terrain Shaders
All four use the Realistic Sky and a Sun Light for ease of Time of Day set up. The Sky is actually not the focus of the product, as I am a huge fan of all of the Carrara sky Products sold at Daz3d, But a lot of time has gone into the Sky and Light Rigs to get the presets off to a really good start.






Comments
The Kit also includes new tree presets and two versions of berries for use in your trees. More info and images to come.
what is it going to cost ?
looks interesting!
I knew you could edit the leaf section to add things like fruit and such...but I was never comfortable with doing so.
Having a way to make even more realistic trees in Carrara would be awesome.
I knew you could edit the leaf section to add things like fruit and such...but I was never comfortable with doing so.
Having a way to make even more realistic trees in Carrara would be awesome.Oh yeah. The Plant editor in Carrara is amazing - I think that one of the big things, though, lies in their shader.
The plant editor has three tabs for adding leaves. But each tab isn't limited to just one type of leaf.
Much more than just plug and play, this whole "kit" idea revolves around practicing techniques that makes stuff look better in Carrara. So one of it's core elements is the instruction guide - even though you never have to use it. There is plenty of Plug and Play that already takes advantage of the steps used in the manual. For instance: Tree and shrub models in the browser; Their presets in the Plant editor; Their Shaders in the shader tab; Easy to use Groves are already set up in the Objects tab; Finally, scene presets in Scenes.
Terrain editor is another strong focal point of study. Ask Carrara impatiently and ye still get something. But add some finesse and you could really have something. I like my people to walk around without tripping on stuff, so I wanted the center to be somewhat flat, letting the surrounding terrain do the rest, so we start with an image map, which is included. I take you step by step through the process in an easy to follow manner, but I also include the images. I cover the filters and generators used in good detail.
But again... you never need to touch the instructions if you don't want to. But if you do, you'll really master Woodland Environs in no time.
Three terrain shaders are included. One procedural and two texture mapped. These are ready to use on any terrain and the instructions take you even deeper.
The Realistic Sky editor is an amazing tool. The setup I include uses volumetric clouds, when clouds are used. This is because I wanted to give a good overview of the sky in the presentation. This is not a plug and play product for skies.
The true intent is something like this:
I have the Fantasy Castle, now what? Bam!!! Here's a good answer! etc., etc.,
Did a news post at http://carraracafe.com/
I am currently taking steps to help illustrate how to create 360 degree panoramas that can be used for multitudes of scenes. It's very simple (yet very time consuming due to high resolution render times) to make specific, individual backgrounds. For these multi-use one's, we need to take different measures. Although the kit will include a collection of them that I made as examples, and you'll be able to use these easily in your scenes, I wanted to really show you how to do these yourself - what to watch out for - what helps sell the effect over and over again for varying situations.
Edit:
Okay, here is a quick example of what I was talking about, above. The intention here is to have a surrounding background that doesn't interfere with the foreground. We need to be able to load in the Fantasy castle, or the Witch House, etc., with the background already taken care of for us, by ourselves, of course, but quickly and effortlessly without putting too much toll on our render times. Let our high resolution heroes take those cpu cores to their limits.
In the following two images, I'm using a background that I rendered using the Basic Panorama Maker scene from the kit. But the I added a single instance of the Large Woodland Block and duplicated it around the center of the scene. These are real Carrara trees, and they're replicated all over that terrain, but there are some tree in the background image, and it's utterly amazing how well they blend to create depth. Some of the trees mid-way through the image are from the background image, while some are models replicated into the scene, and it becomes nearly impossible to distinguish them from each other. This scene is also included as a preset even though its Spherical camera render result is also included as a .png background. Using backgrounds to create backgrounds... how frickin' cool is that?!!!!
Anyways, the second image is the exact same scene and camera angle, but I put a check into the visibility box for the volumetric clouds group, which adds yet another layer of depth and visual difference.
Check it out:
You'll see as I post more images how simple it is to take it from here. Like I said, if you don't have any interest in picking up on my techniques and build your own stuff using this large set of lessons, you can simply use the presets and render them. Plug and Play... add the stuff you REALLY want to focus on in the center, right where it loads in at default position - it's really cool. I'll take some example shots of plug and play methods very soon.
Edit:
Heh... Just looking over the above renders again reveals to me that many of the trees, even within the forested hill are actually from the background image used in the scene. The panoramic that's coming from that scene is actually going to have more distance and should make a really good "Generic" surrounding background with a threatening storm. Lot of depth in there. For good panoramic backgrounds, a bit of DOF will help to take the focus away from the BG.
Wow!
Did you ever try DOF on a 8000 x 4000 render? lol
Results, though... results!
This is where Gimp or Photoshop is your friend. Why take an additional hour or more to add an already-post effect in Carrara when you can do it in less than a minute in an image editor, with the ability to Undo if you don't like the look.
You know me... no freakin' post woik!
I duz evertin inz da Carrara!!!:smirk:
looking good Dart
This is where Gimp or Photoshop is your friend. Why take an additional hour or more to add an already-post effect in Carrara when you can do it in less than a minute in an image editor, with the ability to Undo if you don't like the look.
Results may vary from what is produced in Carrara. From the testing I've done if there is significant dynamic range to the depth (e.g., it is an outdoor scene) then the DOF pass lacks anywhere near the detail to do decent DOF in external post processing. The resolution of this particular image (http://ylansi.net/gallery6/Waiting_-_1280x720_-_1.jpg) may not be good for demonstrating the DOF precision but the scene was constructed specifically to have to broad range of depth to demonstrate the effect.
I used five different camera positions rendered at 6000x3375 and the results for internal DOF post processing were always superior to what could be obtained from external processing using the DOF pass for the same image. Examination of the DOF pass image suggested that it was trying to stretch the 8-bit data from zero to infinity with predictable results. If the patently floating point depth information used internally can be exported in a separate DOF pass I was unable to find a way to do so.
Perhaps you need to relax your unwavering devotion just a little bit? :)
You cut me slack on using LightWave, stating "we all have our tools." The tools analogy is perfect - right tool for the job.
I get it though, it is pretty cool to say "no post work" when a scene turns out jaw-droppingly amazing.
But it is postwork essentially. It's a post render effect (unless you use the raytraced DOF) applied by Carrara after the render is done. It takes forever depending on the size of the render and the complexity of the scene, and there is no undo if you decide it doesn't look like the preview and you hate it.
Everybody has their personal preferences, but I would suggest you give some kind of postwork a try at least once if you haven't already. Don't worry, Carrara will still love you! I know she does me!
Results may vary from what is produced in Carrara. From the testing I've done if there is significant dynamic range to the depth (e.g., it is an outdoor scene) then the DOF pass lacks anywhere near the detail to do decent DOF in external post processing. The resolution of this particular image (http://ylansi.net/gallery6/Waiting_-_1280x720_-_1.jpg) may not be good for demonstrating the DOF precision but the scene was constructed specifically to have to broad range of depth to demonstrate the effect.
I used five different camera positions rendered at 6000x3375 and the results for internal DOF post processing were always superior to what could be obtained from external processing using the DOF pass for the same image. Examination of the DOF pass image suggested that it was trying to stretch the 8-bit data from zero to infinity with predictable results. If the patently floating point depth information used internally can be exported in a separate DOF pass I was unable to find a way to do so.
It would be interesting to see the depth pass for that.
Maybe I'll start a thread for this, so as not to clutter Dart's thread. It could be a good way to learn the pros and cons for both methods, and to generate some tips and tricks.
Define "takes forever". It definitely adds to the render time, but it is far from a simple add or multiplier to time. It particularly slows down when the blur effect is prominent -- so the more of the scene that is to be blurred the more time it adds. IIRC it gets exponentially worse with increased resolution, but my memory may not be correct...
I agree completely with this sentiment, despite my personal preference for having no post work. One advantage of post work in general is that it can be used to produce results that may not even be tractable working solely in the scene.
I should be able to dig those up (or re-render them...). My main problem is limited time, but I do enjoy participating!
My definition regarding Carrara's DOF is that, "takes forever," is longer than I'm willing to wait! ;-)
My definition regarding Carrara's DOF is that, "takes forever," is longer than I'm willing to wait! ;-)
:) per your suggestion I'm moving further replies to the new thread
When I awoke this morning, it was still DOFing. Went to bed at 67%+ and awoke to 77%.
Pushed the good ol' "Abort" button on that whole thing. Removed DOF and my eight cores had the image done in... well, I don't even know. When it's that fast I don't see the point in paying attention.
It really depends a lot on how much of the scene is affected by the blur and, as I think I mentioned before, it increases exponentially with resolution. At the resolution you were doing I can see it taking a long, long time.
If the 8-bit depth map provides sufficient resolution for your needs it is *much* faster to blur in post.
Okay, check this out:
I'm setting up a Plug n' Play Tutorial, built right into the Browser.
By the time the tutorial is done, I dropped in Laurie S' The Witch House (3 Raven Court) just to see how it fit.
Well it fit so nicely that I thought I'd doll it up with some of Lisa's magical touch. So I scrolled up just a hair, in the browser to drop in Ravens Rest, which actually conforms right to the Witch House.
Without doing anything else except for a very slight change of camera position, which I really wouldn't have had to do, I hit Render, well... Ctrl + R, to be exact.
Here's what happened!
Slight degradation to the image saving for web, but it still looks great!
Man, with both Laurie and Lisa in the Platinum Club sale department, I'll remain a PC member my whole life! Check out the awesomeness of their work!
Thanks you two!
Okay, check this out:
I'm setting up a Plug n' Play Tutorial, built right into the Browser.
By the time the tutorial is done, I dropped in Laurie S' The Witch House (3 Raven Court) just to see how it fit.
Well it fit so nicely that I thought I'd doll it up with some of Lisa's magical touch. So I scrolled up just a hair, in the browser to drop in Ravens Rest, which actually conforms right to the Witch House.
Without doing anything else except for a very slight change of camera position, which I really wouldn't have had to do, I hit Render, well... Ctrl + R, to be exact.
Here's what happened!
Slight degradation to the image saving for web, but it still looks great!
Sir Dart, that is fantastic! That is a perfect example why I don't use D/S. I've seen numerous renderings of that house, but the environments seemed so little. It came across more like a dollhouse. Your render, looks like it's actually life size and could be real. The only thing that looks odd to me is the fence. It's a little to even along the bottom. Could use some replicated grass maybe.
I thought the same thing, but just wanted to illustrate how easy it is to simply plop and fizz. All it would really take is to drag the selection in the instances tab and click the visibility box. So then, as I'm adding my sig and my no postwork badge, my son comes up behind me...
Oh Pops... that looks cool! What's with the fence? lol
So I explained to him the exact thing I just explained above! But my next render shows why folks in them thar woods use fences!
Edit: btw, that house if supertastic! It's got to be one of my favorite houses in my runtime! Especial with Lisa's landscaping upgrade!
Hmmm... I use exclamation points a lot. Have you noticed, Sir Evil?
As before, a simple plug and play sort of scene.
Opened a preset, dragged in a few presets and dragged them into position.
Added a Dragon, some Dragon food, and some effect lighting.
Set the production frame and hit render.
This reminded me that I think I'm going to add a generic Hero-highlight light rig and some special effects light setups as well.
If the user wants to use it - it's there. And it seems that many folks would enjoy such a thing.
btw, this is that basic base scene before I added the presets. So I'm very happy with the results of the set.