Total Newbie Tutorial: How to apply a Surface Shader in DAZ Studio 4.5 Pro
I admit it…I’m a total newbie. In fact, I’m such a newbie I can still count the number of renders I’ve done on the fingers of both hands. So why oh why would I write a tutorial?
Basically, because as newbies, sometimes we need a step-by-step on how to do the most basic tasks – in this case, applying a shader. Hopefully, this will be of some use to someone.
Step One:
Acquire some shaders. These can be purchased or downloaded for free and can do things like make a surface appear to be different types of fabric, or metal, or even stone or wood. (Note that this tutorial is not intended to explain light shaders).
Step Two:
Install your shader files. These could be executable files, or they could be zip files. Either way, install them the same way you would install any other file. Double-click on the .exe file or extract and move the zip files.
Step Three:
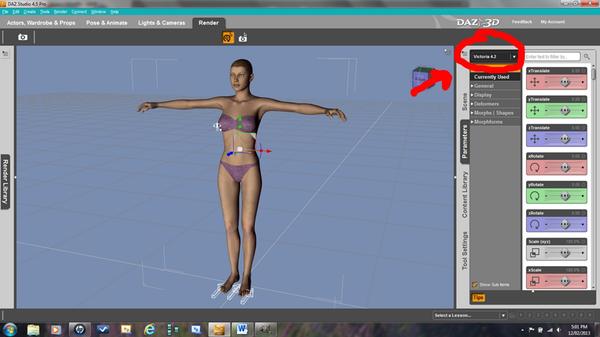
Load the model whose surface you want to change. Make sure that the name of the model is selected in the Parameters Tab.


Comments
Step Four:
Open your surfaces tab by clicking WINDOW -- TABS -- SURFACES (color)
Step Five:
The name of the model selected in the parameters tab will already be open in the surfaces tab. Click on the model’s name to apply the shader to the whole model.
Step Six:
If the model is made up of parts, you can choose to apply the shader to only some of the parts at a time. To see the parts, click the triangle next to the model name to get a list of the parts. Click on the part you wish to change. (In this case, I have chosen Victoria 4.2 and SKIN FACE.
Step Seven:
Locate the shader you wish to use in the Content Library. If the shaders were designed for DAZ Studio, try clicking DAZ STUDIO FORMATS -- STUDIO 3 -- SHADERS.
Step Eight:
Apply the shader by clicking on the folder containing the shaders (in this case, Fuzzy Wuzzy, a free shader pack from Marianne) and then double-clicking on the shader itself. (I chose the black bear shader)
Note that while the color of Victoria’s face changed, it is not fuzzy yet. This is because you will only see the full shader effect after rendering.
That’s it. A basic how-to tutorial by a total newbie. If anyone would like to add anything, feel free!
100% correct, but do not forget the Shader must be applied when Both are selected. And Shaders are great. I use them on clothing and props all the time.
EDIT: Well done.
thank you for that tutorial....its nice to see step by step how to do things click this select that...and not assume we already know :)
Thank-you!
thank-you! I was inspired by the fantastic kit-bashing contest going on over in the commons. I almost didn't enter because I couldn't figure out how to apply the shaders. It's really fun once you get going, lol.
awesome that you entered, I hardly even look at the contest threads cause no way am I ready to enter any contest...still fumbling around finding stuff :)
Good for you!!!
Love this step by step method...i have just tried this and i have learnt from it so i hope you continue with the step by steps lol THANKYOU
Great tutorial, SGCBearcub! Knowing how to apply a shader is a very important skill to have, and not something that's easy to figure out...until someone tells you how. :)
I thought I'd mention that in addition to applying freebie shaders you've acquired, and shaders you have purchased, this same method can also be used to apply the Elite Human Surface Shader (EHSS) and UberSurface shader, both of which are included with the DAZ Studio software. Either is great for realistic skin, and can also be useful when applied to clothing, hair, or other items (note: many products load with EHSS or UberSurface by default, but many others do not).
They offer many settings and delving into them can get pretty technical, but here's a good resource for getting started: https://helpdaz.zendesk.com/entries/20658113-how-to-use-the-elite-human-surface-shaders (That's for EHSS, but the same method can be used for UberSurface) It's a good "next step" for those who want to learn more about using shaders.
Edited to add: EHSS and UberSurface are similar in many ways, but UberSurface offers more settings and options.
what does both refer to?
The Item in the Scene Tab and the Surface you wish to change in the Surfaces Tab. Both must be selected to Apply a Shader.
Awesome! Thanks man. I never knew what a shader was until now (saw them in my content library but had no idea what they were). So is a shader basically just a pre-defined set of setting in the surfaces tab? (like bump strength, reflection strength, fresnel, specular etc)?
Truthfully, I don't know. I think textures are also involved in some cases. Hopefully someone else knows the answer.
Shaders can be done Either way. As fully Math functions or with textures as well. Tip: Shaders can give items extra life. Love that dress but wish it was Red Silk, use a shader and Boom it is Red Silk (as long as you have that shader).
Here's a more practical example than fuzzy-faced Vicky, lol.
The first image is a promo pic from http://www.daz3d.com/vintage-for-west-park-ablutions. It's great, but I needed something more like what you might see in a mall or government office building.
The second shot is using a marble tile shader from Marieah's Pimp My Prop tool. It's just a quick render using default lighting.
If anyone else would like to post some images of what shaders can do, be welcome. Or check out the kit-bashing thread for some cool examples of how people are using shaders http://www.daz3d.com/forums/discussion/14967/