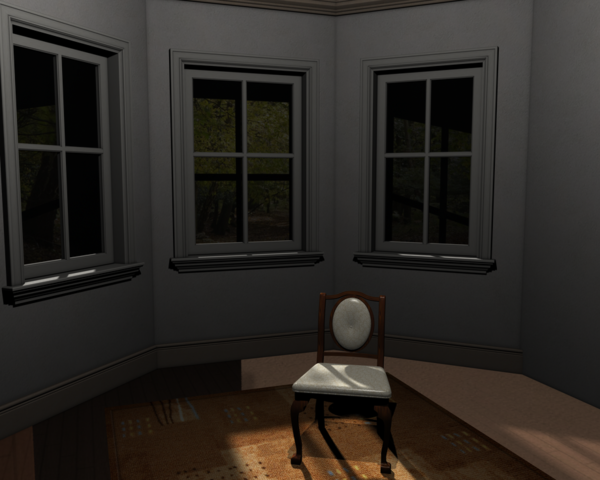
How do I light a plane primitive background?
In this image I have created a plane primitive and applied a forest .JPG texture to it. I have a "sun" coming in though the windows (a distant light behind the plane) and a single, overhead point light in the room (as if a ceiling light)
But how can I make sure my forest looks like a bright daytime?


test.png
919 x 735 - 803K


Comments
I would use a Spotlight above your Set Aimed at your plane Set it to a Wide spread so all the Plane is lit up. Then Adjust the settings of the Spotlight as needed to match your Render.
EDIT: I notice that your Plane is Very close to your Prop, you will need Room for this method to work. Adjusting the Size of your Plane to look proper might be needed. And even a Different image or a ReSized image to prevent distortion.
Second method would be even easyer for some. Render your main image (the room) and save as PNG or Tiff. Both will save the Empty BG as a transparent Alpha layer.
Load your BG image in any 2D art program that has Layers. Add your Render as the Next layer. You then Merge the layers and Save the new image. You now have your finished Image without using a plane or messing with extra lights.
I would go as far as to say the whole lighting setup needs looking at. For daylight, it's very dark inside the room as well as outside. So, here's a few tips and pointers for getting a good light setup. This assumes you're working with the default 3Delight render engine.
1. Use multiple lights
Don't be afraid to add in extra lights aimed at specific points of your scene which are darker than others. For example, you could use a spotlight for the background, and widen the cone so that everything is covered.
2. Distant lights can pass through everything
If you want a light which covers the entire scene then any distant light with no shadows enabled will pass through solid walls. If you position it up high, or even from below, it will light up every face in its path. Moving the intensity slider will help you to control the amount of light in the scene.
3. UberEnvironment
This is a very powerful type of shader lighting, so only use one of these in your scene. These support image-based lighting (IBL) as well as providing an ambient light across the entire scene. You can also use some nifty features like directional shadowing from IBL maps and Bounce GI, though the latter can really amp up render times.
4. Ambient Strength
Ambient strength is a very useful tool for 'fake' lighting. Essentially any ambient surface is self-illuminating, meaning that it will keep itself lit at all times. The amount can be adjusted via the strength slider, and you can change the ambient colour to match your scene, though white will work for most things. Using this on your planar background, for example, can give you a full-bright background without needing to worry about other lights.
There are dozens of other ways to add mood to your lighting, but those are some basics to get you started. It's one of the more in-depth parts of working on a scene, so practice makes perfect.
Brilliant! Thanks. Here's how it worked :)
Ah, ambient strength works a treat. Didn't know objects could light themselves.
Cheers
And thanks for the idea of using a distant light with shadows off to light up the interior a bit. Never thought of that! Here's an improved version looking much more like a real Summer day
That's the great thing about 3D, alway's more than one way to get things done. Render On.
That looks good Sertorial. I would've suggested the Ambient change as well, so I'm glad HeraldOfFire already mentioned it. The lighting looks realistic, and since that's what you were after, it's a success. ;-)
Thanks Miss B :)
Wow the lighting looks fantastic Sertorial. Thanks for asking that question...it will help with my lighting also :)
It does look fantastic.
Here's yet another thing you can do. In your lights you will find Uber Area Lights. If you apply one of those to your backgroud and apply your background texture to the light, the colour from that texture will be emitted as light as well. You still need to use ambiance to get what you have, but other objects will also have that same coloured light reflected off them which will give you a more realistic looking scene.
Keep this in mind with UberAreaLights (or any kind of area lights): Polygons have two faces and they are treated differently.. A Back face and a Front face. The Back face will not emit light. The top or front face will.
sorry, I don't get what you mean?
Szark has a great tutorial on UberArea lights here: http://www.daz3d.com/forums/discussion/14536/
The part that's most relevant to what wancow was describing is at the end of the first post.
Your last render looks great! :)