Men's formal Opera cloak WIP
 Tramp Graphics
Posts: 2,412
Well, I've started working on a new piece, and have the modeling done for the most part. It still needs collapsing, UV mapping, and Mat zones,but it's looking good so far. The real "fun" is going to be rigging. The plan is to rig it to fit Genesis figures, with the extremities "bones' going out to the collar, but not the arms themselves, and then using handles, and possibly movement morphs, to allow the main body of the the cloak to move independently of the figure, and thus flow more naturally. I have absolutely no clue how to pull that off.
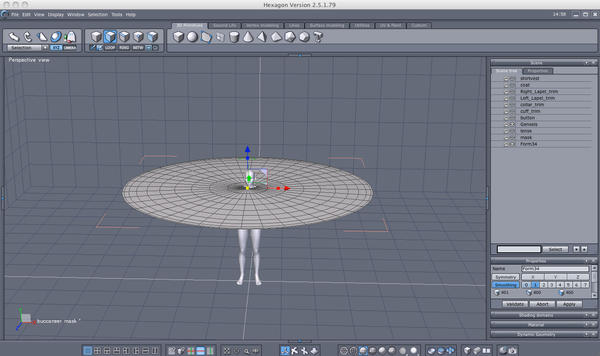
I started with a large 21 point sphere primitive with one level of smoothing (the radius equal to the height of the Genesis figure), cut it in half at the equator (deleting the bottom half) to make a hemisphere, flattened that, and thickened it. After that, I selected the entire outer edge of the thickened disk, cut it away, and did the same for the "bottom disk". This set of steps was needed to allow the disk to be bent and shaped after flattening. Otherwise, all it did was move vertices along a single axis.
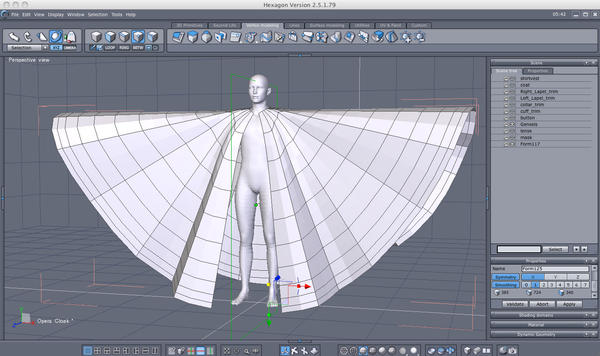
Then, using the Edge tool (extract edge along edge) I Extracted the inner most ring inward to fit more closely to the neck of the Genesis figure, selected the inner most wedges inside this new ring, and cut them away creating the neck hole. With Symmetry on along the X axis, selecting radial lines or faces (it varied)up to the (now—second-most inner ring), I rotated them down, repeating radially around the whole cloak, starting from the spine and working forward, and adjusting as needed. Then I select about two wedges on either side of center of the front, and cut them away,
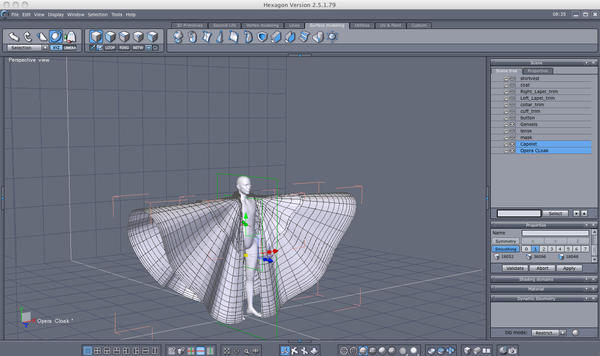
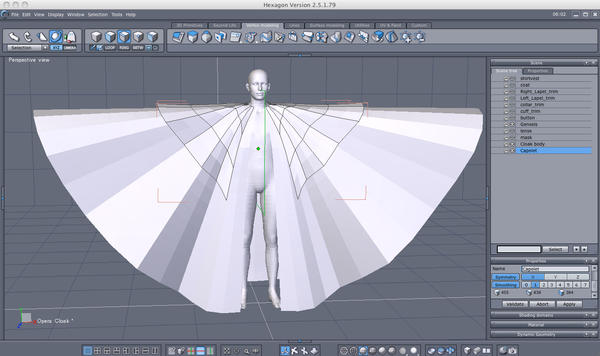
Once this was done, I collapsed the geometry and added a new level of smoothing. I then copied the cloak selected the outer three or four rings, and cut them away, creating a smaller capelet, selected two wedges more on either side of center of the capelet, and deleted them to widen the front opening further. I selected part of the front edge of the main cloak, and folded it over diagonally (selecting two to three more points along the top edge out towards the extremities) to create the lapel. After adjusting the necklines of both the cloak and capelet, I created a 70 point cylinder with only two edges (top and bottom), set symmetry to the X axis, widened the bottom edge, and narrowed the top edge. I then bridged the cloak's neckline to the top edge of the collar, one segment at a time, creating a folded collar, and cut away the remaining unbridged faces from the cylinder, opening the collar in front. After making adjustments to both the capelet and cloak to fix poke through and sizing to fit a clothed figure wearing a jacket, I thickened both the capelet and cloak each with .02 thickness to create the inner lining. I think about the only thing I might need to model yet, is a chain and clasps to secure the front of the cloak at the neckline.





Comments
ooo that looks way cool!
It's a pity we don't have a cloth settup plugin for DS... are you going to rig it with lots of bones or just use it in Poser?
IF you decide to rig it in DS, I would highly recommend you leave it as LOW poly as possible. You're going to need quite a few bones for this.
What I would suggest is this: rig it with bones every other column of polys going down and the polys between them have them weighted at 50% for the poly column on each side, and 100% for the poly column their associated with.
Let DS do the subdivision. That's what I did for the Belle gown. DS seems to like it that way.
I don't work in Poser, so it's DS 4.0 all the way. As for rigging, I haven't a clue. The only rigging I've done is with the Transfer Utility.
I never go too high on poly count when making outfits anyway; usually two levels of smoothing tops, and even then, I do them one level at a time, collapsing in between. For this, I've applied one level and then collapsed it once already. It was an absolute must for folding over the lapels. In Daz, I typically apply a Smoothing modifier of 1 on my outfits.
I truly find this idea fascinating, and I think there's a way to do this so you can get realistic draping with a boned cape.
I did a quick and dirty test to see what it looks like after running it through the transfer util and this is what I have...
I'm thinking that if you do that, and then run bones off the shoulder bone that will give you your drapes... but that depends a whole lot on what the geometries look like.
adding: I just had a thought... what if, instead of modelling it to fit the figure in your modeller, you simply modelled almost flat? What i mean is this, comform those polygons to the shoulders and arms, getting them close as possible: then after you run it through the transfer util, you rig it so you can drape it say with three to four bones per column every other column? This way, with x scaling and offsetting, you can get the drapes and make it move like a real cape would?
You mean keep it mostly a flat disk? It's a little too late now. As for rigging every other column, that might be a bit much still. Before collapsing the geometry, I started with a disk with forty columns, and only removed four of them to open the front. even doing every other column, that would be twenty sets of bones; with three to four bones each, that's between sixty to eighty bones. That might be a bit much.
yah, I tried the flat disc approach and could not make it work.... I'll keep playing with it and see what I come up with.
TG, any new progress on your project? Still wondering how you're rig is going to look...
Working on the UV maps and Mat zones. And just call me Tramp.
Well, I finally have it UV mapped and mat zones added.
uhg... UVS unwrapping, how gloriously tedious :)
Nice work on the map!
Somehow.
Oh no, I do understand! That's why I try to assign my UVS in the beginning... I've had hard lessons on UVS! I'm surprised actually, that you did it that quickly!
Here's a pic of it fully textured: (actually R72 velvet shader and WoS satin shaders). I've run the Transfer Utility to set up the basic rig, but I have no idea how to do the advanced rigging, adding bones, etc I need to do. As it stands a lot of shapes distort the mesh, to varying degrees, and posing mangles it. (though I don't get the only one arm rigging issue others have had). When setting up the mat zones I decided for a simpler trim than my original character's design. Overall, I like it. I just need to rig it.
adding bones is simple. Delete the bones you do not want.
Select the bone you're going to parent from, right click and add bone. You need to figure out the rotation order, preferably in advance. The middle of the XYZ rotation order should be the twist. I believe the last one should be the one most likely to rotate 90 degrees, but I'm not sure.
you can assign weight mapping to your bones by painting on the polygons, and you can copy that map to the rest of the rotations.
if you want it to be selectable in the scene, you have to define a face group for the bone to be applied to, or it'll only be selectable in the scene tab.
btw, Materials look fantastic
I could really use a step-by-step.
The thing is, not understanding how a cloak moves, I'm not going to be all that much help.
HOWEVER
There is this http://www.renderosity.com/mod/freestuff/details.php?item_id=69567
This rig is something I used to do this one: http://www.sharecg.com/v/67408/view/21/DAZ-Studio/New-Dress-Rig
do not be affraid to move bones around.
to add bones, I suggest this video series, they go into detail of how it is done better than I could:
http://www.youtube.com/watch?v=8cV3VaC7eIs
http://www.youtube.com/watch?v=k52wwyv234U
http://www.youtube.com/watch?v=rIIM1oAan7o
OK. That gives me some idea where to start. My thinking is to give each major outward fold a group of bones with the "valleys" between them as the transition (as opposed to the actual lines of the mesh). This will give me about nine bone groups all radiating from each of the collars or chest bones. OF course, that leaves the question of what to name these bone groups and how many bones per group. IT also leaves the question on how to make symmetrical bone layouts.
I believe you're just going to have to do symmetry by hand... that'll be very tedious...
I've got the right side's bones in place. Still need the left side, but don't know how to properly use the Mirror Joints tool. Last time I tried, it screwed up the bones I had already in place. I don't want to go through that again. I won't add the central spine bones until the left side is done.
Well, I think I've figured it out. When creating the "mirrored"bones, you have to copy down the exact X.Y, Z positions of Center Point and End Point for each of the bones you want to mirror and then manually type those values in for the new "mirrored" bone exactly, except for the "X" value which needs to be the inverse (-14.87 becomes 14.87, etc. ) Next comes the real fun—selecting polygons and setting the face groups; In particular, how to select polygons in the front without selecting the Polygons that make up the back, and vice versa. Take a look:
IIRC, using the paint brush to select polys won't select the those in back, but it is a slow, painful process - probably the weakest point in using the CCT.
Umm, double post. :red:
Not that I have the faintness idea of rigging, but if your cape consists of two meshes inner and outer, can't you hide the outer mesh so gaining access to the inner one? :zip:
Dur! Just reread you explanation, OK can you not temporarily hide the main cape so that you can gain access to the underside of the cape-let if they are the two different objects ?
Hiding polygons can be done in the Polygon Group Editor.
Tramp, it's looking fantstic! Can't wait to see how it moves!!! Well Done!
OK, so this is where you have to do a lot of finessing:)
You want to allocate a part of the mesh to a specific domain, which must include the outer and inner layer, but not the mesh behind it. So, select everything you don't want to include and hide it. Then select the outer layer that you do want, allocate and hide it. Then select the inner matching layer and add that to the domain.
Simple? No way - you may need a Cray computer to keep track:)
I'll keep an interested eye on this - always been told that double layers for clothing is a big no-no, so holding thumbs this will work out for you:)
Well, can't say your'e not up for the BIG challenges:) Those are the one's that give the most satisfaction, so, more power to your mouse!