The quickest way to split up one existing material zone into two separate ones?
 linvanchene
Posts: 1,382
linvanchene
Posts: 1,382
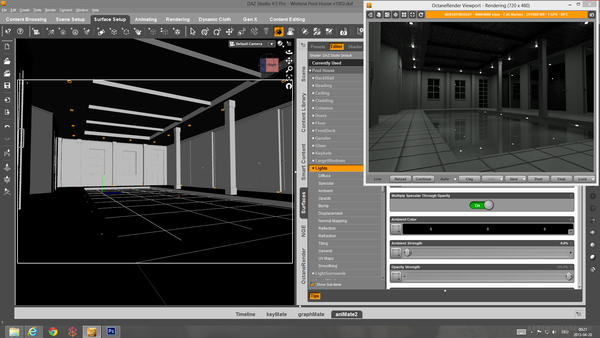
I am trying to build a scene with the wisteria pool house and use the material zone "light" as light emitters.
The idea is to have two separate light groups one for the ceiling lights and one for the pool lights.
- - -
http://www.daz3d.com/the-wisteria-pool-house
- - -
In 3Delight there is the area light shader.
In Octane there is the option to transform every surface into a light emitter.
So no matter which application is used the principle stays the same.
Existing material zones are used to emit light.
- - -
Unfortunately the light surfaces in the pool and the light surfaces on the ceiling have all been assigned to one material group called "lights".
When one uses the "surface" selection tool all lights in the scene are selected at the same time.
What is the quickest way to split them up?
I asume the solution can somewhere be found in the "Polygon Group Editor Tool".
Unfortunately I am not that familiar with it.
Is there a way to quickly select the existing material zones of only the lights on the ceiling or only the lights in the pool?
Daz 3D is part of 
Connect
DAZ Productions, Inc.
7533 S Center View Ct #4664
West Jordan, UT 84084
Licensing Agreement | Terms of Service | Privacy Policy | EULA
© 2024 Daz Productions Inc. All Rights Reserved.
Comments
yep spot on. Try this, second post down is a zip file with a PDF tutorail on how to do this http://www.daz3d.com/forums/discussion/18401/ but it does depend on the resolution of the mesh and how it is made. But for what you want the PDF will let you do it no problem.
Hide everything else in the scene except that material zone. Then use the polygon group editor tool to select just the lights you want (make sure you set it to rectangular select, which you can access with right click--mode). It looks sort of like a pencil. If you create a tool tab for the polygon group editor you can see all the existing face groups and mat zones. Right-click in the mat zone heading and choose "create material group from selected" (that may not be the exact wording, but it's similar).
Now you can add just the selected lights to a new mat zone.
More on this tool: http://wiki.daz3d.com/doku.php/public/software/dazstudio/4/userguide/creating_content/rigging/tutorials/polygon_group_editor/start
oh and I still hate you (only a little now) for playing with octane, that preview looks awesome. :P
Thank you both so much! :-)
The tutorial of Canary will come in very hand for even more complex task.
The quick solution with hiding everything and selecting those remaining surfaces needed worked like a charm!
So glad to have that resolved before falling to sleep! :red:
Did a quick 3 min test render.
Will figure out the final light settings tomorrow.
Spooky. It's a nice effect.
Yes very cool and spooky....nice tip too SickleYield...and it only took until 12.18 am for me to learn something new today. :)
I often use a different approach when I want to split up a mat zone. Especially when its not a simple shape and you don't want to mess with 'did I really get all the faces I meant'. With the PGE tool selected, right click on the viewport, choose select -> surface -> the surface you want to split. Then, with mode set to rectangle, hold down the ALT key (which I guess is not defined by default on Studio for Mac, but is for Windows) and rectangle over the areas you DON'T want to deselect them. This way you know you only have what you want, even without hiding all the other stuff in the scene. This is important, because the PGE only considers the visibility set within the PGE tool itself when using rectangular/lasso/etc select! If you've turned off part of a shape by hiding sub-nodes in the scene tab, PGE will still see those polys, even though you don't see them in the viewport. So you can end up re-assigning faces you didn't mean to re-assign. I learned this the hard way, of course.... Hence why I prefer to start with a known selection and subtract from it, rather than try to use the rectangle tool to add to a selection.