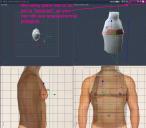
Fake X-Ray view Using Shader and Interactive Render Settings
 DesertDude
Posts: 1,238
I wanted this to be a feature request, X-Ray mode for modeling, but found a work around after beating my forehead against the keyboard for a while. And I hope I am not, as usual, confounding on the obvious and well known. 
OK, for this to work (at least on my Mac) I went to Interactive Render Settings in the Model Room, and from the drop down in the upper right I switched to OpenGL. I then checked Transparency.
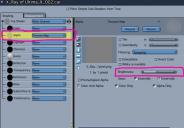
Then I made a shader, call it whatever you want, and in the Alpha Channel I loaded a 1x1 pixel texture map of middle grey (R 127 G127 B127). Strangely, using a Color or Value here, which seems the easy and obvious choice, won't work. (?) (But other things like Pattern and Natural Functions work...weird)
Back in the Vertex Model Room, you can now switch any pane to "Textured" and you should now see transparency over your background image(s).
You can control the transparency using the Brightness slider in the Texture Map.
And if you want more contrast/color, you can put a color in the Color Channel. 
If your Interactive Render Settings are set to 'Software' the Transparency won't show up in the Model room, but will be opaque black, which can be a nice contrast.
Also, check out the plethora of options in the Interactive Render Settings under 'Lighting mode'. The Interactive Render Settings in the Model Room are independent of the settings in the Assembly room, er..., at least some...it's still a bit confusing what is global.
It's not a perfect flat shade like I see in examples in 'other applications', as you can see there is some stacking up of opacity, but it's a nice option.
Hope that is helpful rather than confusing.
Cheers!


