Do any of you lighting wizards see what I'm doing wrong?
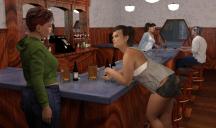
This is a bar that I did some re-working with as far as the interior textures go. It's rendered in Iray, and I set it to render in an hour with a GTX 960. I know the lighting isn't right for the inside of a bar. Too bright. I have ghost lights as the primary lighitng source and a couple point lights. Oh and all the light globes have point lights. My problem is all the specular grainy parts. Fire flies everywhere. It's not much better when I tried for 2 hours either. My take on lighting is, if you have to little, it's hard for Iray to render. If you have to much, it's hard for Iray to render. I have environments that require very little in the way of lighting right out of the box (thank god) and then others that I am constantly trading what I did wrong for what I'm doing wrong this time.
I'm not asking for a simple fix but I thought I'd ask and maybe pick up some new pointers.
Daz 3D is part of 
Connect
DAZ Productions, Inc.
7533 S Center View Ct #4664
West Jordan, UT 84084
Licensing Agreement | Terms of Service | Privacy Policy | EULA
© 2025 Daz Productions Inc. All Rights Reserved.
Comments
What is the convergence when the render finishes? You can get that information from the DAZ Studio log file.
if you scale that image down by half then all the grain dissapears..so I'd start by rendering at twice the size you want and then scale down to get rid of the grain
Try turning down the lumens on your lights until you get the setting you want. Sometimes when using lights it is easier to set them to Watts and use real world values and temperatures, 2750 for an incandescent light bulb at 15 Efficacy or 4500 to 7500 for at 40 Efficacy for Fluorescent Bulbs. I would then use the Tone Mapping to either increase or decrease the light entering the camera. I would then balance the Watts and Tone Mapping settings to get the required lighting to render speed to best render settings.
Some suggestions based on what I do to speed up Iray rendering:
1. If the environment is closed, open it up - delete, or hide, walls and ceilings you cannot see through the camera. In a closed env, Iray is having to calculate all the light bouncing around pretty much endlessly. The lighting will less 'realistic', but not so different as to look completely wrong in most cases. Using Iray section planes is worth investigating if the environment hasn't been built with separate walls/ceilings etc.
2. Overlight rather than underlight a scene, then adjust 'exposure' using tone mapping in DS or in postwork.
3. Reduce the number of separate light sources as far as possible - again, Iray has less to calculate. All those environments you can buy with 25+ point lights on the ceiling? Lovely if you're prepared to wait many hours for it to render, otherwise a bit of a nuisance.
4. Reduce the number of transparent or semi-transparent objects and mirrored surfaces as far as you can. Make sure SSS isn't enabled on things that shouldn't have it - surprising how many solid objects in products have it turned on. Consider turning it off for skin of human figures in the background, see if you can tell the difference.
Could also try going with some darker textures, ones that are not so "glossy" or reflective. The one thing I noted was the 'burl' texture and bump you have on most of the wood items, not sure if it is tiling or not, but it is Waaay too large for the item.
Burl is made from the knots that are formed when a tree is damaged, not from planks or plywood. It does however get rings with age. if you look at the actual bar over the shoulder of the girl in the green hoodie, the cut is across the grain, (which is fine,) however based on the perspective, the diameter at the 'heart' is almost 2 feet, the whole cross-cut spans the entire height of the bar, that's what 7-8 feet? Try tightening up the texture, it will bring the darkness of the rings closer together and not make the wood so bright, and help cut down on the luminousity of the wood.
The very first thing you do is go to the Render pane and make sure your max samples and max seconds are extended. To me, looking at this, it's as simple as putting in 11,000 for the minimum samples and several hours for the seconds. It's not rendering completely. That's your main problem.
In your Render pane, check the Progressive settings. I also change all my renders to Mitchell, and enable the noise filter. I use a 3 for Noise Degrain Filtering and a 4 for the Noise Degrain Radius. The Blur Difference is .11 to .33 I change the Pixel Filter Radius from 1.50 to 1.35 (the lower the number the sharper the details.) The current render I lowered it to 1.25.
For Tone Mapping I usually start with an ISO of 135 and Exposure Value of 14.25, then lower the EV to brighten the scene. My Art Studio thread, the first page, has a long list of references for tips and tutorials, including a step by step lighting tutorial. Edit- change the ISO first, as that moves the EV slider. When you move the EV slider, that does NOT move the ISO slider.
This still has noise but it looked a lot better than with the Gaussian and the default settings there.