Something's gone missing and it looks creepy.
 spearcarrier
Posts: 686
spearcarrier
Posts: 686
Hi guys! Me again with my rare time off! Before I start on this problem let me pause and thank everyone who helped with my content management problem one of the other times I found myself forced to make time to socialize. I lost my library recently and at first I was mad as a hornet, but then I remembered what you guys said, looked up the old thread, followed instructions and made things even worse, slept on the problem and came to a solution. Couldn't have done it without you. =^-^ Library is backed up, all looks good aside from a problem with folders frequently appearing out of nowhere.
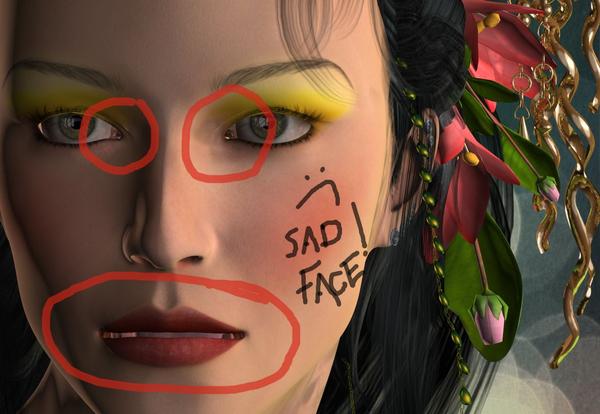
I'm here about render issues. I've got this important lady I'm working on, and for some reason part of her lips and her lacrimals are just not there. Now I know so very little about the settings and didn't even get the old settings under my hat before DAZ changed things up so I can't even begin to know what settings to post here for you to see. I can tell you the diffuse settings look right, darn it. I double checked and tweaked textures and everything. But she insists on baring her teeth and not crying. I thought, okay the teeth are too far forward somehow and put their opacity to 0%. So then I got a strange gap.
This has happened to me before, and deep inside I wonder if it has something to do with the subsurface toon shader as the use of it seems to be linked. But even so.. I don't want her lips to be toon lip. I just use the shader for a bit of velvet here and there. So what setting is there should look t?
Oh and by the by, I also get an issue with the eyes if I'm not careful. The pupils turn white. I've looked up the problem and everyone's solutions are not ones that work fr me. Gloss and specular are never turned way way up. To get the eyes normal I always have to load Zoey's eyes up and ignore other eyes.
Oh, and if anyone has any tips on how to improve my render look/settings. I see these gorgeous renders, no post work, wit pastels and clearness and a plain flat "cleanness" abut them. Mine always look so harsh. I did sort of finally figure out gain's role in it and gamma. Experimentation is at a standstill as I can only get the one look and that's it.
Daz 3D is part of 
Connect
DAZ Productions, Inc.
7533 S Center View Ct #4664
West Jordan, UT 84084
Licensing Agreement | Terms of Service | Privacy Policy | EULA
© 2024 Daz Productions Inc. All Rights Reserved.
Comments
You need to set the Displacement Maximum and Minimum values to 0, it isn't enough with the SSS Shader to have the strength set to 0.
*jumps for joy* That did it!
So I guess displacement is a lot like the filter in Photoshop, where things get 'displaced" a little? If so I can see using that for water, but I'm not sure what else it would be good for.
Now I gotta figure out how to tone the velvet down a bit (her skin looks heavily made up and that's not what I'm after, and the texture is a lot more intense than this) and how to improve the hair. I've tried using bump, but no effect so far.
Oh and the render so far in case someone wants to give advice.
Displacement is a little like the Bump setting, except it actually moves the surface. So if you had wrinkles or bulges, displacement is good for them, while minor changes like skin pores are better as bump maps.
You could use shadows on the lights, and probably bump maps on the character. I usually set the bump for skin to -0.1 and 0.1, then use the Strength slider to adjust for the render. Low settings are good for close-ups, while you generally have to go a bit higher as you back away from the character. I'd kill the mapped reflections in the eyes, too. Just make the corneas and eye surface [if it's there] perfectly transparent with a sharp specular highlight for a shine.
The composition's coming along really nicely.
Thanks for your input here! Okay, so displacement is for sliding things around. I.. hope I got it. :-) I can't think of any place that has wrinkles, but it does make me wonder what would happen if I added displacement to the hair.
I was doing a bump setting of 25% -.01 and +.01 for the skin. Brought it down from 35% and thought that looked better. Why three settings for a bump exactly, ya know?
Thanks for the compliment - and more importantly for your help!
Are there techniques for getting that edge around the eye socket a little less... cartoony?
Omigoodness I just rendered with .1 -.1 on the bump and she looks like she could use a doctor. LOL.
Yeah, I always kill the strength pretty good when I have it set like that, but there are some bump maps out there with almost no contrast at all. [The first render like you said always looks awful. :lol: ]
If by the edge around the eye socket you mean the eye shadow, you'd have to edit that in an image editor. You can use the LIE in DS to stack a makeup texture on top of the non-makeup texture and make it a little less pronounced too.
If you're getting white flashes in the pupils I'd turn the specular of the pupil surface completely off if the iris texture doesn't bleed way in.
A good trick to make lighting less harsh is to load uberenvironment, set the color to white and the environment mode to Ambient Only, no shadows at all, start out with really low intensity and tweak it up to your fancy while lowering the strength of the other lights. It acts like an ambient light for the whole scene.
Yeah, I started lowering settings immediately. This is the first time I've been able to get skin with... *gasp*... pores.. she can SWEAT! Omigosh!
The experiment with displacement on the hair produced a pretty neat result, as well. So displacement is a handy little sucker. Glad I learned about it.
I do use uberenvironment on occasion, but always have trouble with it. Shadows get funky, and more usually skintones take on this mottled texture that i can't find any information about. And things remain just as harsh looking to me. -_- But my skills are pretty low here, so that's gotta be part of it.
I tried raising the gloss on her lips, but there's no gloss setting!
No gloss setting? That's odd. Can you screenshot the settings?
If you just use Uberenvironment in ambient mode with no environment map it won't so anything as far as blotchiness or odd shadows, and it renders very quickly as well. It'll just brighten things up.
Well I just tried to load uberenvironment and it's missing from my library AGAIN. I can't just type in "uber" and have it pop up, can't find it in the mess that is Daz's automatic library section, and the only way I know how to reinstall it requires a total uninstall and reinstall of DAZ. I just went through that a few days ago and so am going to flip uberenvironment the bird and move on with my life. Man I'm tired of that one particular bit disappearing like that. But don't get me started. :-)
Some of the lip settings are here.
and here.
The glossiness should be right underneath the Specular Color at the bottom of your last image, along with strength settings and the alternate specular that will stack on top of or replace the first one. I like to use a brighter sharper secondary specular on things like the lips to get shine while still having all the skin blend together.
The noise adjustment on the first specular is very nice for simulating pores, especially on textures with no bump maps.
You can type in parts of settings in the filtering box at the top; "spec" should get you all the specular settings in this case. It's really handy for shaders with a lot of parameters.
UberEnvironment is in DAZ Studio Formats>My Library>Light Presets>omnifreaker>UberEnvironment2. It takes me forever to find it too; it's not in the right folder [which goes for a lot of lights/light presets," same things for shaders, unfortunately]. And I tend to load preset for it most of the time, so when I need the actual base I'm practically tearing my hair out. :lol:
Well, for glossiness I'm doing a third screen shot and... there's nothing that just says simple "glossiness". It's all these weird settings I'm far far from familiar with. So I don't know what to do with them. I'll reread your post for hints when I finish posting this.
And I just tried to follow the path you provided, thinking hey maybe i got it wrong last time, but nope. Nope. There's no "light presets" folder to follow down. =^-^= I don't know whyyyy. It's not like I went into the content folder and moved things... I think. Guess I'll go into it and see why...
The manual will be good, then. They're pretty easy to work with. Specular glossiness makes the highlight sharper as it goes up, specular strength makes it brighter, noise strength makes more pronounced noise in the highlight, and noise density I think scales the noise.
EDIT: That's too bad. I'm not sure how to reinstall it either.
You have all sorts of little bits that you are working on here, don't you? (smile). The 'mottling' that you get with uberenvironment can be largely due to shading rates. In your render settings tab, advanced, change the shading rate to .2 or so (that's what I always use). This will help with many of your settings, including refraction on transparent objects (such as your eye cornea and tear).
In uberenvironment, try setting the Shadow Bias to around .10 and the Shading Rate to 6 or 8. This will help in that area. Also keep the intensity lower than 100%, maybe around 60-65%.
As for the glossy lips, these settings are in the specular section of the material pane. Lower glossiness settings actually spread the specular highlight across the surface of the lips, while higher numbers concentrate the highlight to a small tight circle. 100% and 0% are not favorable in either circumstance, they just don't seem to behave the way you would think.
The glossy lips effect really depends on whether your texture has a specularity map or not. If no map, then glossiness can look pretty bad... see my first example. This is with regular default shader, specular color almost pure white, glossiness 80%, specular strength 100%. With a specular map in the spec strength channel, these same settings give you pic 2, not strong enough but more controlled. So, lowering the glossiness to 65% and moving the spec map to the spec color channel, I was able to get the third pic. Still not great. Next, I changed the shader to the Human Surface Shader to get more settings. You have to adjust the bump after switching (be sure to turn it on, too), at least I did, since the bump on the original texture was set very low. I lowered glossiness to 25% to spread it more, then increased spec sharpness to 25% to sharpen the highlight. I also employed Specular 2, set at it's defaults (100% strength, white color) with the spec map in it's color channel. The final looks quite good, I think. Of course, you will have to mess with things yourself depending on the spec map you use and the color of the lips, etc.
yes, it's a very good manual and very well written but I get confused before the end of the first page. We have specular. And then we have specular. And we can't make them clear from each other by giving them separate names, they're all specular. And furthermore one specular controls highlights, but wait. The other one controls highlights. And... yeah. It's too much at once, and I honestly can't dope it out. I'm super kinesthetic - something that caused me a lot of trouble during my college years - so that I have to do to learn. I've looked at the manual. I just looked at it again. i can't keep track of things that way; the information literally just doesn't stay there longer than a minute. Wish I could. I'd be a lot better at this. :-)
So when it comes to learning these things I try to find things that walk me through it and explain as I go, which is why I've been milking you for information. It's a rare opportunity!! LOL
But I appear to have broken DAZ by trying to put omnifreaker back where it belongs, so my play for the day is over. DAZ won't load.
hi Slosh! Thanks for chiming in!
oh, and thanks agent for your help as well. I should have thanked you earlier.
Slosh that's a nifty nifty tutorial. So here's what I'm gonna do. I'm gonna reboot and pray really hard that DAZ will load. And if it doens't ... I'm gonna have to reinstall. Dang it. Best back up my library. And if I can get it to work I'm gonna try it because, hey, what's paying work when lips are involved? LOL. And dinner? Pheh. Don't need to eat that either. LOL. It can wait! Cuz you guys have me on a roll.
*kicks DAZ, reboots*
Well the lips have improved, so I think I gotta play around with the settings a bit. I still feel lacking in understanding it, but I know I'm on my way so who could ask for more?
And to think all I meant to do when I started this was create a character setting for one of the ladies in my comic. =^-^= Because I'm planning a naughty picture or two. LOL. And I end up trying to make fine art.
I'm so excited, because so far this picture has more details in it than I thought I'd ever be able to do.
I hope, once you sort out all of the settings, that you will post a new render. Minus the naughty bits, of course. That's not allowed here.
Well I didn't want to inundate you guys with pictures, so I wasn't going to post one until the end. The lips are a lot better. I figure with the type of lighting here, they look alright. And then I tried to use the ubersurface shader to make the flowers velvet, and now everything's a mess. LOL.
In my mind, the flowers have a soft glow around them as if the light were coming off of the velvet. But I guess I'll just have to do a glamor glow as post work.
I ended up using a different type of shader on the flowers and then doing some post work. I know that you usually have to do post work on your render, but I would like to get to the point where I don't gotta sometimes. :-)
Anyway, thanks to everyone for your help! Now this character is set and stuff is saved for when I need her later. This image is not actually the whole scene. The whole scene is going to be angled from her back to show off her tattoos and wotnot. But for now, here is Hitomi.
Postwork: glamour glow, then soft focus, portrait enhancements studio style and wotnot