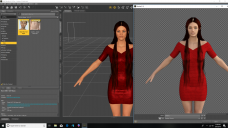
Having some problems with rendering...
 wildbillnash
Posts: 758
I've rendered a few items and am having some problems. My first problem with the character looking plastic before rendering seems to correct itself when rendered. The first few times I rendered the character's background is white. Now it's black and that makes it hard to cut out to add it in Photoshop. (I still don't know about the Photoshop bridge item in Daz 3D). Also, the redhead below seems to have a problem with her part. It's wider in the rendered image than before. Any ideas?
Something else I just noticed. The dress loses its shine when rendered.


Screenshot (23).png
1920 x 1080 - 1006K
Post edited by wildbillnash on


Comments
rather than cutting out in Photoshop, save as PNG or tiff and you will get a mask that Photoshop will load as transparency.
I'm not sure about the hair issue - which hair is it?
The hair is Branwen Hair.
I assume it's been AutoFitted, since it looks as if you are using Genesis 8 Female as the figure. There is a widening in the preview, it may be less obvious due to the lower resolution textures used for previewing. It may also be a rsult of the AutoFit process, or of the way the opacity maps are made (that's a 3Delight material, using the default shader). Unfortunately that's not a model I have to check.
Things just getting worse and worse. Here's a new pic of the same character with the same dress and hair.
Are you sure there isn't a second copy of the dress?
Richard, I have that hair and I tried it. In case it was an autofit funny, I loaded the hair without fitting and parented it to the head instead, then used the included morphs to make the skullcap fit the head (almost) exactly.
It renders perfectly in 3Delight (as you would expect), but I get the same problem as the OP in Iray. The opacity map for the skullcap does have a fairly wide parting area of very faint criss-cross white lines on a black background (I think they are pure white rather than grey but they are so fine that it's a little hard to tell). I took the opacity map into PS Elements and used the dodge tool to increase the whiteness in all but a skinny area up the middle of the parting and got a somewhat better effect (comparison attached). Looks like Iray needs more whiteness than 3Delight in the opacity map?
Yes, that can be an issue. increasing the Opacity past 100% can also help, for which you need to click the gear icon on the slider>Parameter Settings>Uncheck Respect Limits.
Oops, there is a second dress. I made boo-boo. Give the man a cigar!
As per your comment about the Opacity slider...which slider are you talking about?
The easiest way is to switch to the Surface Selection tool, from the tools menu, and click on the hair near the parting - then open the Surfaces pane (its tab is in the lower-right group in your screen shot) and go to its Editor tab. The Opacity setting should be in there (it will be a 3delight shader, which DS will convert to iray at render time). Depending on how the hair iss et up there may be other surfaces that need adjusting, but that should at least make some prgress and once you have the Surfaces pane showing the right stuff you can just use the list of surfaces on the left to select and adjust others if needed.
Just as a matter of interest, if you have a black background on an image in Photoshop, you don’t need to cut it out - just set the layer blending mode to “screen”.
That will depend what is behind the layer, and how much tonal variation there is in the bits youn want to keep. PNG/Tiff are much the best option for compositing - unless you use Canvasses to render a mask layer in Iray.
I wasn’t saying that it was a better option, purely answering the OP’s point about black backgrounds being more difficult to cut out.