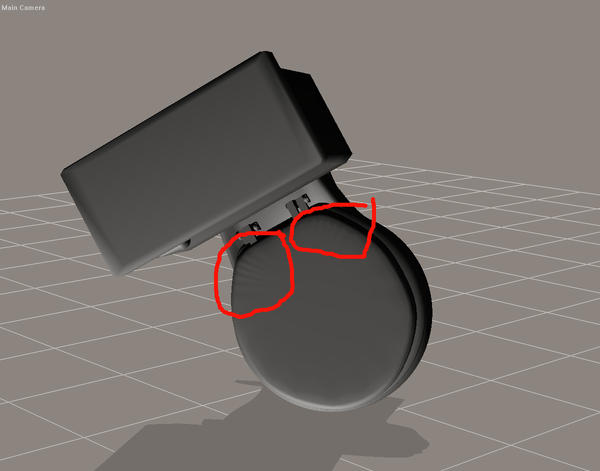
object export
The best way to try to explain this is for you to take a look at the attached picture.This happens when I export object has a obj from hexagon.
I would like the object to looked smooth with no edges or faces areas showing.Applying a texture helps hide the imperfections somewhat.
Lots of time I will model something in hexagon 2.5 and it looks good but the quality is somewhat lost when i export has a obj.I test my
models in bryce,daz and Poser.In Poser it looks the worst unless I apply a material to it.
thank you
Tim Dusenberry


toilet.jpg
1200 x 941 - 221K


Comments
Hi Tim,
I have seen something similar happen depending on the specific type of subdivision (smoothing) applied in hexagon.
show the mesh it looks like some polys are pulling
See attached picture of my toilet has it appears in Hexagon.Smoothing has been applied to the toilet cover.I have tried smoothing in other models and I noticed the results are the same when you export has a obj.You tend to see the subdivisions and edges.I was wondering if there was a way around this,It would be nice if the toilet when exported would look smooth without showing edges or sections of faces created by the smoothing.Is this happening because of the program or would any modeling program give you the same results.
thank you for taking the time to read this and for any replies you may have.
Tim Dusenberry
Tim,
Unless you collapse the Dynamic Geometry (DG), you will never see the "unsmoothed" geometry in Hexagon. When you export, the smoothing is converted into actual polygons.
What I would recommend is you save a copy of your file and then collapse the smoothing (DG) on all the pieces so you can see how they actually look before you export them.
If you notice problem areas like those on the seat cover, you can use the smoothing brush on a VERY LOW setting to relax the polygons to make them smoother. (This is different than using the smoothing (subdivision levels)). It also helps to use a larger brush diameter with feathering, and you'll have to experiment with the settings for the best results.
The smoothing brush will decrease the angle between polygons by moving the vertices. This is why you need to be carefull using it or you can end up with some distortion.
Sometimes you may have to increase the smoothing/subd level to get more polygons so you can smooth them better with the brush. But, as I am sure you have discovered, increasing the level can be problematic. You can also create new polygons in specific areas by using the extract edge or free tesselate tools.
I actually think that the main problem is bad geometry. You have a large n-gone in the middle, when you should have tried to make them all quads (four corners)
one quick fix is to select the center n-gone and extrude a new edge towards the center. Then select the n-gone and use the triangulate tessellation tool to split the n-gone into triangels.
Thanks for the response,I will try cdordoni's and Varse's suggestions this weekend
Yup both are right especially v v the Ngon. I would do it manually though so that the tri-angles have four edges. LOL By joining up every other vert to it's diagonal opposite neighour. Although, it does look like you have more verts at the hinge end than the front edge of the lid which will need balancing so that they are equal. :-)
Well I beat this model around the block enough.i did not like the way my first cover turned out with smoothing applied so i tried to keep
it simple by using the extract fillet around the edges and the Tesselation by Slice on the top of the cover.I also had problems with
the alignment of the hinges and I believe the left side of the toilet base is a bit differant than the right side.I am attaching a screen shot of the final geometry.If anybody wants to mess around with the Hexagon format you should be able to find it shortly at Renderosity in the
FreeStuff section.
thank you
Tim Dusenberry
Well that is slightly better; BUT, you have triangles all over the top of the lid. As I touched on before you need to manually remove every other edge so that from two triangles you will create one quad. The end result is that the lid/cover will smooth without distortion, as against all those tris which will tend to distort the surface when smoothed. ;-)