Iray light confusion
 AnneWertheim
Posts: 135
AnneWertheim
Posts: 135
To make things simple I bought the Lantios light set. I applied the "No Deep Shadow Map-05" to my scene. I parented all the lights to my camera (before I moved the camera).
I did a test render and found that the lights were creating shadows on my characters that I didn't like. I wanted a scene without cast shadows on my characters face.
I do not understand why:
A. In the Aux viewport (set to Nivida Iray) the lights seem to cast different shadows than in the render, same is true for the regular viewport.
B. when I rotate the UberEnvironement, it looks as if the lights are casting different shadows in the preview viewport, but if I do a second render, there is absolutly no change.

Daz 3D is part of 
Connect
DAZ Productions, Inc.
7533 S Center View Ct #4664
West Jordan, UT 84084
Licensing Agreement | Terms of Service | Privacy Policy | EULA
© 2025 Daz Productions Inc. All Rights Reserved.
Comments
I don't have that light set but pretty sure it's for the 3DL render engine. You need to switch to 3DL in the render setting pane. UberEnvironment won't work with IRay.
Something else must be going on. I purchased an Iray light set up (Pure & Simple Lights for Iray). I pretty much get the same result as with the other lights. I did two renders and completly changed the location on the lights. The two renders look pretty much identical and the light is coming from a different direction than in the preview.
To do another test I deleted all the lights, added a distant light, cranked up the intensity and did a Spot Render. Same result.
Adding or deleting lights don't seem to make any difference in the render. I get the same render result with no lights in the scene.
Is this still an Iray render? Intensity is the wrong parameter to use, it's for 3Delight lights only. Use the Luminous Flux instead, the Lumens value is for Iray lights.
That's good to know. What doesn't make sense to me is that none of my added lights make a difference. I can render without any lights and there is no difference in the light.
Something in my set up must be wrong that the lights don't show up in the render.
And yes, I have been rendering in Iray.
Can you check if your Render Settings are perhaps set to "Dome Only" or "Sun&Sky"? Those will not accept any other light sources in the scene. You could try switching to dome&Scene, for example.
That was it. Now the lights show up in the render. Thanks for the help!
Just a note about something that I wrestled with for about an hour the other night. Some older outdoor content comes with a "skydome". It's a semi-sphere that has an image map on the inside of it to simulate a sky. That is nice for 3Delight, but frustrating for Iray when you're trying to use HDR lighting, etc. After an hour of struggling with what I was doing wrong in my Render Settings -> Environment tab, I thought to look and sure enough, there was a dome over my scene blocking my HDR light.
Oops - now on the second render it's back to the way it was before.
This is so strange. I don't get what I am doing wrong?
I was told in order to get correct lighting I first create a camera, then add the lights from the preset I bought and only after that I should move the camera.
I did exactly that and the render does not reflect the added lights.
Ithink that may have been it. I checked and took out the image map. Now the lights do show up.
That was a good tip!
Two things to look at.
1. Is the camera light set to off?
2. Try turning the Environment light down. There are two sliders for this esch doing more or less the same thing only differently
One darkens the map by lowering its intensity and the other lowers the light output. Both can be used together to get a night scene from a daylight hdri.
Using a light set with the hdri can be a problem as the light from the hdri can/will be brighter than them and cancel them out so lowering the intensity, as above, will give you ambient light while giving you the lighting from the set. To increase the light from the set increase the lumens, not the intensity as has been pointed out, and you can change the colour using the temperature, for real life colours, or the diffuse for any colour you want from the colour picker.
Do you mean the Camera Headlight? I did turn that off.
I played around a little bit with the above, but didn't notice much of a change. I am a lot happier with the lighs now, but still not totally satisfied. What I just don't understand is that the preview looks so different than the final render. It's frustrating to get harsh drop shadows, that are not visible in the preview window. I tried moving the light that seemingly was causing the shadows on the right characters face, but it made no difference. Is there a way to get a more accurate preview of the final render?
And if I want to avoid these harsh shadows, how would I have to move the lights, if I can't see what difference they will make?
The Aux Viewport doesn't seem to be set for iray.
Oops - that's right.
I still don't understand how to move the light set so that I won't have cast shadows on right character?
I tried rotating the lights, but didn't get a satisfactory result. I then rotated camera and characters around the lights, until I got the direction of the lights correct. What's puzzling is that the viewport again did not reflect the render view.
The viewport shows you exactly where the light will hit (the more lighted parts). You have to understand that the viewport "shaded" look, and the iray render are done by completely different render/display engines. They cannot show the same result, because they talk different languages, and interpret the information in the scene differently.
"Rotating the lights" - it looks like you are using Dome&Scene without a HDRI, so it will be basically "Sun&Sky", with the usual sharp sunlight shadows?
I also notice you have a Distant light shining in from the right which, depending on how bright it is, will also add to the Sunlight from the dome and wash out any other lihhts in the scene. If you chage from Sun&Sky to Scene Only the light from the sun will be gone and only your lights will be used to light the scene.
So I'm confused as to your goal. It might be better to approach the problems from that side, rather than try to fix something where even the fix is not to your liking.
Are you wanting complete flat light, or do you want it modeled? You mention in your first post that the lights were "creating shadows on my characters that I didn't like." Shadowing occurs with light sources that are smaller, and where the rays are more parallel. A distant light is by definition a point light source at an infinite location in space -- like the sun. Its light will cause the sharpest shadows of them all. You'd get a similar look if you use the Sun/Sky option for the Iray dome.
Since you are using Iray, you have a few options:
1. If you don't want shadows from lights at all, you can switch from Photoreal to Interactive Mode. It's a little-known settings in the Render panel. Once in Interactive mode, you can control the shadow cast by certain types of lights. However, in Interactive you give up other parts of Iray that build realism. Since you are rendering cartoon characters anyway that may not matter.
2. If you want to keep some shadows, stay with Photoreal, and set up lighting using spotlights. After creating the new spotlight, set its emitter type of Disc, and then make the emitter size something fairly large -- 100 or so. This mimics a light with a 100 centimeter light source. The larger the source, the more diffuse it is. Be sure to crank up the Luminosity. You need some pretty high numbers here. The default 1500 lumens isn't nearly enough. Start at maybe 50000, and go from there. (The advantage of a spotlight is that you can select it as a view, and aim it as if you're seeing through the light.)
3. Use emissive (so-called "mesh") lights. These can be a challenge to set up, so a package from the Daz store might be your best bet. There's a popular "Ghost Lights" set that you can use to add invisible lighting to your scene without those lights showing in the camera. Emissive source produce diffuse and generally shadowless lighting.
4. For a very flat, somewhat featureless lighting, use any graphics program cand create a 2000 by 4000 pixel solid 25% gray image. Save it as a JPG. Load that as your environment map in the Iray render panel. Switch to Dome only, or Dome/Scene if you have some supplementary spotlights. Adjust the overall brightness the way Fishtales explains earlier. The gray image will not influence the color in the scene, and because there are no variations in brightness across it, will produce very flat light. It's akin to using a light tent in real photography, if you're familiar with that technique.
Wow - thank you all for your input. It's going to take me a few days to try out what was suggested.
Tobor - I really appreciate the different suggestions you make.
I don't want to go flat with my characters. I use them as reference for illustrations I paint in Photoshop and need the shadows. As I find lighting a bit of a challenge in Daz Studio I bought an Iray lighting set to use and was hoping I would not have to mess with the set up.
"...set its emitter type of Disc, and then make the emitter size something fairly large -- 100 or so"
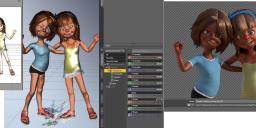
I dont' understand what is meant by the above quote? I looked for Emitter size and couldn't find anything?
It's in the Lights pane. Select that, choose a light from the drop down at the top and then find the 3 properties outlined in the picture. Choose 'Disc' for the 'Light Geometry' and set size to e.g. 100. I believe the only Height has any effect if the 'Light Geometry' is set to disc.
OMG - what did I hit now that I am getting this result as a render.
This is driving me nuts!
What's your lumiance set to?
This (usually) either one of two things - light blow-out from too much light, or shader snafu (happens every now and then).
First issue can be solved fairly simple by checking the lights and tune down extra-huge values.
The second is also easy to solve. Save the scene, close Studio, open, and reload.
If it's neither of the two option, further information would be great.
The scene is "blown out" with one or more lights that is far, far too bright. Maybe you entered a couple extra zeros? Or maybe you selected Distant Light, which uses far different luminance settings (based on incident light onto the scene, not light from the emitter source).
With lighting start with a single light. Select Scene Only to remove the Iray environment map from the equation. Get the one light to do what it's supposed to do. Your first light would most likely be the main key light that sets the overal modeling you want for the scene.
Once that light is set you can add others, if you need to. For use as a model source, the standard Iray environment map and a single spotlight, set to the specs below, are enough to get a decent look.
Emitter type: Disc
Emitter size: 40 cm
Lumiance: 9000 lumens
To point the light select it as a View, then set it so that it covers your characters. The controls work just as they do for a camera. Remember the light will be the brightest in the center of the screen. Set the light off to one side to give modeling.
Note: If the light is visible in the camera you will see a white or black circle in the image. This is the emitter being rendered. Go back to the spotlight settings and turn off the Render Emitter option.