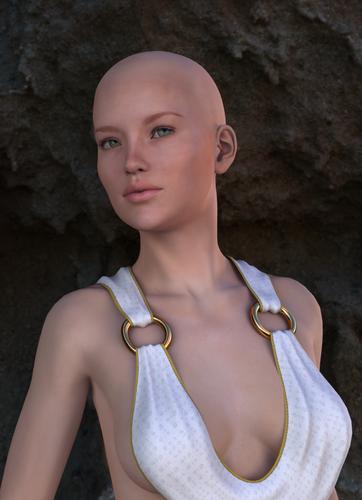
Victoria 6 Photo-realistic render.
 ringo monfort
Posts: 945
Victoria 6 using DP Victoria 6 Carrara shader. Render using HDRI, Indirect Lighting, Global Illumination.


Victoria6_new3.jpg
800 x 1104 - 379K


Comments
Hey Ringo, this is absolutely gorgeous!
On a sot of a side note, don't you just find that working with Victoria 6, well, Genesis 2 Female, for that matter, in Carrara 8.5 beta is just a blissful dream?
She's just 100% pure dame,
Her rotational joints and rigging setup just blows away anything I've even used prior.
Her shader domains, shaping morphs, expressions...
DAZ 3D has always had the best reputation for the best rigged figures on the planet - and yet they eevn blow themselves away with this new and improved Genesis female whom can morph into any lady you desire.
You MUST have had a blast perfecting these shaders as the layout is nothing shy of perfect!
Add to that the new enhancements to our killer 3d machine that is Carrara... we're on the winning trend - especially having someone like you providing an irresistibly perfect shader set to get her looking the best that she can - which is truly a m a z i n g ! ! !
Great job bud! My business is yours!
You truly have a gift for the shader world of Carrara and I hope that you just keep it up forever!
Total Ringo Monfort fan,
Dartanbeck
That's some fine render Ringo
Congrats, you obviously really know your stuff.
It's almost like you have inside information ... ;)
Not bad, how about this http://www.deviantart.com/messages/#/art/The-Shift-390829758?_sid=78d29755 for a good start. :)
Nice. Not sure if I would call it photo real, but real enough for me ;-) As I've said I prefer realistic over photo real.
"On a sot of a side note, don’t you just find that working with Victoria 6, well, Genesis 2 Female, for that matter, in Carrara 8.5 beta is just a blissful dream?" Dartanbeck
Yes, then I wake up, get out of bed, and start my comp. When I still had all this installed; uninstall carrara, studio, and my content a week or so ago, loading G2F took 15 minutes, then I couldn't do anything with her. My high rez quite costly V4 skins wont work and autofit just doesn't. Then it's another 15 minutes waiting for carrara to close; during which time I can do nothing but wait.
G2F may be fun if you have a couple of hundred to throw at her, but I have far more important things to spend my itty bitty bit of money on. And I have already spent far too much on DAZ content that is now out dated.
Hell, I've been eying this for a couple of weeks http://www.newegg.com/Product/Product.aspx?Item=N82E16883113266 , but it may be months before I can replace my comp, and I expect my ATT intro deal to run out soon, then I will have to cancel my internet.
And you wonder why I am always so crabby.
Hi,
Victoria 6 is by the far the best Victoria ever. She is just so beautiful and a real joy to use in Carrara 8.5. Yes Genesis 2 Female is very advance and like you said the rigging, shader domains, morphs and expressing are just amazing.
I am having a blast working Genesis 2 Female and her characters such as Victoria 6, Gia 6.
Really love pushing the envelop in what can be done in Carrara. It does has a great render engine. Just need to setup the proper render parameters and we can get killer looking images.
Carrara 8.5 Pro is a huge improvement and I think users are really going to enjoy working with it.
Thanks for the kind words. I'm blushing.
Best Regards.
Thank you very much. ;)
Ringo,
Great render! Would you post your render settings so that we can try and reproduce your results.
Also...
I've been having a tough time with Genesis 2 that seems different than what you and Dartanbeck have posted. I have the base Genesis 2 with the Victoria 4 for Genesis 2 ( http://www.daz3d.com/victoria-4-for-genesis-2-female). Autofit just doesn't seem to work. I've tried a few items like shoes and a cape for V4 and Genesis and they don't conform. Do I need to purchase V6 to make this work or am I missing something?
Brian,
I will first recommend to download as many HDRI files as possible. Here is a link to the one that I used for this particular render.
http://www.hdrlabs.com/gallery/flashpanos/pano.html?RedRock_HighUp&.
I will be back with the light and render settings screen captures as soon as I am done rendering a new image. ;)
Be back soon with the rest of the information.
I use HDRI a lot, ether stand alone or with secondary lighting; depending on what sort of shadows I want.
http://www.hdri-hub.com/free-samples
Brian,
I will first recommend to download as many HDRI files as possible. Here is a link to the one that I used for this particular render.
http://www.hdrlabs.com/gallery/flashpanos/pano.html?RedRock_HighUp&.
Setup the HDRI image with 150% Intensity. See image.
In Carrara there is a light set rig with spot lights and Light Panel. Set the spot lights to 40% each and put raytrace soft shadows to 5.00 FT and Good Quality settings.
Now see the render setting pictures for the render tab settings.
Now keep in mind that if you use other HDRI images than you render setting and light setting will need to be adjusted as each HDRI file will have different light effects.
When I change HDRI files what I do is turn off all the lights in the scene and just do a fast sky light render with intensity at 70% to see how the image will render than I turn on Indirect Lighting also at 70% to see how the image comes out. This way I can see how much more additional light the image will need or if I need to turn down the Global Illumination settings. I turn on the lights in the scene adjust them and do a fast render and adjust as needed. Let the HDRI file be the main light source and the spot lights just as helpers to help add to the illumination with out killing the HDRI effect.
Regards
Thanks Ringo. That's very helpful. I will give it a try.
The Gia 6 shaders are done and have been submitted to DAZ3D for approval. Hopefully you guys will get to enjoy them real soon.
Regards
RingoMonfort, I noticed you're not using Gamma Correction of 2.2.
Do you never use that for your renders?
I was just going to mention the same thing. Ringo, you might want to try that same render with gamma correction set to 2.2. We've been discussing in a different thread that Carrara apparently does more than just gamma correct when you check the gamma correction box. It seems evident that the render engine actually renders in a different and more realistic process (perhaps due to linear workflow) and catches more details and gives more accurate lighting and texture response.
By the way, I never realized that this lighting rig was in the Carrara scenes tab. It took a little digging to find it (it's for the elite skins for Lana, I believe). Thanks for the tip, it's a neat little lighting rig :)
Very nice render too!
RingoMonfort,
Wow, just wow. A picture is worth a thousand words. You just improved my render qualities 10-fold, and only increased render times by 2.
Thank you very much for clearly illustrating how to use IBL HRDI GI.
I know its in bad taste to duplicate someone else's work, so please forgive me for the overlapping similarities. But here's my slightly tweaked version with your settings.
I included a yellow tinted spot light to bring the character forward, however left the shadows blue to blend with the background. yay? ney?
Bianca
Dream Stalker
Shigi Hair
This looks fantastic!!! I am very glad that the information was very useful for you!
Best Regards.
Hi, I haven't used the Gamma Correction of 2.2 and I am trying to remember back to the Eovia days when this was first introduce to the render engine when they first added the Global Illumination and what the developers had to say about it. During that time many of the beta testers opted not to use it in their renders.
I have been reading the discussion in the other thread but I haven't had time to use it and get into the discussion as I have been busy creating shaders. :) But I will make time to stop by the thread and hopefully I can recall what the developers said way back around 7 years ago. LOL
Regards
RingoMonfort, am having difficulty locating the lighting rig you mentioned. Could you tell me where to find it.
It should be under Scenes tab\Lights\Elite and you should see 3 car files.
Regards
The lights folder is empty.
hmmm now that I think about it I think they come with the Victoria Elite skin shaders.
Maybe its time to create a free scene.
Definitely a 'yay'. Very nice render there GrokDD
Hey Ringo, I noticed in the render settings you're saving the irradiance map with Photoshop in the name. Does this mean Photoshop can open the irradiance maps for post production, or is this just part of your own naming scheme?
Along those lines, do you use the trick where you do a low-res render and save the irradiance map, and then in the full res-res render use the saved low-res map to speed light calculations?
Evilproducer, I like saving the irradiance maps to save on re-render time and to use the trick that you mention.
The folder that you see name Photoshop is for the Multi-pass rendering that I save in Photoshop format I just happened to save the irrandiance map in the same folder but they don't open in Photoshop.
I have an older version of Photoshop and it wouldn't open it, but wasn't sure about the newer versions. Thanks!
Update image.
Victoria 6 in Carrara 8.5 Pro using HDRI, Global Illumination, Carrara skin shaders.
The Scene of Victoria 6 in Carrara 8.5 Pro.