Making skins from scratch Tutorial Thread - Dec 2013 Free Skin Starters
 patience55
Posts: 7,006
1. I KNOW that many people already know how to make skins much better than i do. However some people are just starting out and so I'm starting this thread as a help for them and anybody else that wishes to read through it. This particular "skin set" is a WIP [work in progress] and as I have many projects on the go, there is no eta [estimated time of arrival] for the .pdf edition.
Any opinions I express about ANY software are just my own general 'down to earth' observations and are not meant to be taken out of context.
Anyone wishing to contribute more or better information about creating skin textures is quite welcome to pitch in.
A few things to remember BEFORE using any resource materials is to:
Check usage rights if it matters.
Generally speaking one can use MR [merchant resources] to create skin texture SETS to sell OR for one's own commercial [and sometimes free] image renders. If desiring to make free skin texture sets "for free" the available MRs are fewer. "When in doubt" contact the vendor and ask.
The tutorial I have re-uploaded at DA covers how to start a matching of a MR set for a figure.
The following is starting "from scratch".
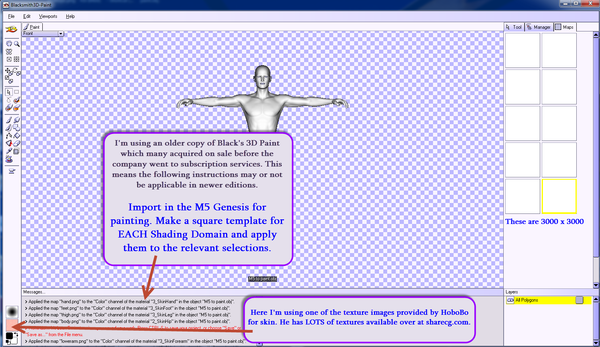
HoboBo has generously been providing the community with all kinds of free textures. In his texture folder one can usually find the full texture image such as the one I'm using to paint with in my old Blacks 3D painting program.
So here's the start :-)






Comments
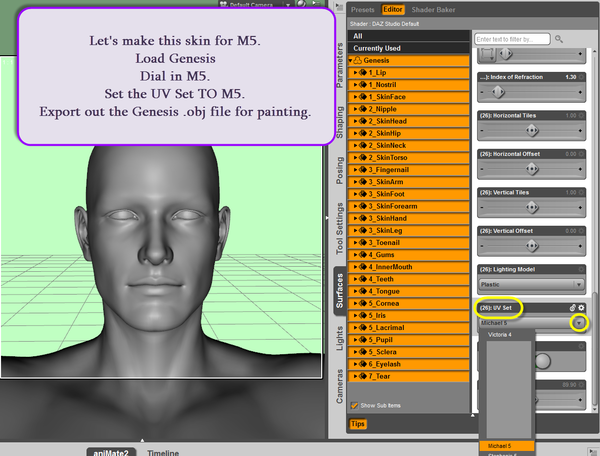
The purpose of acquiring the .obj to paint on is to "match seams" as best we can. One still adds a "seam allowance" aka 'buffer zone' to the template image in the image editor.
And some more ...
Remember, we are creating a "template .psd file" from which to work. As colouring lips or the use of lip textures is done with finesse in the image editor, the colour for the template does not matter. I do suggest making it quite different from the skin texture though so one can easily identify any problem areas.
If wishing to make the image "look like somebody" in particular, use head. Copyrights, trademarks, moral rights ... consider if somebody took your picture and made a 3D face with it, how would you feel about that?
The following is NOT legal advice, just general observations: If you use the image of somebody whose face makes money, expect a bill. If you misuse a face of somebody, expect a lawsuit. And if making faces of certain political leaders ... well, don't. Artists, stores, etc. "go poof".
ASK FIRST.
Watching with interest. :)
Just want to make a small correction here towards Blacksmith3D. They're not a subscription service now, they've just changed to RealityPaint. You don't have to pay a monthly fee or anything, you can still purchase the software outright.
http://www.realitypaint.com/main/
Good to know, thanks for the info. Will have to take a look-see ;-)
The templates I was working with apparently didn't react well with the background eraser so this is the other way to get some clear backgrounds relatively quickly.
Why would I want each surface on its own layer ... helpful for placing "skin marks" "tattoos" etc to NOT be going across seams ;-)
Along your internet journeys, look for brushes or .png files to turn into brushes in your image editor. Or make some of course.
Many brushes have "catches" to them so be sure to read the conditions of use.
Of course if you make your own you don't have to worry about conditions of use ;-)
Subject matter: freckles, eyes, beauty marks, wounds, stitches, anything you want to be using a brush for to put skin effects on your creation.
If you're interested in using a photograph to beautify the skin, you'll need a full frontal and possibly both profile views for the face.
PLEASE, for crying out loud, DO NOT TAKE PICTURES OF YOUR PRIVATES to share with the world.
Yes I've seen people doing this ... and like, gee ... if I know your name, etc. I would like to remember your face with it.
I appreciate that some are very enthusiastic to share a beautiful skin creation with the world ... there is something called Merchant Resources. Use them "if you must". My figures "wear clothes". So quite frankly leaving some portions of one's skin creations rather vague is quite okay too.
I work with the theory that artists doing nudes and for whatever reason requiring extreme details already have a collection of all what they need and/or know where to obtain more and better than from anybody's "learning projects" ;-)
The higher quality the photo image, the better of course.
"what did the Fox say?" .... hehehe ... catchy tune!
Sometimes people have also shared their .psd file along with their skin creations which was a most generous gift. These are a lot of work if you count your time on them. However remember to not be "too" generous. DELETE ANY AND ALL layers of "other people's work" before saving and sharing said files ;-)
And whatever else you do, "never" claim another's work as your own. It's a small world. People do recognize whose work is who's and when caught, there goes your career in the field. NOT WORTH IT.
And this is the last of this set for tonight.
.........
And to kindly remember "any and all advice" I may suggest, is intended as "motherly advice" ... keep the kids out of trouble type thing.
Is not legal 'cause I'm not a lawyer and most of us all are in different countries with different laws anyway.
...........
Once for an art project I had a collection of really nifty looking VERY HOT peppers. I laid them out to sketch them. Fine.
My Springer came along and wanted to eat them.
ha!
I told him "no".
He ate one anyway.
Next time I said "no", he listened.
In post #6, I'm curious why you took a backroads method to removing what you needed to. Why go through the brightness/contrast/etc steps? Why not just magic wand select the white background and hit the delete key, or magic wand the pink things and invert the selection?
Because ... in PSP [have no idea if it's a problem in other programs or not] ... all those nice areas are not a 'solid' colour/layer and are not going to be selected 'en masse'. One will get a bunch of little tiny areas selected like in the image where I show the Edit > Undo to undo a miss on selection.
Certainly if one can select the undesired area and hit clear/delete, go for it!
There is a powerful tool that I don't see you use. I guess PSP also has opacity mask. I rather use that instead of deleting
When you select some area that have very distinct colors, you could use the selection by color (at least in Gimp)rather than the magic wand that I never use in fact.
Yes PSP has masks but sadly there aren't enough days in the hour for me to learn how to use all what I have ;-)
Maybe one day I'll get that one figured out too.
I do have another set of images being edited. Hopefully sometime tomorrow I'll get them uploaded.
Images are numbered sequentially ... in the series yes there are some numbers missing.
Back to the textures now ... and getting some brushes ready :-)
next bunch ...
And you will all be so glad to know, no I am NOT releasing this "beautiful photograph skin texture" to the world lol ...
Hopefully we'll be seeing more free skins one day ... not for some characters though as people haven't been releasing MR products to make free texture sets with. Presumably they wish to always buy their stuff.
People making free sets are not normally inclined to spend tons of money for said MR products if/when somebody wakes up. Free is nice too. Don't have to be huge sets ;-)
Some MR products were released sometime back with either "now missing" information pages or "unclear" licenses as to whether or not they could be used for free texture sets. Have been debating with myself whether to release free sets and see if the [...] hits the fan ... or not. Quite frankly, I don't see what the big deal is. Like I want to paint eyelashes one at a time or something, I don't think so.
And a few more ...
And saving the best for the last for this set:
The Magic Wand tool has a Contiguous check box. With the box checked selecting a color/brightness/opacity 'island' won't select similar spots through out the rest of the image.
Good to know, thanks.
Something to keep in mind when creating skins ... and then in their promotions, is also 'reality'.
Years ago a book was published called 'Color Me Beautiful'. While some of it may be rather dated now, the basic concepts hold true.
Categorizing people into one of 4 seasons ... there are the colours for the hair, eyes and skin.
There are not "just" brown eyes for example.
There are brown eyes and then there are brown eyes with either a black or grey outer rim of the iris.
And for each season is of course the appropriately coloured wardrobe.
from the book.Lots of gems in the book, some of which is readable online.
There is also this page which may be of interest and AFAIK I can link to it here.
The textures that one makes and plans to keep, go in one's own folder under "textures" in the "Runtime" structure for the "My Library" in which one is planning to put their D/S mats. It's the same textures folder that one would also use for creating Poser mats.
For example:
My Library > Runtime > textures > YOUR handle > YOUR subfolder(s)
My Library > People > Genesis > materials > your handle or product name
Awesome, I have the possibility to get some real skin pictures from a male model and this tut comes in handy!
Thanks :)
That's wonderful. You'll be wanting the seam guides from SnowSultan as his include the templates for matching the male regions.
Having read that the information on how to do some of this other stuff is rare ... and since I was going through the steps anyway ...
As one needs to make some mats for their new creations ... this is how to get some going for the female part.
And these too.
And today's adventures included Shader Baker.
Some are using this feature for making skins. I suspect it may be helpful for some of the "other" textures like specular and so forth but not everybody wants big highlights burnt into their main skin textures. Highlights would vary with scenes ;-)
And some are having questions about making templates ... and that is one function Shader Baker can assist with :-)
So here goes:
Starting with the basic grey g.