How to fit V4/M4 Clothing to Genesis2 Female/Male
 PiratesMoon
Posts: 27
How to fit V4/M4 to Genesis2 Female/Male
This is a tutorial on how I solved the issue of autofitting Version 4 figures to Genesis 2 for Carrara. I'm using a lot of screenshot graphics so this will be in three posts. As the graphics are attached at the end of posts and limited to 5 each post, all the graphics will be numbered to associate with the text numbering.
Problem:
Carrara does not currently support autofits for Genesis 2. So after two days of trial and error, this is my working solution to use the "M4 for Genesis 2 Male" helper application to convert version 4 (M4, V4, S4, etc.) clothing content (skins too, but I haven't gone there yet) for use in Carrara with Genesis 2 figures.
What I used:
Windows 7 Computer, Carrara 8.5, Daz Studio 4.6, "M4 for Genesis 2 Male" helper application
The Process:
1.
Open DAZ Studio (am using 4.6).
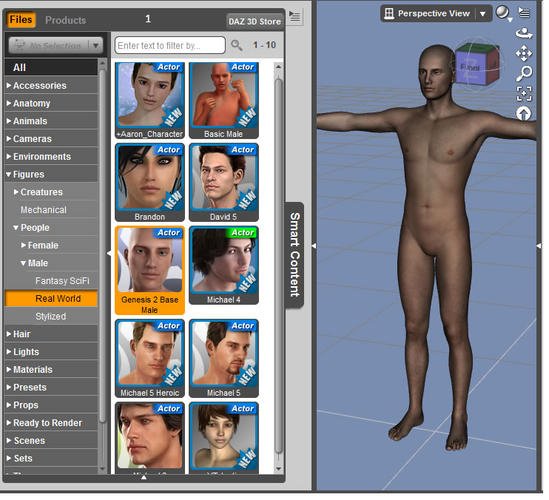
Open Smart Content Pane Figures>People>Male.
Double click on Genesis 2 Base Male (or your Gen 2 choice of figure). This places a figure for assembly use.
2.
Close the Smart Content Pane (click the teeny tiny white triangle to shut the pane).
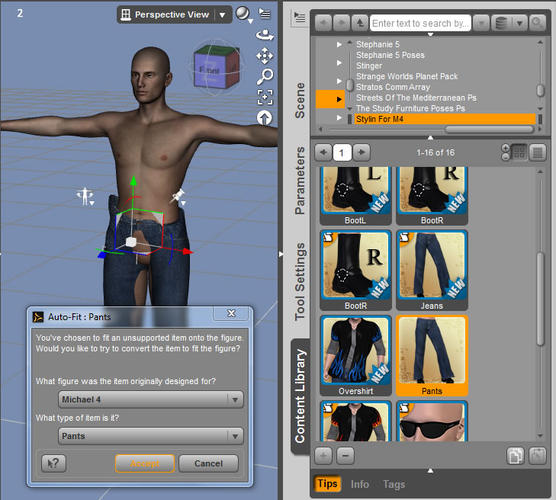
Open the Content Library (for this demo I'm using "Stylin for M4" Pants).
DRAG (do not double click) the Pants icon onto the male figure. This places the pants and activates the "M4 for Genesis
2 Male" window.
I chose Michael 4 and Pants and clicked the Accept button. This transforms the pants to the Gen 2 figure (Thank you
developer Slosh, this applciation is very nice work).
3.
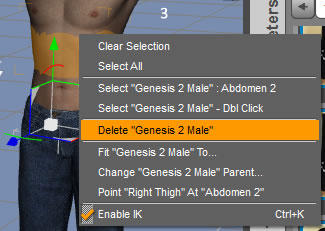
Next I deleted the Genesis 2 Male figure (just to isolate the pants).
Right click the male figure and select Delete "Genesis 2 Male."
4.
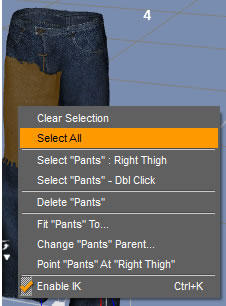
Right click the pants and choose Select All.
5.
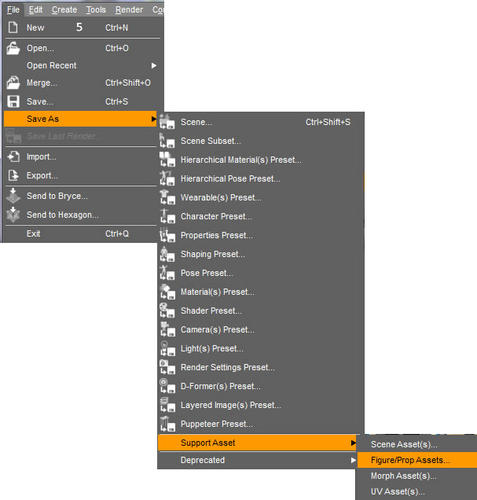
Under the File menu choose Save As>Support Asset>Figure/Prop Assets.
[Graphics 1,2,3,4,5 follow]






Comments
Graphics stack backwards, oh well.... Maybe an admin can solve this for me....??? Anyway to continue...
6.
Accept the location (this is the Daz 3D/Studio/My Library/Figures folder).
Name your file something appropriate to help you organize content parts.
Click the save button (not shown).
7.
This will bring up the metadata window prior to the actual saving of the file.
This is my example of filling in the metadata ("Smart Content uses metadata to categorize files when searching. At least, that's my take on things."):
Asset Directory: Accept this.
Vendor Name: I made this up, R means Richard (me) 2 Gen2 as I'm only converting, for my use, other peoples content work.
Product Name: What evah (try to make these names organizationally sensible for you).
Item Name: What evah.
MetaData: Choose what's appropriate for your content, like in this case, Wardrobe>Pants etc. You will see a gazillion choices when you enter here.
Asset Defintions: Accept all three of these.
Have no clue what Parenting Data means. I do know what Smart Parenting means, but not in this case.
File Options:
I turn off compression in case I want to go into the DUF file and make some changes. You don't have to turn off compression. (note: DUF is a text file and looks like a form of JSON which is probably the root of the term DSON).
Click the Accept button.
8.
This creates your content for use with Genesis 2 in Carrara 8.5. If you look inside the folder "YourName\Documents\DAZ 3D\Studio\My Library" there will be two folders: data and Figures. "data" has all the, while, data for the content you just transformed.
9.
"Figures" has in it the two files that Carrara uses to find the data.
At this point you are done with DAZ Studio 4.6. Just close the program, no need to save anything as the content you were just transforming is already saved.
[Graphics 6,7,8,9 follow]
Next, open Carrara 8.5 and go find and import the "My Library" folder (YourName\Documents\DAZ 3D\Studio\My Library).
10.
Open Carrara. Click on the Browser tab at the bottom left then click on the Content tab.
Click on the document icon in the black circle over on the right. You are interested in that "Add Folder" selection.
11.
Click on "Add Folder" and navigate to the "My Library" folder.
Select My Library and click OK.
12.
In the next window select Content and click OK.
13.
Now you have the folder imported and the Gen2M_Jeans ready to load on the male figure.
Notice the comparison: on the left is the newly transformed Jeans fitted on Gen 2; on the right is the original M4 version of pants fitted on Gen 2 which, as you can see, is not currently supported.
That's it. The same process can be used with "Victoria 4 for Genesis 2 Female" by MellenLane. It's a little convoluted having to go between the two programs, but it works, and doesn't take that long once you get used to it. I hope this saves someone from the frustrations I had, and I'm sure there are some good suggestions or edits to be made to this by some of the power users and am all for improvements. My icon images could certainly do with some help too, but that would be a different tutorial which I leave to someone else, or you might try copying and substituting with original icon images as long as you name them the same as those that are produced by DAZ Studio during the transform process (not the original name).
Graphics 10,11,12,13 follow]