Wireframe Render for Iray (Commercial)
 MikeD
Posts: 301
MikeD
Posts: 301
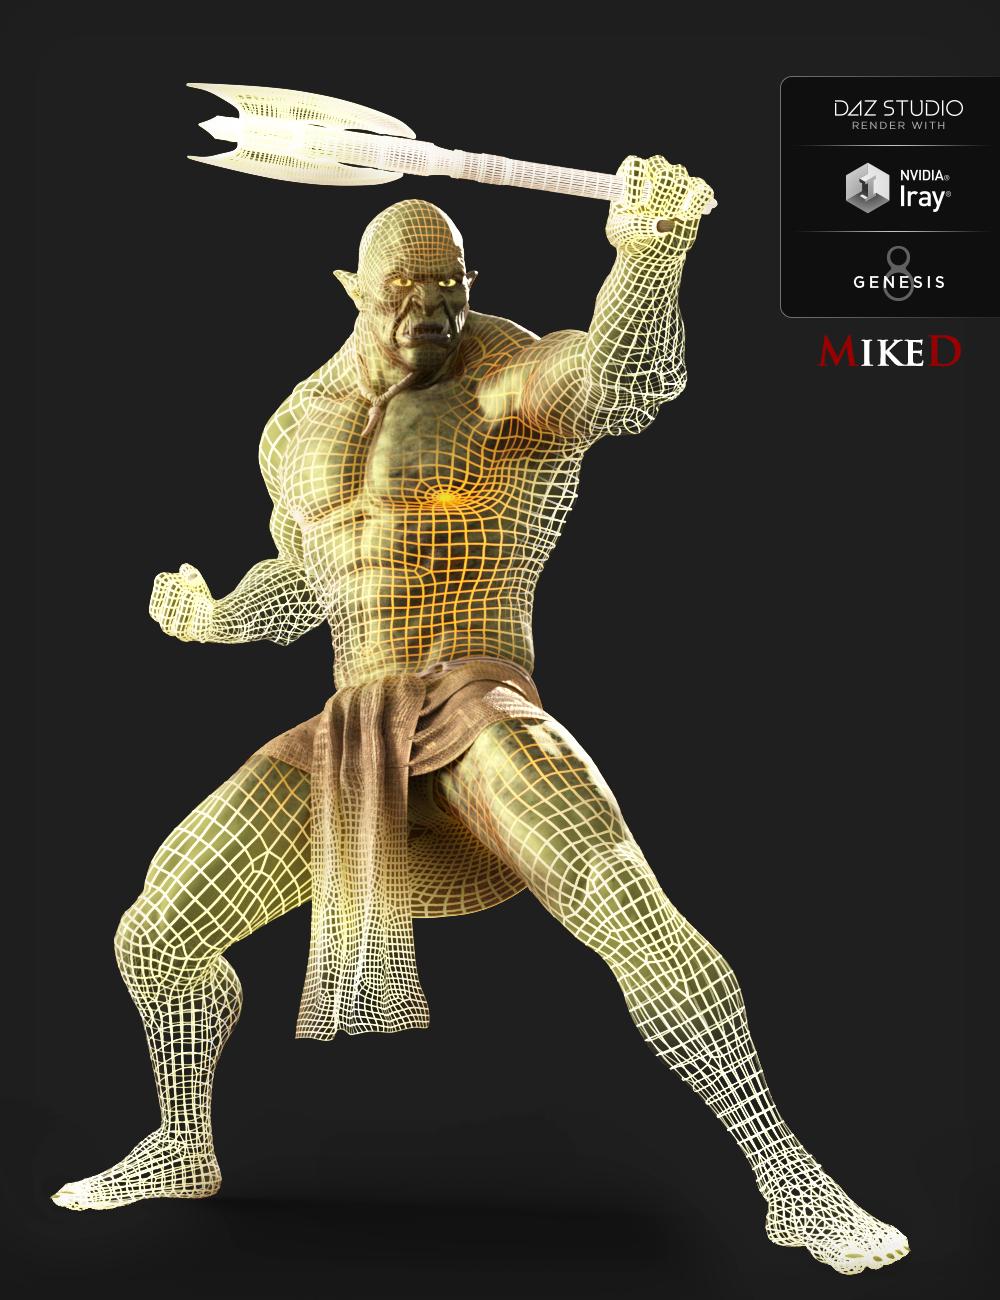
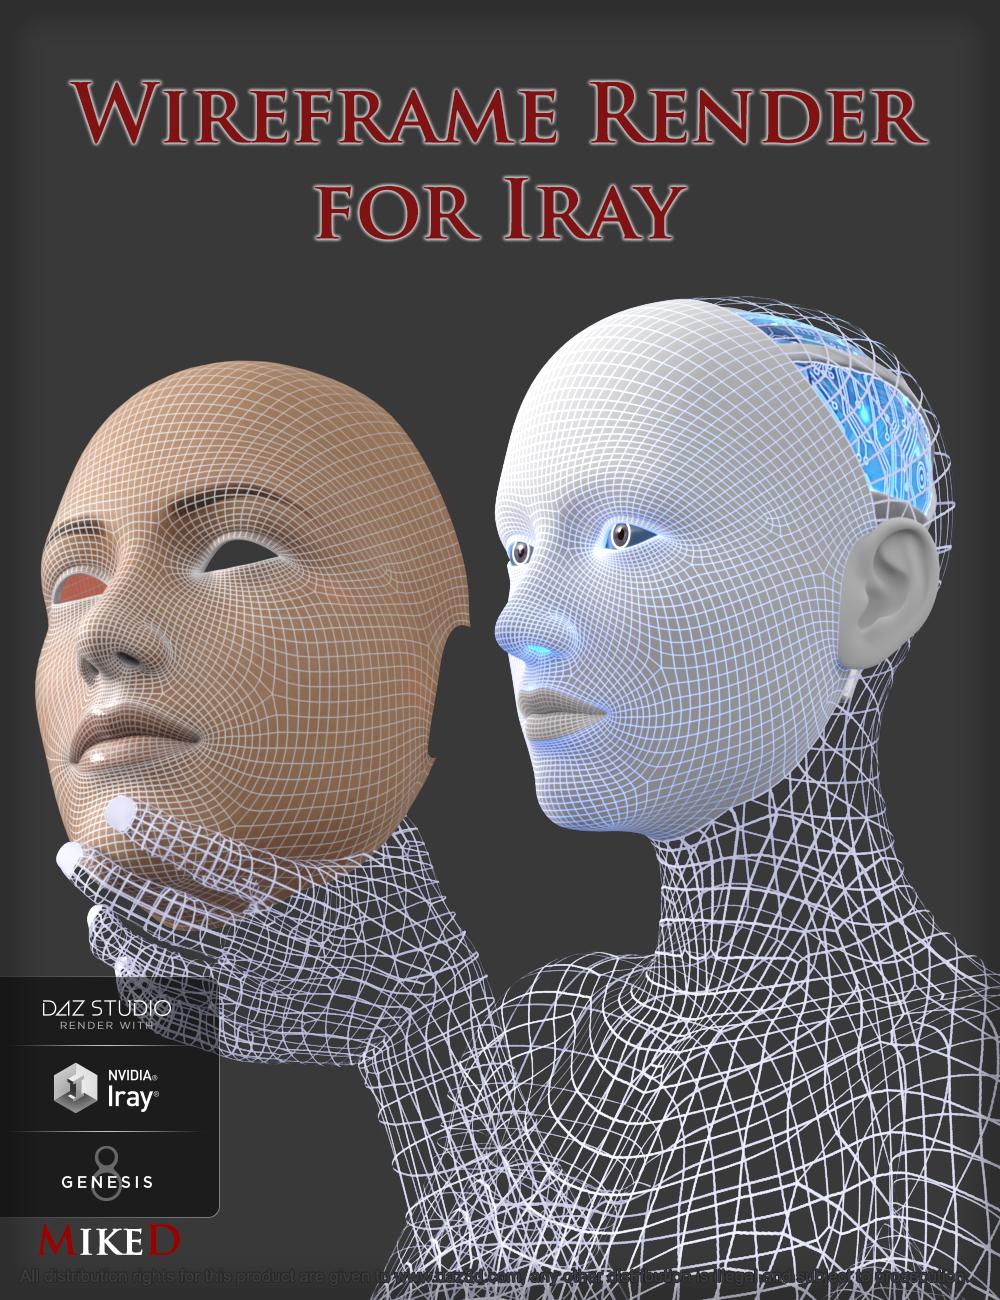 Many times, we need to render some items in a wireframed look. The ‘Wireframe Render for Iray’ script builds the UV templates (in base resolution) of an item (or more, if you have many items selected in the scene) and plugs them into the item’s surfaces, projecting the wireframe. You may choose to project the wireframe maps over the existing textures, over a clay shader, or as transparency. The script can also make these maps transmit light (emissive). It can also save some material presets for the new wireframed look of the item, so you don’t have to recreate the maps again (time consuming operation). DAZ script is not the perfect tool to draw new maps and the whole process needs some time to complete (from some minutes for a single low poly item until many hours for some high polygon multi-selected items, in high resolution maps). The script can track any previous wireframed maps that are used on the item(s), so you can project them over a clay shader, or use them to build a wireframe transparent look, without the need to rebuild these maps again. This product is not a wireframe shader. The script finds the actual wireframes (UV Templates) of each item and use these UV Templates as maps.

The Wireframe Render for Iray script allows you to:
- build, save and plug the UV Template maps of one or more selected items, giving a wireframed look.
- choose the surfaces of each item, that you want to be wireframed.
- select between three modes (over Textures, over Clay, Transparent)
- make the wireframe emissive
- track any previous wireframed item(s) in the scene
- select any previous wireframed items and wireframed surfaces in the scene
- transfer the wireframe maps from any previous wireframed item(s) to ‘over Clay’ mode
- transfer the wireframe maps from any previous wireframed item(s) to ‘Transparent’ mode
- select the folder in which the maps will be stored
- select the size of the maps and the lines’ thickness of the wireframe manually or use the auto function
- choose the temperature and the luminosity of the emissive property
- save a Material preset for each wireframed item
- choose a mapped folder in the content library to store the material presets
- choose the color of the wireframes, the color of the clay base, and the color of the emissive property
- choose if you want to use the “Diffuse overlay” property for your maps (visible in Render Mode) or make them LIE
- store/remove the script into the “Script” menu of DAZ Studio and additionally on a custom toolbar
Check this animation using the Wireframe Render for Iray Script (volume up)!!!


Daz 3D is part of 
Connect
DAZ Productions, Inc.
7533 S Center View Ct #4664
West Jordan, UT 84084
Licensing Agreement | Terms of Service | Privacy Policy | EULA
© 2025 Daz Productions Inc. All Rights Reserved.
Comments
Shoot, that is pretty slick. Looks like another insta-buy.
Very cool......
Oh, wow ... I recall seeing someone explain how to do something similar in Carrara by messing with .. er, something and thinking "I wsih DS could do something like that" and now this, much, much better!
This is one of those cases where something is easier in 3Delight (and Carrara) than it is in Iray. Because Iray doesn't give the shader code as much access to the underlying geometry. Wireframe shaders written in RSL were pretty simple. Iray MDL is much harder so kudos to @MikeD for figuring out a way to make it happen!
Thank you all for your nice comments....
This is so cool!
Instabuy.
Thanks Proto!!!
Bought!. The video demo is really impressive
Could you please provide some screen shots of the outcome and some images of the map the script produces, as I don't have the product and I can't recreate the result?
Thanks!
Thanks for getting back to me and I love your product, great stuff. I've attached some pics and think I know what's happening. It only happens when a texture is used that is "tiled", like in this case a 1024x1024 leather texture. Over clay it works just fine, but as soon as the leather texture has been applied it tiles the wireframe with it.
Yes it is a matter of tilling of the product.... You can go to each property with texture map of the product and choose the 'Image editor'. There is a tab in there called "Instance Tiling". You can choose the tile of each map to be the same as the overall tilling, except the "Diffuse Overlay Color" property. In this property you can hook the wireframe maps without tilling. Then go to the "Horizontal Tiles" and "Vertical Tiles" and set the value = 1. With this trick the product will have tilling to each map, but the wireframe. It is a time consuming prcedure nevertheless...
Hey MikeD!
I just got your product and it seems very easy to use. I am looking for some advice....I wanted to make the model I was wireframing to have the same thickness lines in the face as the rest of the body. Do you have a suggestion on the easiest method of doing this?
Thanks!
Case
I'm new to Daz and I wanted to create a basic woman in wireframe. I found myself in front of this package. Anyone know where I can find videos that explain step by step how to install and get to the final result?
Thank you for your time
@MikeD is there a user guide, or a video tutorial that shows how to find the script in daz and actually run it?
Hey Case,
Sorry for the very late answer ... It seems that when the forum's counter stop for a while, the notifications stoped too, because I never took an e-mail for your post...
Nevertheless, in order to achieve the same thickness lines in the face and the rest of the body, set the face to a thickness around 5 and the body to a thickness of around 3 for a 2K map, if I remember well from the time I made the promos. I searched a while with trial and error. The issue is that the face maps cover a lot less surface than the body maps. The same thickness for the body and the face, will cause the line to looked too thick to the body (it is the same thickness on the maps, but the maps are stretched a lot more for the body, making the lines to seem thicker) than the face. As I remeber a difference in 2-4 units in the values of the body and the face thickness will give good resaults (the final differece between the values depends on the maps' size).
If you have purchased the product, run your DIM. It should have the 'Wireframe Render of Iray' in its list, ready to be installed. Click the install button next to it to downoad it to your main library. Next open your Content Library tab within the DAZ studio. it should be found in your "Main Library/Scripts/MikeD/Wireframe Render for Iray". If you run the script once, there is an option in the 'General Setting' tab to add this script to a DAZ Studio menu bar, and under your 'Scripts' menu as well (see 1st attachment). There is no video that explain step by step how it is work (at least by me), but you can read the extended manual by clicking on the product guide within the script. (see 2nd attachment)
You can also use the 'Whats this' button within the script. There is help text for almost every button of the script. (see 3nd attachment)
Select the item(s) you want to wireframe and run the script in your "Main Library/Scripts/MikeD/Wireframe Render for Iray". If you run the script once, there is an option in the 'General Setting' tab to add this script to a DAZ Studio menu bar, and under your 'Scripts' menu as well (see the previus answer. I belive it will cover you as well).
Look at the attachemnts of the post for the user guide of the srcipt!
I purchased that product about three days ago. I have made a mistake in taking your advise not seriously enough. Consequently, the processing of ten items from a scene to create wireframes for, took more than two days. After that, I changed that scripts' settings to the minimum, and that way, I can accept it. Surely, I want to figure out which (other) variations of parameters and types of settings are to my liking, and meet my expectations. Therefore, I want to only, save the wireframes' data eventually afterwards. Is there such an opportunity already? I read its manual, but I did not find that information. Likely, it is to upgrade and update that skript, if that is simple for you to perform, what I think it is. I have one question: What is your most professional method for effectively disabling shadow-casting of produced wireframes, if you would also choose so? I would appreciate it at the least, but sincerely I want that as a standard for wireframes, on produced render output frame(s). Thank you in advance! I found something odd: Unchecking all clays, results in unchecking all wireframes as well. That may be a flaw - I can not tell. But I would like to only handle clays for that action.
CyberneticHFX, I will take a look tomorrow, cause I don't have access to DS right now ... sorry for the delay ....
Thank you very much! I ran that script again for many hours on only a single item of the same ones I had targeted the first time. It was crazy again. After a while my computer's memory was used up completely, and I had to re-adjust my multi-monitor setup after a full graphic blackout. I think something very odd is with that item. A cube that processes like forever. Like the way you experienced it with massive multi strain hair item maybe. The thing is, I want to understand why. Now I try running that script with low parameter settings on one of the other items I had used initially when testing. If it behaves the same (longer than an hour, I think), then I must abort that.
Hey CyberneticHFX,
Well, as for the saved data: Unfortunately, the script has not the feature to save the data to an external file. The drawing function (the one that draws the wireframe maps) needs all the vertices of the mesh (not references but the vertices themselves), so there is no easy way to save the data to an external file, with the current script structure. It certainly should be handy to save these data somewhere, but the vertices retrieving time is about 1/10 of the whole process, as you can see from the next arrays, so the bottleneck is at the drawing procedure.
If you want to check which variations of the parameters lead to a good result, have in mind that a map for a relatively small surface (like Genesis face) needs more wireframe thickness than a map for a relatively big surface (like Genesis torso) for the same size of maps. If you try to use the same parameters for Genesis 8, you will see that the face wireframe seems too thin in comparison with the rest of the body (in the promos I used different parameters for the face). Also, a small sized wireframe map will be drawn more quickly than a big one, but the wireframe will be rougher (pixelized). Another determining factor for the time needed is the mesh density. Dense mesh will need a lot more time as it has a lot more vertices to calculate and more edges to be drawn.
Now for the shadows. I guess you are interesting for the ‘Clay Transparent’ mode. The wireframe appearance made by this script, is due to the maps of the UVs plugged into the surfaces’ channels of the item. The item will cast shadows in Iray as it should have done with any other maps into its surfaces’ channels. So, the question is how to disable an item’ s shadows from the renders (no matter what the maps are). In Iray photoreal mode, I have never managed to disable shadow at all, in a simple render. I am saying simple render as there is a more complex solution. You can make a render with the wireframed item alone (with all the other items invisible) and then render all the other items but not the wireframed one and mix the renders in Photoshop or Gimp. Nevertheless, the wireframe item will cast shadows to itself. In Iray interactive mode, an option to cast shadows or not will be available in the item’s parameters tab, under Display group. If you choose this mode, remember to change the option ‘Shadow Type’ into ‘Raytraced’ for every spotlight in the scene, or it will never cast shadows to any other item as it is ‘None’ by default. A similar option for the item exists in 3Deligth renderer as well. From the above methods I prefer the first one (multiple renders) as it is closer to the original Iray quality.
As for the check-uncheck option (“Over Clay” and “Clay Transparent” modes) … no it is not a flaw. The wireframe maps are applied above a background which is a clay look like the modes indicate. If you disable any surface ‘clay’ look then the wireframes will not have a clay background so they are automatically disabled. The opposite is still valid. If you choose a clay as a background, you do not have necessarily choose to project a wireframe above it. For example, you may need to make a Genesis 8 wireframe, but you don’t want to apply the wireframes for the eyes, but only the clay.
I run a series of tests yesterday.
My CPU is I7 4770 3.4 Gz, 32GB RAM, GPUs: 2x RTX 2080 Ti.
Mode: Over Clay
Cube 5 divs/side
150 faces
152 Vertices
1 Material Zone
Size
Thickness
Time (s)
2048
3
11
2048
6
24
4096
6
25
4096
10
25
Cube 10 divs/side
600 faces
602 Vetrices
1 Material Zone
Size
Thickness
Time (s)
2048
3
13
2048
6
13
4096
6
22
4096
10
22
Genesis 8 F SubD1
65.472 faces
65.806 Vetrices
16 Material Zones
Size
Thickness
Time (s)
Take Vertices (s)
2048
3
149
15
2048
6
183
15
4096
6
212
15
4096
10
224
15
Carriage
229.858 faces
231,400 Vertices
9 Material Zones
Size
Thickness
Time
Take Vertices
2048
3
14 h
1.5 h
The carriage pushed my PC to the limits. I did not perform another test for this item as I waited for prox. 14 hours to finish the wireframes, with the above settings. I did not have any weird events while making these tests. The Carriage wireframe used around 2/5 of my RAM but I had never a blackout event or any crash. It has to do with the meshes and the PC configuration, I guess. The cubes are made with DAZ’s primitives objects. I am very curious to see why the cube in your tests stress the PC so much. I know what you mean, I had the same effects in my PC when I was trying to wireframe a hair (stupidity) …
I don’t know if I were any help, and I really would like to know why this item in your tests caused these effects…
- Mike
Thank you, Mike!
Your highly detailed perfect response is heartwarming. I will be busy for a few days right now. But after some work I have to do, I will delve back in there, read your details again, and then try to find the details of the item in question, to start by comparing. Please give me about three days, until I will respond to your words. You have a great time!