My New Look-Alike Character
 jtdekoning
Posts: 145
in Art Studio
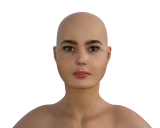
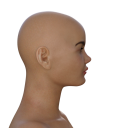
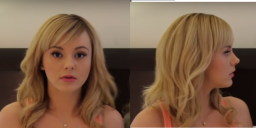
I'm trying to come up with a character that looks like Bree Olson. After several days of glaring at the screen and bugging my wife for her opinion, I thought that I would come to the professionals and see what you all thought.
All opinions, suggestions and comments on my work are welcome.


bree lookalike_Camera 1.png
1800 x 1440 - 2M


bree lookalike_Camera 2.png
759 x 863 - 586K


Bree Olson Profile.png
982 x 487 - 654K


Comments
1) Philtrum or is it Fultrum is too deeply scooped out in side view
2) Lower lip not full enough
3) Chin is far too wide. You've got the lips about 3/4s the chin but in her picture her chin is about 3(4s her lips although it is difficult to see in the frontal picture.
4) Nose looks shortened
5) Jaw looks too full
6) Nose bridge looks too wide
It's still a good likeness to my eyes though and I can be mistaken on what I critique. Lighting is everything to an untrained eye like mine so I'm not 100% certain.
I'm not certain what your approach or workflow is, but, for what it is worth, here's some tricks that I use when working from reference photos, to get everything roughly in place before final tweaking:
1. I always work with the default front view in DAZ Studio and one or other of the left or right views, never the perspective view as that creates distortion. I only use the perspective view when I wish to examine the work from different angles, never to make changes.
2. I always create primitive planes for my reference photos, and calculate the scale adjustment necessary for each photo to avoid distortion. For example, if the image dimensions are X x Y, I divide X by Y to get a percentage and then enter that percentage in the X scale of the planes I created, before adding the image to the diffuse channel of the plane. I can then rotate the planes to make them vertical: 90 degrees on the X-axis for a frontal shot, 90 degrees on the Y-axis and -90 degrees on the Z-axis for a profile shot (or reversed depending upon which way the individual is facing). I then can translate the plane into position near the target figure's head and adjust the overall scale of the planes to correspond roughly to the head of the target figure.
3. With a target figure loaded, and my planes approximately scaled and positioned as described, I then create two more primitive planes. I give them a plain black diffuse colour and set opacity to about 40 percent so that they are partially transparent. I rotate each plane 90 degrees on the x-axis to start with, and set the Z-axis scale to 5% - so I end up with two narrow bars. The purpose of these two planes/bars is to use them as gauges when going from the reference images to the figure being worked upon. For example, working in the front view with the figure positioned at the origin, I can switch one of the bars to a vertical orientation by setting the Y rotation to 90 degrees in the parameters tab. Then, I can translate that bar horizontally along the X-axis to straddle the nose on the reference photo, adjust the Z scale of the bar to the width of the nose, then position the bar over the figure's nose by zeroing the X-axis. I can now adjust the figure's nose to the width of my bar to duplicate that on the reference photo. The process can be used to transfer/duplicate anything (mouth, lips, eyes, etc.) either horizontally or vertically. The second bar comes in handy occasionally when I wish to toggle between front and side views without having to switch the bar from one view to the other. Of course, the key to this approach is ensuring that your front and profile photos are aligned properly with each other and the figure's head, which can be tricky, but that is a whole discussion unto itself. Again this approach does not produce the final result, but gives a solid starting point from which features can be tweaked.
Of course, one does not want to do too good a job of reproducing a celebrity's likeness, less one run afoul of that individual's rights to their likeness.
Ive only done a handful of face models prior to the face transfer feature being added. I did what SixDs suggest and did the mugs on intersecting planes as well, however I grid lined my sources, adding the sliding planes as a reference is a good tip.
You have good source mugs as far as sizing and tilt angle. However, by the example it appears you may have aligned the photos using the booth in the background. I would tweak your oppacity on layers overlapping them and line up the eyes, nose, and chin before transfering them to planes in DS. When I overlapped your sources the profile was slightly smaller than the front facing which may account for the upper lip and chin discrepancies in the profile render.
For super realism and to possibly save you from redoing your work later. If you have a height stat on your model and a full body pic it could be helpful to overlay a ruler scale so the head doesnt become disporportional to the body if you are going for ultra real full body renders in the future. Models that are much shorter or taller than the default G8F's 5'9'' appear to get head deformation when sizing is adjusted
Quick and dirty the face transfer tool does a decent job when given good source photos. Sure the geometry isnt factual, the neck always seems to need remorph, and you usually have to scrub out shadows or hair overlap on the maps (source dependant) but its still a nifty plugin.
Side note: Im no relationship expert either, but Id be mindful of how much time and oppinion requests went to the wifey on recreating a pronstar adult actress.
Yes, one of the biggest problems is distortion in the source images, which is almost an inevitable unknown with images from the web. Distortion can be introduced by the lens of the camera itself, as well as by the angle of the lens or camera, distance from the subject, etc. Without some sort of detailed measurements of the subject to use to correct discrepancies, one is left with little alternative but to "pick one" and go with that.
True, although I was just refering to large body height adjustments makeing the head scale disporportunate to the body. Resulting in you having to resize the head and rework all your facial porportions.