More odd discoloration..

Hey people of Daz! :)
Usually, I can find the answer to any question in this treed forum. Acually, this might only be the second of hundreds I've not seen a fix for. And I might just not know enough to know what words to type. (Highly possible and sorry for wasting your time if that's the case.)
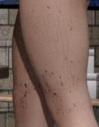
I guess a picture is worth a thousand words, so I attached one. I had a similar issue once and found two fixes - one being a script that moved everything to the center of the grid and the other adjusting the scale of the hair I was using. What made it different, if that matters, is that I was seeing circular patterns. This looks more like inky wet spider webs. Also, in this instance, it only appears on the left leg around the thigh, knee and upper calf. So I moved everything to center and messed around with the hair. No change.
Anyone have any ideas what this might be? And what other information can I provide that would help?
Most importantly THANK YOU ALL so much for all of the wonderful help and doccumentation you've provided for us noobs. :)
Daz 3D is part of 
Connect
DAZ Productions, Inc.
7533 S Center View Ct #4664
West Jordan, UT 84084
Licensing Agreement | Terms of Service | Privacy Policy | EULA
© 2025 Daz Productions Inc. All Rights Reserved.
Comments
It's not easy to see what is happening in that image. Is it just the basic character or does it have other things (a Geometry Shell, clothing of some kind) layered over the the model? Are you using the materials from ne character on a different shape - if so it may be worth seeing if the issue goes away after applying the Normals Off preset that goes with the skin materals (if there is one).
I am using a geometry shell and she's wearing.. Well shoes in this render. I am using mixed assets. It's the Genesis 8 base with a custom skin texture and morphs. But everything was made for G8F.
I'll take a bigger zoomed in picutre (that was my bad) and I'll take a full body picture and just black box out the forum rule breaking parts. And I'll try the Normals Off and get back with you. Thank you very much for the suggestions!
Also try turning the the Geoemtry Shell off, and if that helps turn it back on and try increasing the Offset value a little
I really need to break the habbit of dropping threads after I find a solution and never returning to give the Paul Harvey..
First, thank you very much, Mr. Haseltine.
It's been a while and I don't remember this particular set I was working with. However, I recognised the artifacts in the picture. This happened for me when messing around with cloths, hair, everything. Mr. Haseltine was absolutely right. It was an issue with offset. Hair is the easiest one to talk about that was giving me fits.
When you load a hair, usually it comes with some kind of a cap that goes over the figure's head and the hair is attached to that. It's "invisible" in the render, the cap is. However, if it's clipping (meaning part of it is breaking the plane of the figure it's supposed to be contouring to), even though it's marked to be invisible in the render, it will show dark lines at every point where it clips. Sometimes these dark lines will look like weird water stains, sometimes just a straight line, sometimes a squiggle.. The way to fix it is to expand the thing itself (the cap in this example) until it's no longer clipping. If you go crazy with it, the hair will look strange. So only expand it as little as possible to remove all the clipping where it will be visible from the camera. Poof, problem gone.
This happens for me a lot when I'm messing with clothing. Armor, usually. I like to remove certain parts to either slim the armor, or expose skin. The two ways I do this mainly is to either untick the little eye symbol in front of the part I want to make invisible in the scene box or set the opacity to zero in the Surfaces tab. In either situation, often the part I'm making invisible has inner geometries that clip the figure. If it's not invisibled, this isn't an issue, because the geometry is hiding that part of the figure anyway. But, as soon as you make it fully transparent, those lines will show themselves. This can be fixed the same way to a certain extent. The problem is, when you expand one little part of a figure, the rest of it goes nuts. So I don't have a good solution for cloths.
With cloths, as with hair, first check to see if there are any "adjust" dials in the Parameters tab. These are there for a reason. The creator of whatever you're messing with probably saw these issues comming and was nice enough to put them in there for you. They're WAY quicker and easier than anything else I just described.
Hope this helps anyone who googles onto this thread. I'm still a noob. But I've came a long way since originally making this post.