Tasty Occlusion Sammich
 evilproducer
Posts: 9,050
This is a very basic intro to a lighting solution called an Occlusion Sandwich by Jeremy Birn in his book, Digital Lighting & Rendering (3rd edition).
I was intrigued by the concept and wanted to test it in an animation.
http://youtu.be/CxeluTryr_0
The concept is simple enough.
I set up my scene by setting my key light. In this case, the key light is sunlight shining in from windows on the left. I then set up my other lights as if I was trying to simulate sky light and indirect light, albeit a bit simpler and with less lights than I normally would.
The room has windows on the left and right. The windows on the right are smaller and have a wall on the outside a few feet away, so I knew I wanted some faint bluish atmospheric light to spill in from the windows on the right. The wall on the left is basically a glass wall, and the sunlight is coming from that direction, so the atmosphere fill light was a bit brighter and a lighter shade of blue.
The carpet on the floor is beige with a reddish small carpet near the right wall. I added a 50% intensity beige colored light to simulate bounced light from the beige carpet. It was a bit brighter because sunlight is hitting the carpet directly. The reddish colored carpet is in the darker half of the room, but I did want to have some reflected light from the rug spill up towards the ceiling as well to help add a bit of color.
The walls are white or off white, so I added a light for the back walls that was a very light beige and low intensity.
Having tested the fill lights with the key light and deciding I liked it okay, I proceeded to remove the shadows from the fill lights. Ambient Occlusion and the key light would provide those.
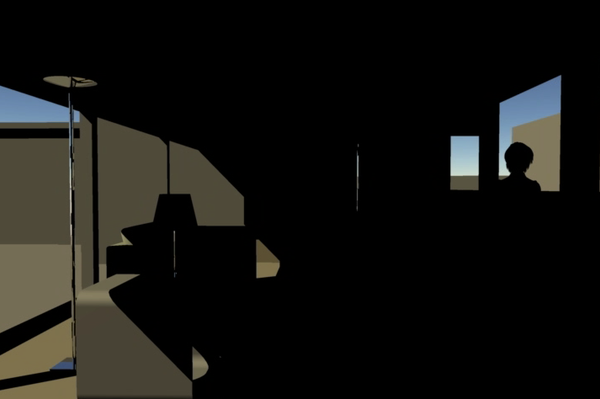
Now I needed to organize my scene for rendering. I saved three iterations of the scene. One for the fill lights, one for the occlusion layer and one for the key light.
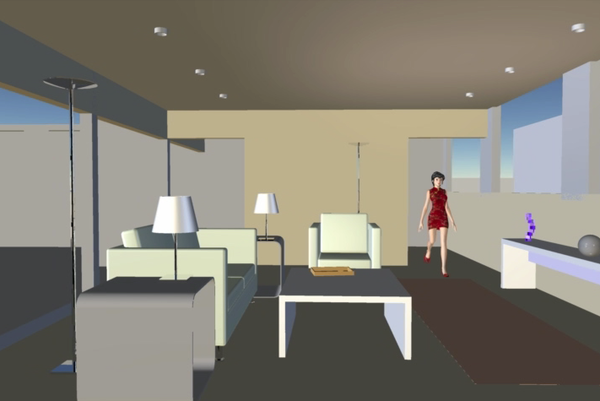
For the fill lights, I hid the key light and made sure that the scene's ambient light was set to 0%. I also double checked that each light's shadow intensity was set to 0%.
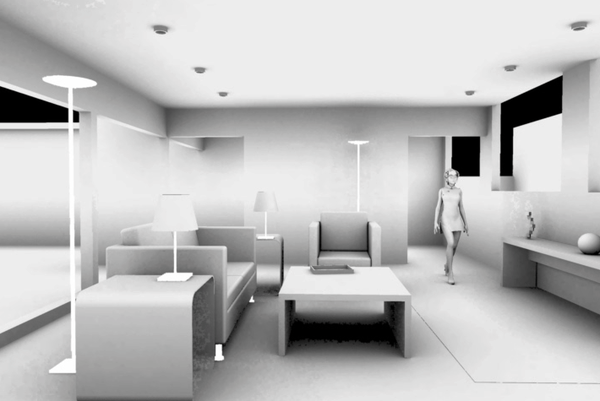
For the occlusion scene, I hid the key light and the fill lights. I turned the scene's ambient light to 100%, and under Multi-Pass in the render room selected the Ambient Occlusion Pass. I also made sure that I had enabled the Ambient Occlusion Only option.
For the Key light scene, I made sure the fill lights were hidden and that the scene's ambient light was set to 0%. I used hard shadows as the occlusion pass would provide a simulation for soft shadows. I could have added some more key lights for more dynaimc lighting, but this was just a test or proof of concept for me.
For both the fill lights scene and the key light scene I did not use ambient occlusion.
I loaded each scene in the Batch Queue to render.
When the renders were done, I loaded them into my video editor (Final Cut Pro). The occlusion scene provided to video files. One was the ambient occlusion movie which was colored. The other was the ambient occlusion render pass which was gray scale. I discarded the colored render in favor of the gray scale render.
The fill light render was the first (or base layer) and had no blending.
The middle of the layer was the occlusion render pass and had Multiply for the layer blending.
The top layer was the key light render and it used Add for the layer blend mode.


Comments
...and images are completely out of order. :-S
A little tip to try to make sure images load in the right order.
Select first image, then review the thread. Now check bottom left corner and make sure that the message there has finished, the little message that says waiting for DAZ3D / transferring etc. Once that has disappeared then select the next image and do the same, SOmetimes it can take a few seconds for the message to click off.
"For the occlusion scene, I hid the key light and the fill lights. I turned the scene’s ambient light to 100%, and under Multi-Pass in the render room selected the Ambient Occlusion Pass. I also made sure that I had enabled the Ambient Occlusion Only option."
You don't need to hide the lights if you're using multi-pass: the layer will ignore them.
But you want a really funky thing?
Turn ambient to 0%, quality to "Best", and watch it render faster than it did at 100%.
And it's 100% black. I tried that at one point.
Good point about the lights not being seen in the render pass. However, the lights being visible will add to the light calculations for the render, even if it is minimal. On my old machine, any optimization I can get is a bonus. ;-)
Huh. Doesn't end up black for me, but I'm on Windows - maybe its different. This is a sphere on a plane, no lights at all, 0% ambient, Multi-pass AO rendered to a BMP file. (The main render is, of course, a featureless black rectangle)
Weird. I'll have to give that a try. Maybe I had something set wrong. I don't usually mess around with AO.
I may have set something up wrong when I had a black render pass with no ambient light.
There is a difference in the quality of the pass with no lights and no ambient light.
The very rough looking ambient occlusion pass has the scene's ambient light set to 0%. There are no other lights in the scene.
The smoother looking image is exactly the same except that I turned the scene's ambient light to 50%.
I'm also posting two screen caps that show the AO settings. The settings are the same for both renders. The only difference is the ambient light.
Yeah - that's why I said you had to turn it to Best (you have it on Good), turn off interpolation, too. On my computer, that is still faster than having the lights on.
Interesting stuff you two. Sweet!
Thank you EP for this very interesting topic.
Just a remark. On your composition, the ambient occlusion may be too dark (I reckon it's just a matter of opinion :-)).
Anyway, you gave me the idea to buy the book (at least the kindle edition, $10 difficult to miss an opportunity like this)
So, thank you again
My opinion too, the falloff seems sharp. maybe clamp it, or reduce the layer's influence...?
I noticed it was too dark under the table as well. This is really the first time that I messed around with AO, so consider it a beginners attempt. I was actually more interested in trying it in an animation, as all AO stuff I've seen so far looked as if it were geared towards still images, plus it was a great way to explore some of the layer blending options in FCP. I've done quite a bit of compositing, but mostly just straight Alpha channels and layer masks.
I would love to see what others come up with, either stills or video (now that I have the bandwidth to view videos). That's why I started the thread, as kind of learning experience for all of us, or a sandbox to play around in and see what we build.
I might try it, if I can get the time.
I've bought the book and I'm learning so much (for instance, I've never thought of a spill light setting for the sun) that too much ideas are coming at the same time. I just don't know where to start.
I must confess I've been spoiled by Octane render where physical reality is a granted fact so I've never explored that kind of avenue. I must rethink my way of considering lighting.
For anyone wanting to know the purpose of an Occlusion Sandwich
It is a quick-render way to simulate global illumination with indirect lighting.
Ambient Occlusion blocks light from spaces within a scene according to their relationship with other geometry. So a very small, but deep hole would result about as black as your occlusion will create, while two surfaces coming together at an obtuse angle will have a much smoother blending of darkness where they meet.
So, while not actually calculating shadows, it creates a very softly shadowed appearance. It does require a lot of calculations by the render engine but often is set in a way that is much faster to render than soft, raytraced shadows and a lot faster than global illumination combined with indirect lighting.
The thing is, to really take advantage of such a feature, we must layer our images together instead of running a single shot render.
With computers in our homes becoming so much faster with multiple cores and literally gobs of RAM, many artists go for GI with IL. After all, with just a few well placed lights GI and IL can create for you an amazingly realistically lit scene - so long as you set up those few lights properly.
Indirect Lighting (IL) calculates light rays versus anything that crosses their path and determines any illumination being provided through reflection (Some say "bounce"), effectively making any lit object in the scene at least some form of light source itself.
Global Illumination (GI) determines ambient light of a scene according to surrounding colors or even shades of gray. Ambient light helps to fill in shadows from whatever direction the light comes in at, so when it is calculated globally for the scene, you're getting about as close to what real as can be given the same situation as your scene.
So together, GI and IL can work together and provide soft, realistic shadows with realistic reflections of light illuminating anything that comes near enough, which can then also reflect the light back onto something else, even if very little. This all makes for an incredibly realistic setup, especially if you turn some setting to optimum values.
Do keep in mind that even though this stuff is all calculated by the computer, automatically for you, it is still not going to design your lighting for you. But if you have any idea on how to light a scene using methods like three point lighting techniques, the GI/IL calculations will work with your lights and provide outstanding results.
For me IL is vastly too slow to use for my animations. So I often cheat in many ways that I have learned (from the book mentioned in this thread) are well used methods to achieve what I'm aiming for... speed.
Well the Occlusion Sandwich is a way to use my fast method and add a couple more fast steps to the process to get results very similar to GI/IL. Even in the time taken to combine the sandwich into a single clip of video, it should still result as a much faster process. That's the thing that I can't wait to see... how fast is this?
After looking at some of my animation clips with my cheats applied, I'm not sure that I want to add these extra steps. But like evilproducer, it's definitely something that I simply have to investigate - just to see for myself.
I should have saved the render times. The shadowless fill light was stupid fast, and so was the keylight render. The occlusion render was the slowest, but even that was pretty fast on my old system. Under 30 seconds per frame if I had to guess. The AO render pass was generated as a movie file at the same time the full AO render, so I didn't have to wait for the render pass to be generated from the completed video.
Compositing in FCP was also very fast and the render for the completed movie was very quick.
I'm curious to try this with a scene that uses an alpha channel or a shadow catcher. My initial thought is that a shadow catcher object may be problematic. I probably won't be able to try that until this weekend.
Now, something always strikes me when you're talking about the AO render. Am I to understand that the main output render is already multiplied by the AO pass? Just curious, since I would be using the separate AO pass from multi-pass in an AO Sammich ;)
Shadow Catchers.
I'm glad that I'm going for a total CG production. I have had a good experience with Shadow Catchers, but I tend to always prefer real geometry over a background/drop. But you do those awesome composites over camera shot footage. Perhaps one day I'll work in that realm too. I think that AO will see the geometry as geometry and would apply darkness, but only where necessary. So it might work just fine. I guess we'll see, eh?
Now, something always strikes me when you're talking about the AO render. Am I to understand that the main output render is already multiplied by the AO pass? Just curious, since I would be using the separate AO pass from multi-pass in an AO Sammich ;)
I don't know if it's multiplied, though I suppose it could be used maybe as a combination fill light/AO pass, although it could limit the lighting choices for the fill.
Here's the main render and the render pass side by side.
Shadow Catchers.
I'm glad that I'm going for a total CG production. I have had a good experience with Shadow Catchers, but I tend to always prefer real geometry over a background/drop. But you do those awesome composites over camera shot footage. Perhaps one day I'll work in that realm too. I think that AO will see the geometry as geometry and would apply darkness, but only where necessary. So it might work just fine. I guess we'll see, eh?
You can use shadow catchers as Wendy does. Make a spherical render of a complex scene and stick it on either a sphere or in the Scene's Background, then use a shadow catcher on a plane or other object to generate shadows for figures in the scene. Renders super fast.