Vertex Modelling Tut
 franontheedge
Posts: 342
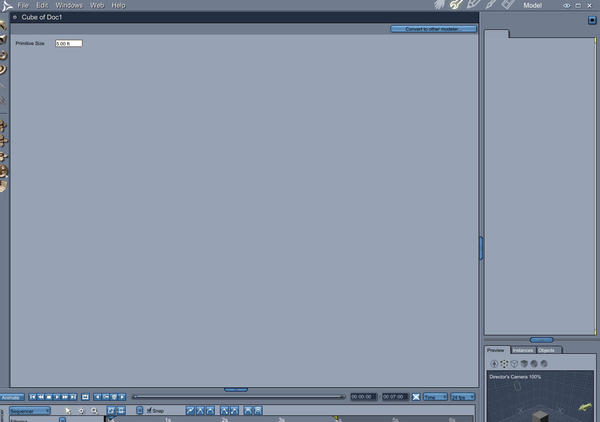
Hi, I'm trying to follow a vertex modelling tut by DimensionT but unfortunately he doesn't explain how to get to his starting point - which is the modelling room with a load of tools across the top menu bar, this is what I see:
Can anyone tell me how to get my screen to have all those modelling tools available that he has in his screen?
P.S. This is the tut:
https://www.youtube.com/watch?v=jPh72xHjFD0


CarModelRoom1.jpg
1266 x 891 - 91K
Post edited by franontheedge on


Comments
You're probably clicking the wrench like I did many times at first.
After you create a new project, click on the Vertex object icon (looks like a distorted globe) next to the cup, then click in the work area. The screen will change to the model room.
Or choose Insert > vertex object. This will open the model room, too.
I still consider myself a newbie (started in October) and am learning the vertex modeler slowly.
I've worked through a few tuts on it and learned a lot. There was often so much (especially at first) that it was a little over-whelming. What I learned was really important was actually practicing and playing with each tool. After working through each tut, I go back and stop at each step, create a new model and play with the tool being discussed at that step. The I started combining things and just repeating and repeating until I get a good feel for it.
Good luck!
Thanks for the reply.
Yes, I did click the wrench. Seemed logical at the time. But I'll do as you say....
er... I did just try that and although a lot of things did change - it still says 'Assemble' at the top right, not 'Model' so where am I now?
I usually play a tut through once (if it's not too long,) and then play it again while trying to copy it. If it's a long one (half an hour to an hour) I'll play a little of it just to make sure I can follow the tutor, and that there's no irritating background music or lack of explanation to drive me nuts, then I'll go back and do it all the way through.
Oh, and DimensionT does do as you just described, but I didn't see what he did with the cursor, I can see I'll have to replay this one a lot. I wish people's cursors were larger, or something.
Thank you.
What do you see at the top?
a few things on the left and then: ball - cup - distorted globe and others
or
nothing on the left and then: ball - something like an "N" - magnet and others
I see what you did. You created a cube in the assemble room and then clicked the wrench (sorry, I said I am still new at this).
The tut probably wants you to create the cube in the model room.
I see this:
Gosh! It makes that much of a difference?
So should I go back and delete the cube and then click on 'Vertex modelling' and THEN create a cube, or what?
You type faster than I can!
Yes.
Delete the cube you made in the assemble room and then click the vertex object icon (the distorted globe) then click in the work area. That will change you over to the model room.
Once there, you will again have the cube-sphere and whatever icon at the top. Choose cube and then click the work area.
Your new cube will look very different from the one in the assemble room (a primitive).
Okay, will do.
You can keep your cube.
Two possibilities: you click on the hand in top left and you edit your cube in the assembly room or you click on the key of mechanic in top right and you find your cube in the modeling room.
Too late, I deleted it.
What's a 'key of mechanic'?
Too late, I deleted it.
What's a 'key of mechanic'?
I think he means the wrench.
There are several objects (including vertex ones) in your scene.
Oh and it does. It looks like it has more verts for a start.
Had a little trouble to start with as suddenly I had such a massive cube I couldn't get a view of the outside, just the inside. I just couldn't get it smaller, try as I might.
Had to create a new document and start again to get a cube small enough to work with.
Sorry, I speak french...
It's the icon on the left side of the hand (right side up)...
I think he means the wrench.
There are several objects (including vertex ones) in your scene.
There were, - I had 2 target helpers. But now I just have a cube with extra verts.
Oh right oh. I guess a wrench is a sort of mechanic's key when you think about it, in that it enables a mechanic to do many unlocking type actions.
I'll try it your way too - with a cube in the assemble room first, - just to see what happens.
Thanks.
P.S. I can order a meal in French but that's about it, so you're well ahead of me. Lol.
PPS. Tried your way but I just can't seem to get it to work at all.
I guess I'll go back and do it with the vertex model icon, click in room, THEN create cube method.
It took me a while to grasp the vertex modeler. As I said above, I found it essential to repeat the same steps over and over to get it into my thick, slow head. I still have tons to learn.
In the assemble room, I click vertex object, click screen, choose cube, reduce vertices to lowest (minus key), hit return to accept and then deselect the cube and start from there. I then model using extrude.
Last week I finally graduated to trying polylines (the icon that looks like an "N", though I first worked through a tut on them in January.
I've just let the video run through a bit more and I can't wait to try out the various spline effects... In fact I just did. Love the method for making wiggly pipes! Weeeheee!
I do have a question though:
over on the bottom right I can see 2 cubes and 3 vertex objects? Yet looking in the scene there's just the wiggly pipe.
Now I deleted the cube, and the spline that made the pipe (but not the circle I used to sweep around the spline) so what are all those things over on the bottom right?
Ahh... that window! Yeah, that confused me for a while.
Go up to Edit > Remove Unused Masters > Remove unused objects.
I saw somewhere that if you delete a lot of objects memory can become a problem so you may need to delete unused masters from time to time.
Dunno.
BTW... looks like you're making some progress!
Okay....
I just tried that - but that option is greyed out - how do I get it to be available?
(By the way - do you have a link to the tutorial you followed on polylines?)
Lol.
Yeah but two steps forward - one step back...
and sometimes it's one step forward and two steps back!
Okay....
I just tried that - but that option is greyed out - how do I get it to be available?
(By the way - do you have a link to the tutorial you followed on polylines?)
To remove those things you need to be in the assemble room.
I have seen several polyline tuts online but I also bought a few tuts at the Daz store to save the hassle of searching. I saw the one you are working through now (just checked). Part 2, too. Can't recall if Cripeman did one... Check for Cripeman on Youtube.
HI Fran on the edge :)
When you insert a "Primitive" object such as a cube,. you're adding a pre-set object,.. (which could be converted to an editable model) but by default, primitives aren't editable as models. they'd need to be converted to another modeller before you could edit it,..
(EDIT / Convert to other Modeller )
It's easier to simply insert a new vertex model....
From the INSERT menu, you should select "Vertex Object",. and that will take you into the Vertex modeller to begin creating a new vertex model.
Once you're happy, you can return to the Assembly room by either closing the vertex modeller, by using the little round icon in the top left corner of the screen,..
Or,. by selecting the "Windows" menu, and choosing Assembly room
you'll also notice that you can select and jump to the other rooms from the Windows menu,... Modeller, Storyboard , Texture, Renderer.
If you already have a Vertex model, in the assembly room,. you can select it and hit the Wrench icon (to edit the model)
Or simply double click on it in the Scene or (Scene Instance list) on the bottom right hand side, which lists all the objects in your scene.
In C8 and 8.5 you can also edit vertex models inside the assembly room, by using the Wrench on the top left of the screen
Hope it helps :)
True, it is the wrench (I know the English word now…).
I looked on your screenshoot and it was a hand...;-P
This wrench becomes a hand when you are in modeling mode in the assembly room. To return in assembly mode, you click on this hand.
HI All :)
In American English,. that tool is a Wrench,. but in the UK it's more commonly known as a Spanner.
Franontheedge
You need to be in the main "Assembly Room" to be able to access the EDIT / Remove unused /
You cannot access that menu from inside the Vertex Modeller.
Hope it helps :)
if it’s a Big or Important project, save regularly, and save with a different file name after you make any major changes or edits.
I always do. Minor ones too sometimes. This is just one more thing to remember to clear up...
Hope it helps
Yes, so I heard from 'That Other Persona' above. But nice to know that the same function can clear other detritus too.
One More Question:
How do I add a loop of verts around my wiggly pipe? I want to firm up each end - where it looks floppy.
Or else 'Bevel'?
FranOnTheEdge