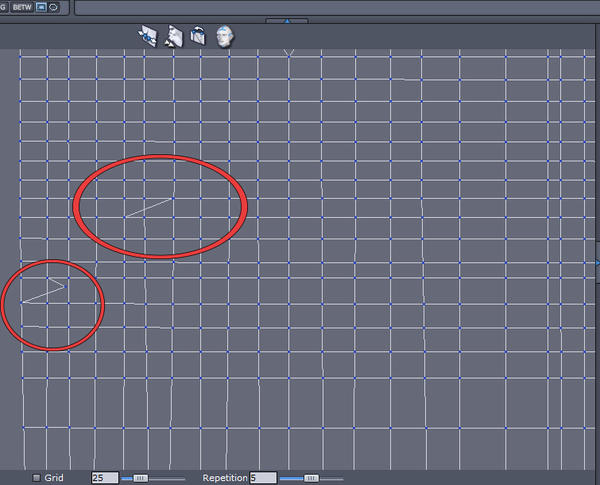
Extra verts in UV mapping
I've run into the UV mapping area of Hex adding in some vertices as I straighten out the lines in a model. Not sure if they are occuring because of skipping a step or doing some wrong methodology. I've tried to correct them by doing some welds but not sure if thats actually doing anything worse to the map. On the surface they don't seem to be causing any trouble. Curious if I should just ignore them or fix?


vertices.jpg
755 x 610 - 221K


Comments
Try going into face selection mode and select the whole map - if those areas show up a darker colour, it means they are overlapping and should be fixed, otherwise you'll get texture distortion.
Thanks, checking out that way they were tears in the model. Interesting the checker looked intact but when you select the faces you can see the tears. Main thing I'm trying to do is bring down some of the distortion in the bust area of materials. I notice some patterns are worse than others when applied. Perhaps applying patterns to the bust is not a good idea. I've had some decent luck with skirt/pant style designs but not so much with female tops.
Can't say I've ever needed to texture a pattern on a woman's shirt, but my gut feel tells me that laying out the UV map in a grid is not the correct method. I'd be inclined to keep it as close to the shape of the clothing as possible - just seems too easy:)
Hopefully one of the clothing experts who post here can give you better advice.
What happends if you just delete those extra edges?
Strangely enough if you delete them over in the UV mapper....as the verts don't show up on the model itself, nothing seems to happen. But when you light up the faces on the model to see the selection in the mapper, missing pieces appear in the map. Seems kind of off I've pulled some model pieces pretty hard by accident and the mesh never tore in the modeling area. Yet apparently you can get tears in the UV area.
Can you show a pic of the mesh in wireframe, with the area you circled on the UV map circled? That will give a clue as to what is going on.
I've highlighted the around where the extra vert appears. Interestingly enough you can click in the area of the extra vert and choose one, but the vert will not show up on the wire frame as selected until both are selected. I may have come one a solution for the issue by using the weld in the UV map screen to put them back together. Seems to work.
I've had few on this particular model than in previous ones. Took a lot more care in pinning and choosing which axis etc to choose. Yet one made its way in. Kind of curious how it happened so as to avoid it.
Thanks for the help
Try going to "Selection" in the top menu and "Select non manifold edges". If that is the problem, the culprit will be selected. Delete that edge and rebuild the mesh in that area.
Not saying that is the problem, but worth a try:)
Fixing it in the UV map has no effect on the mesh, which will give problems if it is non manifold (more than two faces attached to an edge)