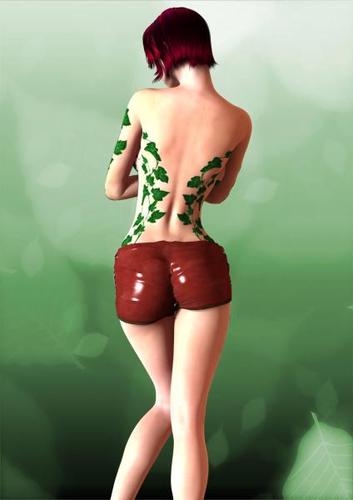
Ivy Tattoo for Genesis Geometry Shell
I've created a material preset for a Genesis Geometry shell that works as a tattoo. I used Adam Thwaites' Ivy Tattoo for V4 and I uploaded it to Sharecg with his permission. The technique is an easy once and done way to be able to create wounds, tattoos and other marks on the body that can be reused regardless of the skin. All you need is Genesis and Daz Studio 4.5+ Check it out at Sharecg
http://www.sharecg.com/v/75738/browse/21/DAZ-Studio/Ivy-Tattoo-for-Genesis-Geometry-Shell-DS-4.5+


133997.jpg
424 x 600 - 21K


Comments
Nice work, it's great to see someone taking advantage of the geo shell features!
Yeah it's an awesome feature. I really feel it's underused.
What is Geo Shell, if it is not too much to ask?
The geometry shell option is found under Create. It adds a layer over a character or object that's basically exactly like that object's geometry, with the same materials and defaulting to the same UV. If you add one to a character like G2 or G1, you can change the geoshell's UV to one that doesn't match the underlying body, so you can use tattoos made for any UV WITH any UV (or use M4 Jewels and Tears layered over G2F and G2M UVs, which I do a lot). It doesn't have some of the issues that LIE layers can have.
The downside to creating products is that it requires the customer to create the shell first, then apply mats to it, and some people won't want to do that or read the instructions for how to do it. I'm guessing that's why there aren't as many products created specifically to exploit its very useful features.
I think it's best feature is the fact that you don't have to explicitly add the tattoo to the diffuse textures with Photoshop. It's like, 3 clicks and it's applied and it's reusable with any UV set.
Thanks, i will try using it as it sounds like thing that i just need and post some pictures if i make something good :).
The key to remember when working with a geo shell is when you make a transparent texture you want to show up, the other areas will show up white unless you make an opacity map.
Ok, thanks, i have downloaded it and i will definitely have to try this. I still don't know what is opacity map, but i have tried using this products and can't say i know how to use them fully yet with hope that i might achieve similiar effects like giving my characters scars, or other skin effects:
1. Subsurface Shader Base http://www.daz3d.com/subsurface-shader-base
2. Grime-Inizer for DAZ Studio http://www.daz3d.com/grime-inizer-for-daz-studio
Currently i am working on a picture and i expect it to be soon finished, focusing on light and depth of field, things that i have recently learned and now trying to use them, and i am really surprized how good it can look. Also i was using this freebie: Male Tank for Genesis http://www.renderosity.com/mod/freestuff/?item_id=73149 and i think that it is great when clothes have additional effects like dirty, or torn like in this one or bloodied too.
I wish i could learn an easy way to do things like that on my characters skin or their clothes and i will have to try to see what i can do :)
Creating an opacity map is easy. Take a look at my freebie ivy tattoo. I took the original image Adam Thwaites created and placed it as the diffuse in png format, so it would be transparent on the geometry shell. It's easiest to start with the Geo Shell entirely invisible with the Opacity on all surfaces turned down to 0. I then took that image and resaved it as a jpg. Then, I took the jpg image in Photoshop, went to Image -> Adjustments -> Levels (In GIMP Levels is just under Color) and drug the middle arrow on the graph all the way to right. This will cause your tattoo or other mark to turn black. Then hit Invert. This will reverse the image. Now take that jpg and put in the map spot on the opacity area. Make sure opacity is up to 100% in the surfaces that you are putting your tattoo or wound. So, all you'll see is what shows up white in the opacity map, which should be your tattoo. Just keep in mind while creating your initial wound or tattoo that you use the diffuse texture as a background so you can get the placement right. Then get rid of it before you save. I hope this helps.
EDIT: You can use this technique to create holes in clothing too, just by deleting parts of the clothes original texture and creating an opacity map for use on the clothing item.
So... In theory one would be able to use eyebrows for v3/m3, v4/m4 or even k4?
Thanks i will try to use it and will report my progress :)
Eyebrows would be tricky. I'm looking at Genesis and hers are drawn right on the face. If it had it's own mat zone, that would be another story, but it doesn't. I'm not sure why that wasn't built into Genesis 2... probably for reasons of backwards compat with Genesis. In order to use eye brows in this way, it's likely your figure-equipped skin would have to lack them, because if they were even slightly smaller, or placed slightly differently, you would see the ones underneath. And placing ones from V3/A3/M3 on to higher generation would be tricky as well. So likely this can't easily be used for eyebrows, you'd still have to change the original skin (unless the new ones are bigger than it wouldn't be an issue... but you'd have to remove them from the texture they are apart of as well.
Edit: Now that I think about it, as long as you are creating the new ones from the scratch and making sure they cover the old ones, yeah eyebrows wouldn't be hard. Using pre-existing ones on the other hand will require a good deal of Photoshop work, but you'll always want to make sure the figure-equipped ones aren't visible. Prepare for lots of resizing and placing lol.
I figured out how to use it and it works nice, now i am trying to figure out how to use texture atas and make something to use with geometry shell. For know i know how to open texture atlas and how to save textures.
Hi, Many thanks for this, it has proved quite useful for me, as I wanted to give a Genesis 2 character a particular tattoo. Using the existing textures(limbs texture map), I worked out the placement (upper right arm), successfully photoshopped the tattoo into place, selected the right arm and created the geo shell. It worked perfectly!!
Until you notice the smaller copy of the tattoo it placed under his chin.
Now how in tarnation do I remove THAT one?!? Lol.
Cheers for any help with this :)
That sounds as if you applied the tattoo map to all surfaces, not just to the limbs and perhaps the torso (depending on where it fell). The Geensis mappings use several maps, each of which will overlap with the others if viewed in a stack, so it's important not to apply them where they aren't needed - just set the other surfaces to full transparent (0% Opacity).
Also you can "stack" Geo shells like layers :-) Check out the "Wet Body Geometry Shells" product here at DAZ :-)
Is there a tutorial for using the geometry shells, or what it can and cannot be used for? I tried using the M4 jewels and even hair with it but it doesn't even attempt to load, as do list things I try? Am I missing something?
The geometry shell option is found under Create. It adds a layer over a character or object that's basically exactly like that object's geometry, with the same materials and defaulting to the same UV. If you add one to a character like G2 or G1, you can change the geoshell's UV to one that doesn't match the underlying body, so you can use tattoos made for any UV WITH any UV (or use M4 Jewels and Tears layered over G2F and G2M UVs, which I do a lot). It doesn't have some of the issues that LIE layers can have.
The downside to creating products is that it requires the customer to create the shell first, then apply mats to it, and some people won't want to do that or read the instructions for how to do it. I'm guessing that's why there aren't as many products created specifically to exploit its very useful features.
Where's my pen and paper? I need to start taking notes, this is good!
Okay, make sure you have the item selected, then click create, New Geometery Shell. You want to parent it to the selected item. Just make sure it's set up like the pic below. The shell is an exact copy of the item, with all the same surfaces and it will pose and move just as the item does without having to be messed with. As a default, you won't be able to select it in-scene so you'kll have to select it with the scene tab, but that's easily changed. Let us know if you have any other questions, goose.