My attempt to create clothes in Blender using SinckleYeld´s tutorial
 Toyen
Posts: 1,911
Hey everyone!
First of all, Sinckle if you are reading this, thank you very much for making these tutorials and sharing the knowledge!
I have been using Blender for only a few days and I was wondering what would be the best thing to start with when it comes to 3D modeling so I went for clothes and I seriously need help : )
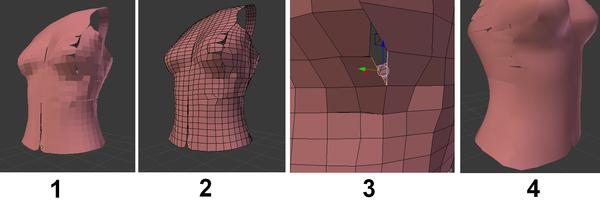
I got to the point where I was almost ready to export the clothes in .obj but when I subdivided the surface it had holes in it and I do not think there is any way to fix this other than start all over again. The clothes in the tutorial had much better wireframe look than mine although I guess it is more difficult modeling female clothes because of the breasts.
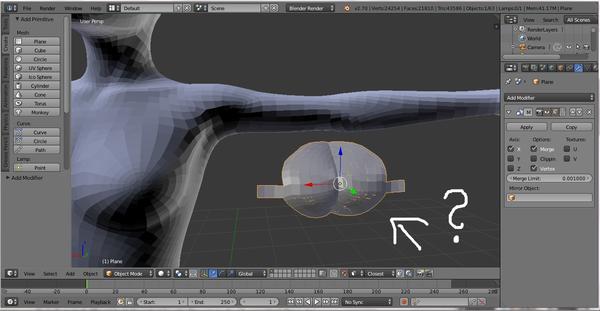
I went for asymmetrical clothes this time but I did try to create a bra but when I added the mirror modifier after the right side of the bra was finished, instead of the mirror creating the missing left side of the bra, it created another right side, does it always create the right side only so I always have to start on the left side of the figure while creating symmetrical clothes? Or am I missing something here?
I wish I could move on with the tutorial but I don´t think I´m ready, I might as well start all over again and try to create a better piece, what do you think?
I included images:
1 - Here is the piece of clothing after applying the subdivision modifier, came out rather ugly with holes in it.
2 - Here a wireframe view in edit mode.
3 - Here I was wondering if there is a way to join these two edges, in the tutorial it says how to create a face between edges but if there is a way to join two or more edges so theit faces stretch rather than creating a new face between them, I´d be very glad if somebody could tell me how to make this happen : )
4 - And here I smoothed it a bit, still full of holes, I also tried to solidify the clothing a little bit but what came out was a MONSTER, so I did not include the picture : D
And I also included the bra picture with the mirror problem as I have already described.
I´d be very glad for any feedback from anybody who worsk with Blender and knows all of it´s secrets : D : )
Thanks for reading and have a great day : )


Comments
Hi Dave.
As for 3.
in vertex edit mode. Select one vert hold down shift and select other. Then Alt-m and merge at centre.
Hope that helps. I might try clothes one day.
Thank you! That works pretty well : )
Good progress there Dave. Sickleyield's the best. Yep, I'm a fan too and was inspired to get to grips with Blender and create content myself.
I've had the same mirror problem. I think Sickleyield does mention it somewhere, but basically it's an issue with the central point of the geometry (the origin) not being at the edge. It's like holding an actual mirror, and the origin point is where the mirror is going to be held, which means you don't get the entire reflection. So you need to move it to the middle edge by moving the cursor there (click where you want it to be), and then you can do Shift+Ctrl+Alt+C and move the origin to the cursor.
I hope that's some help.
<--What Jindi said about the object center. I do mention it, but the tutorial is a huge wall of text and it's not in the pictures-only version; one could easily miss it. ;) </p>
Inability to be succinct is one reason (with unwillingness to do video) that I'd never sell commercial tutorials, I tell you what.
Also make sure you've used Ctrl+A to apply rotation and translation on the mirrored object. None01ohone also is correct; and make sure that you do not attempt to apply subsurf before an object's mirror is APPLIED (thus you won't have the weird splitting in the middle caused by subsurf on top of a mirror modifier).
Thanks very much everyone for replying! This time I went for pants, these were so hard to make and I got to the point where I was about to rig the item.
Let me show you the progress, here are the pictures.
1 - Here is the front of the pants, I tried to place them exactly on the figure at least in the front.
2 - Here is wireframe view after subdividing them once.
3 - The back of the pants doesnt really fit well but I was like nevermind, I´d be glad if the front turns out to be okay.
So after that I exported them as obj. imported them to Daz Studio, had to rotate them a bit because they were lying down, loaded genesis 2 female and place them to the part of her body where they should be approximately. I didn´t go for an exact fit like I tried in Blender and moved on to the transfer utility tool.
I selected the source and the target, I selected the pants option, I checked the smoothing and other than that, I used the default settings that were already checked and here is where the pants ended up. What went wrong? : )
Also, after smoothing they turned out to have holes in them again, is it because I might have forgotten to merge some vert points?
And one more question, when I want to make a piece of clothing that is slightly thicker in Blender, I always try to use the solidify modifier but it always turns out weird, any tips on how to add thickness to clothes?
Image removed
If the holes are in the centre then you may not have enabled clipping in the mirror modifier.
Just wondering also, if it's worthwhile modeling an interior for clothes, and maybe make it 0% opacity.. Would it help when conforming to a figure, ie, avoiding poke through?
I have modeled these without mirror modifier, I dont know if trying to make an interior for these would be the best idea...there must be a way to solidify them just a tiny bit, I hope.
I new to Blender also, I've just been messing about with it for a couple of months. I would have thought that soldify would have worked.
I sure the more experienced users will point you in the right direction. ;-)
It sounds as if you did not model the pants around G2F, or you had a mismatch between exporting the G2F OBJ to use as a guide and importing the pants for rigging. An item you are going to rig must align with the base figure as imported - any adjustments made in DS will be ignored. One fix is to line the pants up, hide or delete everything erlse in the scene, export as OBJ, and then reimport using the same preset (effectively freezing the local transforms).
While exporting the Genesis 2 Female figure from Daz Studio I selected Blender and the size said 2%. While importing the pants.obj from Blender to Daz Studio I again selected Blender but the size said 5000% yet they were the right size, they just appeared at the very bottom of the scene and I had to rotate them and place them on the figure. I deleted everything else in the scene so the .obj file from Blender contained the pants only.
The scales are right, 2% is the opposite of 5000%. It sounds as if the axis settings are different - one is swapping z and y, the other isn't - and that's causing your problem.
When I loaded the Genesis 2 Female figure into Blender, she was lying on the "ground" instead of standing up so I had to rotate her while in Daz Studio she is always standing on the ground, is that what you think is causing the problem? And if so, does this also affect transfering on the pants in Daz Studio?
When you import G2F to work with, you need to make sure you use these settings:
Ngons on
Lines off
Smooth Groups off
Check Polygroups, select Keep Vert Order
Clamp Size: 0
Forward: -Z Forward
Up: Y Up
I'm guessing having her come in lying down is caused by having the Forward/Up settings different from this.
When exporting from Blender, I then use the attached settings. You can create an Operator Preset by hitting the plus sign at the top of the dialogue so you only have to do all the checking and unchecking once.
If your Blender settings are already this, don't use the Blender export settings from DS, try using the Poser one instead. It's what I normally work with, and it causes the figure to appear small compared to Blender's default scale, but that's never caused me issues. I don't THINK DS rotates things on import/export but I'm starting to wonder if it is when that setting is used.
Hey there Sickle,
I just imported the Genesis 2 Female .obj file into Blender with the exact settings you gave me and she is still lying down instead of standing, any ideas why? Maybe I need to export her from Daz Studio again with different settings?
Export from DS with Poser settings and see if it still does it. There is an axis difference between DS and Blender and I'm guessing DS is trying to "fix" it.
EDIT: Or if you're sold on Blender's scaling vs. DS's, change the axis to X, Y, Z in the export from DS settings.
Oh she is finally standing after being exported with Poser settings and imported into Blender, she is rather tiny though compared to the previous one, is that an issue or should it be okay?
That's how Poser scaling is, and that's actually what I normally work with. It won't make the slightest difference because you'll use Poser import settings when getting the obj into DS again.
You'll need to scale her up x10 or so to work with cloth simulation in Blender, but that's the only wrinkle I've ever found using this as my defaults. There are limited situations where cloth sim is the best choice for an export item since a sculpt needs to be broad enough to reflect multiple positions (not just the default one) so wrinkles need to be in more places than they would be on a "real" item.
Thank u very much : ) This is what she looks like after 10x scale, am I good to go now? : )
I probably didn't express that clearly enough (sorry about that, moving boxes all day has the brain functioning below optimal). You only want to use the 10x scaling for cloth sim. Otherwise you'd have to scale it back down to 1x before export to prevent it coming in too large in DAZ Studio.
Oh I see, so I can leave the figure as it is, then I create the clothing after that I scale it 10x and then save it as .obj ? Or am I still not getting it? : D
Look, just ignore the 10x thing, you don't need it right now.
Okay then, I will try to make a simple shirt tommorow and hopefully I will get better results so I can move on with the tutorial. I will post my latest progress here, I really hope I can make it work. Thanks very much for everything : )
Hey everyone I finally have a new computer, two graphic cards and 16GB RAM, I love it! : ) So I was finally able to continue with making the clothes! I finished tutorial number 2 today. I took some pictures so let me show you my progress! Although it´s not perfect I´m quite happy I still managed to make it that far : D
Picture 1 - Here is the basic net.
Picture 2 - After subdividing, it looks kinda fine from the front but....
Picture 3 - .....came out kind of ugly in the back.
Picture 4 - Here I tried to add some folds, I wanted to ask, whats the option for making them go inwards rather than stand out called? I´m sure there is one but I must have missed it.
Picutre 5 - And here in Daz studio....I managed to make the top fit the figure! Yay! I can´t wait to make some decent clothes : D : )
Please let me know what you think and if you have any tips or suggestions on how I could improve, I´d love to hear from you!
Also, if anybody knows how to make the clothes thicker without them turning into a MONSTER I´d love to know that, solidifying always turns them into a MONSTER!
UPDATE: Oops I messed up the first and the second picture, they should be switched. But I think u all know which one I mean in the description.
If you're strip modeling at the size that looks like, I can't for the life of me figure out how you keep getting holes in the mesh, or how the weird flow in the shoulder area is even happening. Subsurface modifier doesn't normally do that.
Nice start on the fold sculpt! The Add or Subtract buttons determine whether the sculpt goes in or out. They're not far down from the top of the panel in Sculpt mode.
Never use solidify on clothes. Well, not except in unusual circumstances you won't have run into yet. It adds unnecessary poly count that will clip with itself when multirez or smoothing is applied. It's more useful on some types of props or jewelry than clothes.
Instead, select a ring of vertices at the edge of the mesh and extrude inward slightly to form a coved edge (e key; x, y or z applies an axis just like with g for grab or s for scale). Repeat on sleeves, neck and hems. Ideally you should do this on the lower-rez version so that it is smoothed when you apply the subsurface modifier.
The reason why its so weird in the back is because I tried to put together two sides of faces on the shoulder and one side had 2 faces and the other one had only one big face but I was like nevermind, maybe it won´t be too bad : D
Anyways, I am reading through the third part of the tutorial now and when you say select your clothing item in Blender and go back to modifiers, do you mean the .duf file that was the result of the second tutorial or should I load that .obj file before it was edited in Daz Studio?
As for making the clothing more solid, the only way then is to create another inner layer in Blender I guess, right? Do the more advanced programs like Zbrush handle this better?
Thanks again and have a great day : )
Generally you don't want most clothing to be double-layered - just double up along the hems the way SickleYield described above. If you do double it up you are asking for self-intersection during posing and morphing, and if you (or another users if you share the result) apply a transparency map there will, at least in close ups, be a visible gap between layers around the trans-mapped hole - it's also a waste of polygons, and possibly a space-hog on the UVs. There are exceptions of course - cloaks or open coats say, where you would expect to see a differently coloured lining, though even there it's possible to use a shader trick to give the inside and outside of a single-layer mesh different material properties.
Okay I needed a break from the clothes so I tried hair, this is an unfinished WIP that needs a lot of work but I have yet again ran into a problem, after I rendered this I change some things a little bit and wanted to see what the hair looks like but its not rendering even though it is there, anybody has any idea why?
What is not rendering and how? The hair is there in preview but gone in render?
Yep the hair is there in 3D view but when I click on render, only genesis renders without the hair. Also I tried to turn this hair into a mesh and export it as .obj and open it in Daz Studio but it didnt work for some reason.
Not sure if this is really relevant, but I've had what looked like holes only to discover that the normals were facing inwards instead of pointing outwards. You can check in edit mode, hit 'N' to bring up side bar, scroll down to 'mesh display', there you'll see a small cube graphic under 'normals'. Select the face/ RH side button when in face mode. This will show you which way the normals are facing. (make length shorter if it gets to 'busy' looking.