Using Carrara Render Layers in Post Work - random thoughts
 Headwax
Posts: 10,098
Headwax
Posts: 10,098
Not sure how many of us are using native Carrara render layers to boost our post work?
Maybe we could share our thought processes onhow to use them?
Idea is to encourage other users to work with Carrara - it, after all, has so much to offer straight of the box.
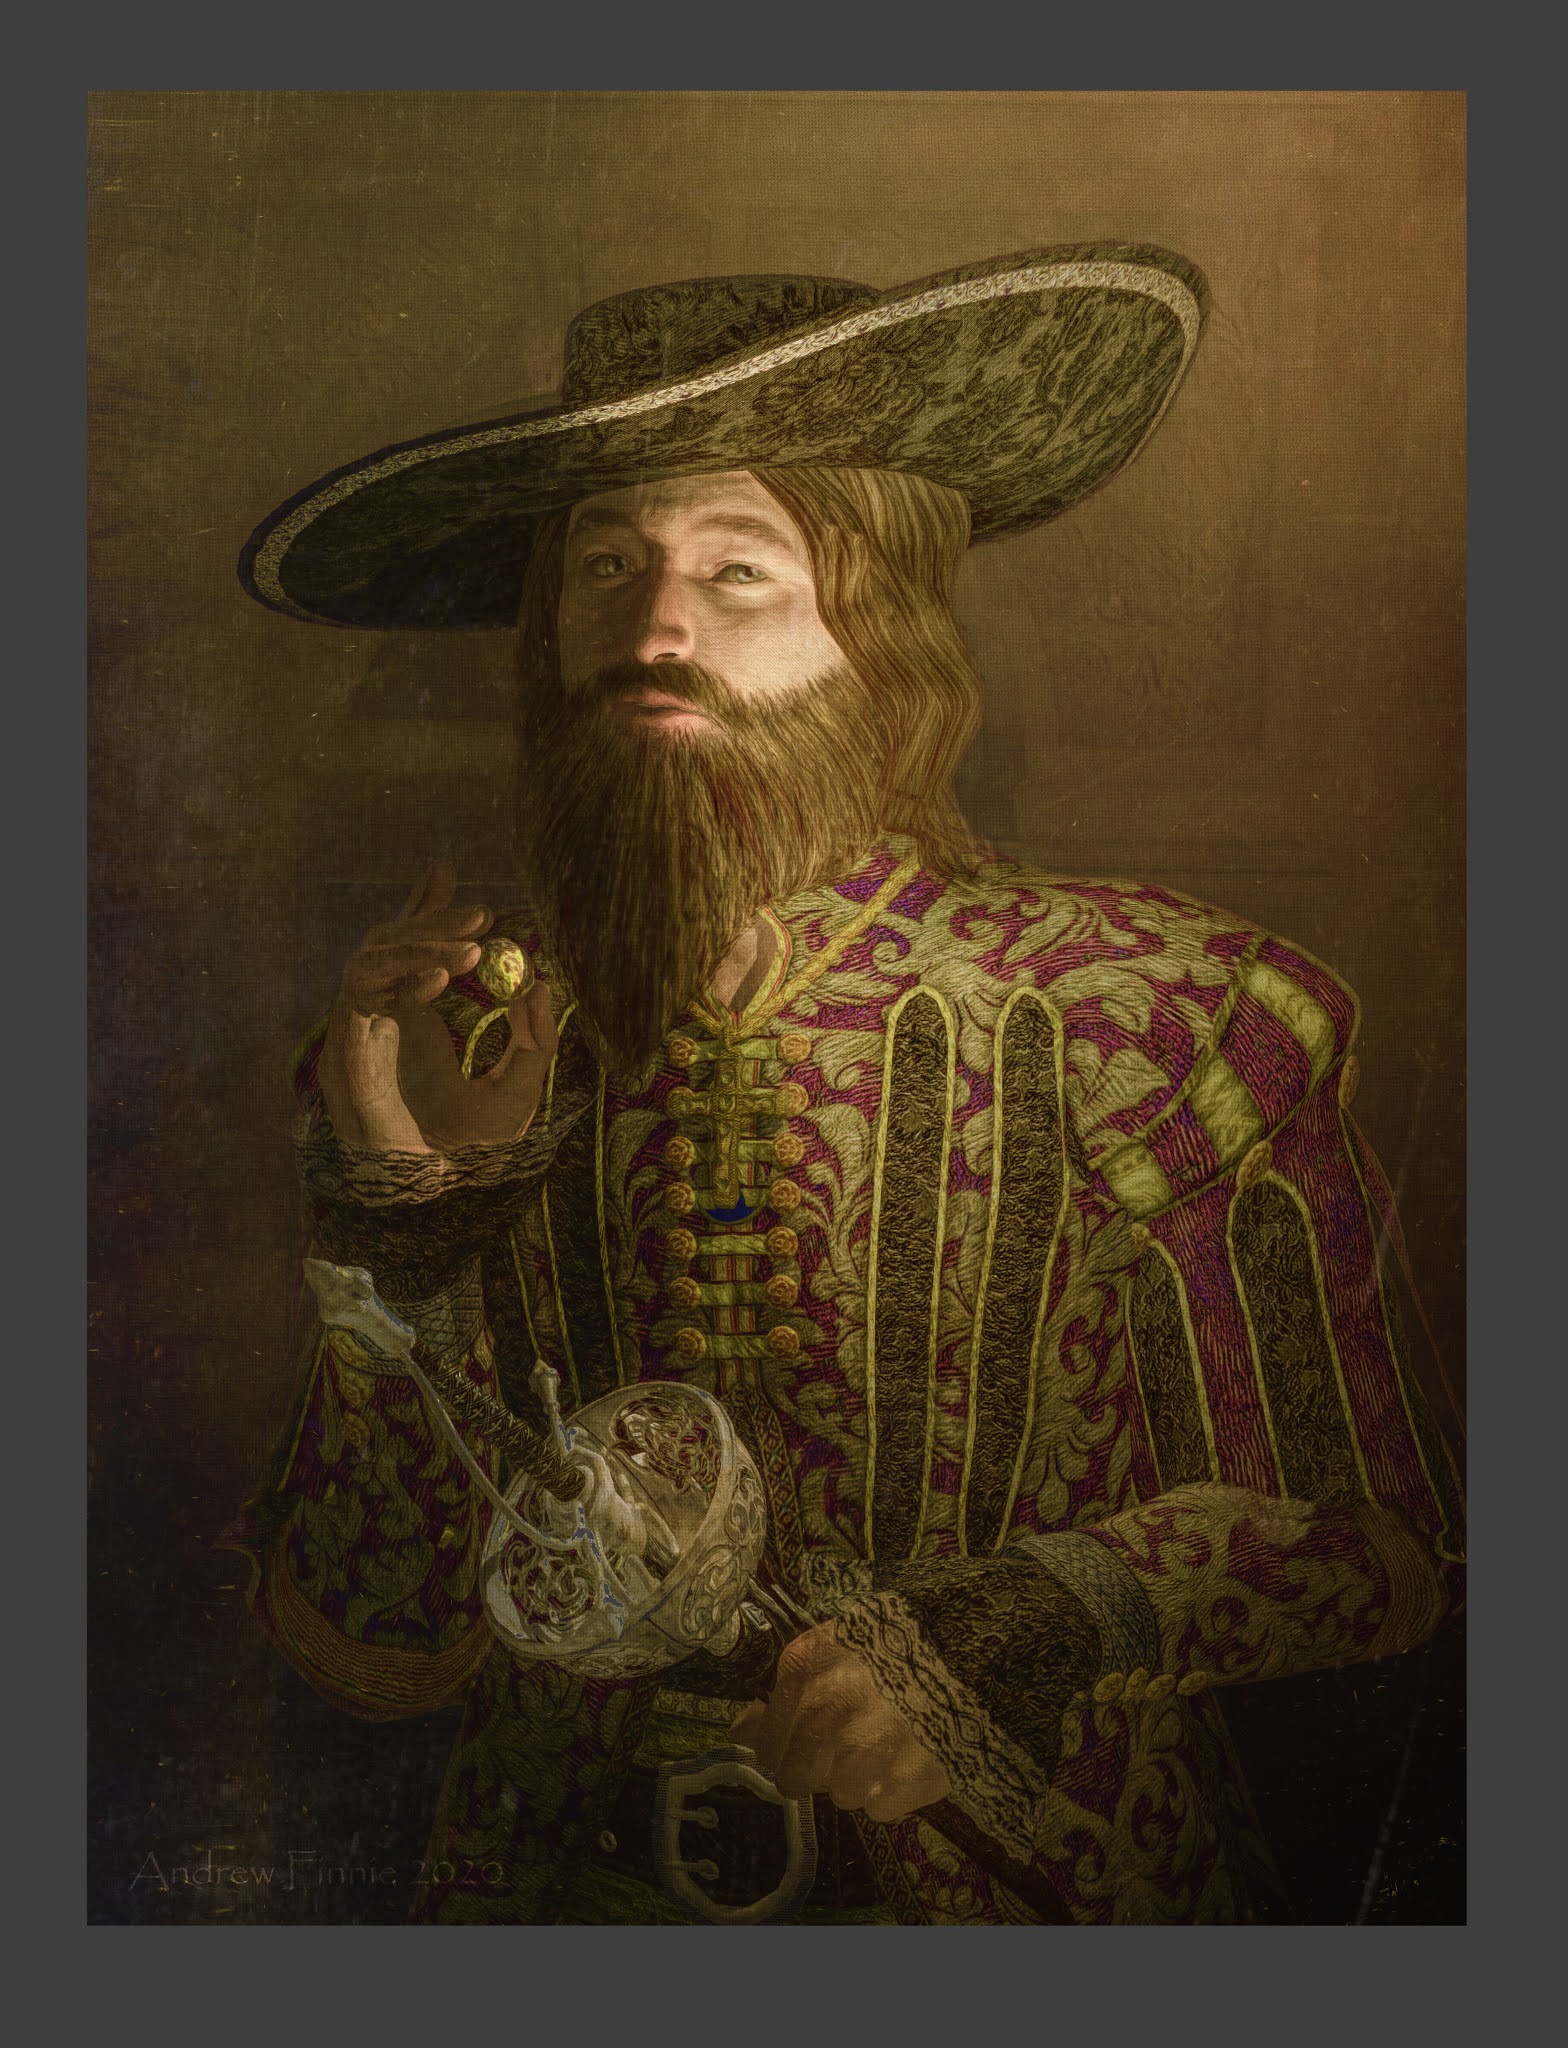
Here's a portrait I finished today of Aramis. Also added are some of the render passes I outputted in case they came in handy.
I used Topaz Impression for paint effect, Topaz Simplify to simplify, Affinity Photo for Tone Mapping, Topaz Studio (Free) for a bit of a grunge texture) Fotosketcher to get a canvas texture Photodonut to get some lines and textures
Photoshop Elements to put it all together.
In Carrara I also rendered out a separate building shot to put behind the character .
Tone mapping - if you are wondering why, Affinity tone mapping means you can compress the tonal range but at the same time increase local contrast (the trouble with CGI is that you have an enormous an unnatural tonal range)
As far as the render passes, when I look at a render pass I ask myself - what can I use this for :)
Finished Image Follows
Original Png

Render Passes
Daz 3D is part of 
Connect
DAZ Productions, Inc.
7533 S Center View Ct #4664
West Jordan, UT 84084
Licensing Agreement | Terms of Service | Privacy Policy | EULA
© 2025 Daz Productions Inc. All Rights Reserved.
Comments
Render Passes - if you open them in a new tab you can see their names. If I dont get a chance to post them all I'll come back tomorrow and finish.
I didn't use all of these in my post work but I like to keep them handy - just in case.
Ambient
Coverage
Depth
Diffuse
Material Diffuse
Normal
Object Index
Position
Shadow (not sure why beard is screwed up)
Specular
Uv
Velocity
Toon Pro
Placeholder
First random thoight - if you are wondering why render a normal pass to use in photoshop in post - you can use it to pick up clean lines in the image
here we have Photodonut filter departing trains applied to the normal pass. It's great because it is making highlights and shadows and also picking out eye wrinkles .
dont worry the highlights and the shadows are in the wrong places - you can always invert the image
Excellent thread! You have been preaching render passes for years. Explaining the value of certain passes is very valuable, thanks.
But for me, the difficulty is in actually applying the passes to the render. There is a skill involved. I think that it can be taught, but I have not yet seen a tutorial which actually goes through the process. In other words, the specifics. Yes, there are esthetic choices that must be made, and esthetics may be impossible to teach - how exactly to "dirty" the image. For that reason, I will likely never be able to replicate the exact quality of your work. But basic techniques are surely teachable.
It's like opening a closet door, and the ocean is on the other side. I think to myself, "Wow, what a great ocean," but it is so big that I end up doing nothing with it.
Just being honest, and not critical of your efforts at all. Your stuff is incredibly inspirational.
Thanks UB :) ah i know you are not critical.
I think making picturs is about learning the rules.
the art is breaking those rules ... maybe. But not too many at a time otherwise you out pace the audience.
and that would e bad because, after all, at heart, arent we entertainers... if not just for ourselves as audience?
one great rule by a famous illustrator is that get the face and hands right and you will be forgiven for all the rest.
so, for example, if we dirty the image thats fine, ut if we get a blob right on the protagonists eyeball then thats probably not good. Also if the grunge obscures the meaning then perhaps we have failed?
sorry about punctuation ipad keyboard leaves lot to be desird for lazy typists
will post more stuff later, random stuff that might help, have a look at waterlogue too, low res but not bad and quick, we need quick so we can make more mistakes and learn more quickly !
Normal is also useful for deformation on a further pass through Carrara, I think. Here's a spherical cave I did using the Badlands Cave System presets
Here's a beauty pass
...and I was going to try using a normal map in the bump channel on a sphere. Not sure if it works for deformation or not. Here's the normal map
These are all 8000 x 4000 renders if any of you want to download them to try some spherical background effects with them. Next post I'll summarize what they are
...continued
Ambient Occlusion Pass
Atmosphere (Realistic Sky Fog)
Color Pass
Depth Pass
Normal
UV Coordinates
Material Diffuse
Actual Render 01a
Render with Ambient Occlusion
Background Sphere Basic Instructions:
Extra Credit
...A Quick Look inside DaVinci Resolve in making Introducing Rosie 5
I was a bit timid on using the node-based workflow in Fusion. DaVinci Resolve 15, which now includes Fusion in its own page, seems to be a lot easier for a newbie like me to use. Now it's just a matter of dreaming up what to do and just do it!
Here's my first tiptoe steps into it
You'll see how I render the scene and the characters in the same scene with the same camera, but in separate renders. The same can be done with any of Carrara's many effects - or even doing other renders using GMIC or whatever you want.
very impressive Dart - especially for a first go!
now I have the sphere shaded do I render it with a spherical camera - not sure where you are going with this in relation to postwork?
Watching with interest !!!
Thanks Headwax for bringing up this topic once again, it's absolutely fascinating what one can do in post.
First off, for those who missed it, you wrote a concise PDF tutorial available here:
https://www.daz3d.com/forums/discussion/272046/how-to-simple-uses-for-carrara-render-passes-in-postwork
Second, for those brave souls who can wade through personal insults and virtual pistol whipping, 'legendary' forum member JoeMamma2000 provided for us detailed explanations and examples of render passes here:
https://www.daz3d.com/forums/discussion/54406/compositing-and-post-work-what-is-it-and-why-should-i-care/p1
Third, you also started an inspirational informative thread demonstrating how you create some of your exquisite images using render passes here:
https://www.daz3d.com/forums/discussion/158646/carrara-non-photo-realistic-works/p1
Meanwhile...
Carrara's Multipass Rendering allows us to break down the Beauty Pass into basic elements and / or create specific mattes we can manipulate in our favorite post processing software to enhance (or intentionally wreck) our images.
Dartanbeck said::
> ...and I was going to try using a normal map in the bump channel on a sphere. Not sure if it works for deformation or not. Here's the normal map
Dartanbeck, cool, cool but...is that the Normal pass from the Multipass Render options?
A Normal map is used to add high detail to a low poly mode, eg, sculpting detail onto a sphere and exporting a Normal Map via Baker and using that in the Bump Channel of the Shader of the low poly model.
A Normal pass is used in post to manipulate lighting based on the Normals of the geometry of the model / scene by isolating the R,G, or B channel(s) and creating an alpha matte.
That's how I understand it.
I have to get ready for work right now, but can't wait to get back to this thread to create some simple examples. (I know, I know I, can be flakey...)
Ya'll Rock!
Thank you Headwax for the examples and for your continuing contributions on this topic.
Thank you, DesertDude, for collating additional information and providing links.
I also watch with interest.
Excellent information. If I ever take a break from animations, I'll get into this ...
Sorry, double post ... this forum is acting weird ...
Nope. See, when using Gamma Correction = 2.2, background/backdrop images do Not get automatically degamma treatment, like all other image maps do - so they become washed out.
Use this sphere as a background for your scene. It will add to Global Illumination, if used as well as Indirect Lighting. But otherwise just makes for a nice background to work with - and it can be animated, scaled, rotated, etc.,
Further, we can introduce other maps that I've included in many different ways for many different effects - even psychedelic.
Ideas:
Operations > Mixer will give two sources with a shader channel for blending the two. Use any of the maps as the blending shader and any of the maps (or something completely different) in the two sources.
Try the Normal map in the bump channel, set to Normal Map and crank bump amplitutude up to 100
Use Multi-Layer Element features to add the Ambient Occulusion map to the color channel
Try the Depth Pass as the blending shader with source 1 as black or None, and source 2 as one of the two renders. This will make the texture fade to black the deeper it goes according to the depth pass.
Overlay some fractal noise using the Atmosphere pass
Perhaps go on an acid trip by blending Normal Pass with UV Coordinates pass using Fractal Noise as the blending shader!
======================================================
I use the Glow channel as my color channel, so that I don't have to use lights on it. It simply uses the shader as the scene illumination. The effect varies depending upon whether or not we also put this into the Color channel, which is my default method. I normally have a map multilied by itself in both Color and Glow. I use the Source 2 map in the multiplier to adjust darkness if it's too bright.
I also experiment a lot with using any sort of map as the controlling shader of a color gradient, which can make some very interesting results.
What does this have to do with Post? Well.. using a sphere like this renders incredibly fast!
I can plunk any sort of extra scenery, vehicles or whatever into this sphere, set the camera to perform the same as my beauty pass of an animated character, and render out this backplate element. It renders quickly and can easily be customized for the scene I'm creating the backing plate for.
I assume that you are talking about things like exaggerating a perspective to heighten tension. Sounds reasonable to me.
Are you referring to the Loomis book? A friend told me of it a few years ago. I need to work more on both hands and faces. ...and the grunge. :)
@Bunyip02 me too ha ha - bitten off more than I can chew
@DesertDude thanks for those links - I was going to bring up Joe's thread eventually after we all took a dose of valium ha ha :) But seriously, great stuff in that thread
very interested to see this in action DesertDude !
@Diomede pleasure - anything to show what great software Carrara is (almost) out of the box!
@Steve K it's terrific to see you and Dart holding the animation banner up high - you must be both very patient to be animators
@Dartanbeck thanks for that explication - I'm very interested in working methods for using the UV pass to change an object's textures - just not sure how to do it easily in my available software which is affinity photo.
Great idea on the textured sphere - can't wait to explore this
@UnifiedBrain yes, and yes - sorry I couldnt find who said it - when I google it all I get is covid19 handwashing techniques! I thought it was Norman Rockwell
rules might be anything - eg you can use any colour you like in a painting as long as you maintain a restricted tonal range - once you step out of that comfort zone then you are pushing the boundaries
I was thinking of Indian miniatures where the most important person was the largest (aegyptian as well? ) If you broke that rule you would 'lose' your audience because they wouldnt know how to read your image
Here's some simple stuff that I guess everyone knows -
1) When doing a lot of passes it's a great idea to name the file before you render
Otherwise you will be spending a lot of time typing when it's time to save all those passes.
2) You can select a lot of passes by holding the shift key. That way you can activate or deactivate them or delete them without having to click each box.
In PD Howler, we can use the results of multi-pass render options as selections, which is very useful when we need moving selections for animations.
You may have seen this video before.
It demonstrates how I intend to use Fluidos, and this was made long before Fluidos 2, but that's not the point.
The point is this:
I have my character running through a room with a watery floor so I need water to splash as she runs.
If I were working at a big VFX house, do you think I'd run a liquid simulation on the floor so my character splashes as she runs through?
So how do we do it?
So right from the start, I have intended to use Fluidos as a fluid simulator to create the effects that I can use in post efficiently. Now, I'm still very new to compositing and a lot of the techniques behind it. I study it, but haven't had a lot of experience yet - especially when I made this video.
In this video I demonstrate how I will use Fluidos in Carrara to create my water splashes and other effects. I'm just kinda talking through it unscripted. I've learned not to do that anymore going forward - just so you know.
* I could have simply done the composite in PD Howler as well, but I wanted to spread it out to other packages for the demonstration
I forgot to mention: I was using the term Stock Footage loosely. The footage I made was actually specific for that scene - I even made a spherical render of the room to be used when rendering the fluid simulation so the water matches the original footage it's being composited to.
I realize that I get stuck in what I'm trying to say in the video, which is highly frustrating. Once I learn Fluidos II, I'll make a new, better video with better, more practiced techniques.
Very Cool! See, I don't truly understand entirely. I mean, I realize the process of creating normal maps from ultra-high density models to lorez, at least somewhat, but not how the multipass normal output works. When I saw it, it looks like a normal map, so I wanted to try and use it for visual deformation.
The thing is, in the example I was giving with the background globe, we don't really need to deform it at all - it's just a matte painting. Hmmm... used to manipulate lighting eh? Interesting!
Thanks for the cool resources! I remembered some of them when HW made this thread, but didn't look into them.
...and You Rock!!!
ha ha great stuff Dart - wow, your mind is an encylopedia !! you and Wendy could take over the world :)
looking forward to seeing your fluidos work!
out of interest here's that link to the normal map comparison with bump - though it has nothing to do with your background sphere - btw the way those cave images you posted were amazing
https://www.daz3d.com/forums/discussion/144721/bump-and-normal-map-comparison-examples-in-carrara/p1
Here's a play I had today. All the images were rendered with 100 percent ambient. Bare in mind I am designing these images so I can work on them in post.
I know that we are not supposed to use much ambient - but I don't agree ! (looking for a quick way to render and also looking for an illustration style)
There was one light source (a bulb). I was looking at doing a shadows pass and overlaying it on either the clean pass, or the ambient pass to demonstrate what you could do with the two layers.
Anyways the shadow pass turned out like crap (i'll go back and do it with a distance light) .
It was howevere good for selecting highlights and darks so I could make the shadows more eg purple. etc. You could also add a gausian blur to make it more subtle.
I did get some happy (unexpected) results though by changing the gamma settings.
The low gamma setting of 1 gave me much more detail in render diffuse render passes, than did the gamma 3 setting. Though it blew out the highlights in the 'bare render'.
The pictures are big if you want to click on them.
Looking at the gamma 1 diffuse render pass gave me what looked like a great start for the shadows - they were soft and pleasing.
I knew I could use them to work up the 'bare render"
Oddly they didnt seem to have much to do with the real shadow pass.
Luckily because, as mentioned, the shadow pass was ugly.
I am not sure where Carrara is getting the data for the darks in the diffuse pass?