COF Beaded String (Daz and Poser)
 Seliah (Childe of Fyre)
Posts: 336
Hey guys,
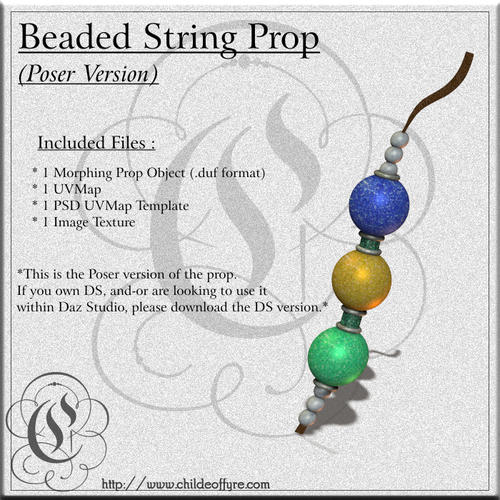
I made this for use with one of my character designs/concepts. It was made originally for placement up against/within hair objects, but I've found it useful in some other areas as well (hanging off belts, bags, bracelets, jackets, etc...).
Requires manual placement, loads in at center and on the floor, at about 25% human scale. Use trans, scale, and rotate dials to position and scale according to needs.
It does include some (not very good, I'm sure, but hopefully helpful) movement morphs (one of which is visible in use on the promo). They mostly just affect the string, give it sort of a winded appearance, that kind of thing. Go very gently on the morphs; values over or under 1.000 tend to do some unsightly things to the shape of the beads and the string itself.
There are DS and Poser versions both, so download the one you need.
I included the UVs for those who prefer to make their own textures. UVs are in two forms, one is just the standard black and white texture map, the other is a layered and colored PSD file for those who might need or want the added guides in terms of what goes to what part.
Enjoy, folks.
Website :
http://www.childeoffyre.com
(It's in PROPS on the LEFT hand side navigation menu.)
ShareCG (Poser Version) :
http://www.sharecg.com/v/77677/gallery/11/Poser/COF-Beaded-String-Poser-Version
ShareCG (DS Version) :
http://www.sharecg.com/v/77703/gallery/21/DAZ-Studio/COF-Beaded-String-Daz-*FIXED*


Comments
Ohhhh, this looks useful. Thanks Seliah.
One of those useful little thingsd that you never knew you needed till you see it. Thanks.
You're welcome, guys. =) I'm actually trying to make this 'somewhat' modular... I'd like to be able to put out a set of them with a string and separate beads that folks can mix and match, but I"m working out how to do that so that the textures work on all of them, as the only way I knew how to do this was to save each of the objects separately out of my modeler, and thus... they were uv mapped separately. *winces* So I might end up just releasing the 'modular' parts as a separate set and make note that the texture from the string up above won't work on them, as they were uvmapped separately.
I'm also working on doing some other shapes of beads, and some feathers as well to be able to use on them. I find myself often in need of just random little bead strings and feathers to hang on things, and have never been able to find them except as part of other props, such as hair objects or headbands, etc. So, I figured to release this one, and if I can get the others working the way I want, I will release them as a separate package as well. There's often a need for just little accessories to add into outfits, hairs, and whatnot. I find it to be good practice with modeling, too, though I still end up doing this in Wings no matter how many times I start in Hexagon, it seems like. LOL
Thank you for the beads, and I just wanted to give you a heads up that the Poser version on your site links to the DS download instead of a Poser version.
Also, if you wanted to do a modular set that incorporates the texture set above you could try and combine the objects in Wings3D, and combine the mapping (stacked with a numbering system such as V4/M4; 1_Torso, 2_Limbs, 3_Head, etc. where you save out each set for painting/texture sets, or a multi-prop shared UV where each prop has a dedicated space on the map, and you could bake your bigger maps to the smaller map parts).
After you are finished with your mapping work, just separate the props and export the appropiate ones per set as you have previously done with this prop.
I downloaded the DS one from your site, so I am off to check it out. Thanks again.
Rargh! I'm so sorry! I have fixed the link now, so it will get you to the Poser version properly. I have no clue how I missed changing the download link on that page! Thank you for letting me know, I didn't realize the link was wrong. *headdesk*
As far as the mapping... I don't actually do my mapping inside of Wings... and uhm... most of what you said up there is greek to me. -_-;;
I have no clue what any of it means. I model the objects and export them out as obj's, then open the obj's in UVMapper and map them from there... that's my usual workflow. I do not understand the uvmapping functions of Wings OR Hexagon, they're awkward at best, and completely foreign at worst for me. So I always wind up just exporting the objects out and doing the uvmapping in Steve Cox's old uvmapper...
What a useful little thing for hairstyles! I enjoy the beads from Damaris Hair very much and now I can recreate the effect. Many thanks.
Seliah,
Secondary issue; The DUF in your DS version is only a Scene Subset, and requires the original PP2. If the Poser version is the PP2 (It should be unless you created as figure CR2, but I suspect it is PP2) I can just retrieve it from that version (I'll download after this post). You will still need to fix the DS version for others who only wish to download that version alone. (I've attached an image at end of post showing the DS error)
Regarding the UV mapping; Just wanted to give you alternatives. Stacked mapping is used on meshes such as Victoria4/Michael4. They are all layed out on a square grid within UV space in layers on top of one another, but layed out in such a way (and number coded for easy retrieval) that you can extract only the UV set needed per body part for texturing. In UV Mapper you would select by Material everything but one numbered set, and hide all selected leaving only the one numbered set visible. Next, you export the map making sure you select do not export hidden.
The other way is for multiple props sharing one map, but all having their own dedicated space. Some of Valandar's weapons are a good example of this technique. If you have any Valandar weapon packs, I would suggest you check out how he did the mapping if you are interested.
You can do all your mapping the way you like to in UV Mapper, but you can add to your work-flow to import the UV'ed meshes into Wings3D just to use the Auto-UV module for easier stacked or dedicated multi-prop placement with combined props.
The OBJ contains any UV mapping data you assign to it no matter what software you open it up with after mapping. Some software is just easier to use to manipulate placements/rotations, etc. For multi-prop UV combining I don't think UV Mapper can import and combine multiple props, so you might have to find another solution if you still wish to pursue something like this. You have Wings3D, and I know the techniques work there. Hexagon, I don't know, but it might be possible in this software as well.
Alright. Let me deal with the asset error first - again, my apologies. I am still figuring DS out in some ways (my native program is Poser, only really been using DS with any regularity for the last couple of months in all honesty).
I thought I had saved it as a Prop asset... rrrgh. Let me fix that first... and then I will dig into the uv mapping some more. Been pulling up tutorials for Wings uvmapping and the like. I doubt the little uvmapper I've been using can combine multi-props or objects, no. I don't think that was ever in it's capabilities.
Give me a few to fix the DUF mistake. Rargh. I tested like crazy, too... but I only have one rig to test on, and yes, the original file was a .pp2 prop file, so if DS went looking for the .pp2, of course it would find it in my Poser runtimes. *headdesk* LOL
I'll note the update once the DUF file is fixed. Thanks for letting me know.
Okay... let's try this again, eh? LOL
I re-saved it out as a prop asset through the correct menu. I removed the .pp2 from my Poser runtime entirely, closed out Studio, opened it up again, and then loaded the bead prop. If I've got this right... removing the original .pp2 file from the Poser folder WOULD have given me that error when I went to load it after the re-save if my save format had been incorrect.
I did not get such an error (loading the re-saved object while the original .pp2 was residing on my desktop and NOT inside of my Poser runtimes anywhere). So I am going to presume that the DUF error is fixed.
Now that I feel like a complete goof... =) I've uploaded the (hopefully!!) fixed DS zip file with the re-saved prop. Just overwrite the .DUF file with the one in the updated zip file.
Please let me know if it continues to spit out any error messages, but I think that was all it needed, was a re-save in the correct format. *mumbles* Having the various file types carry different file extensions in Poser is sure very helpful in stuff like this, I swear. A .pp2 extension is for sure very clearly NOT a .cr2 extension, for instance.
Anyway - I think that will have fixed the DS format error. Updated the file on ShareCG and the one on my website as well.
It seems I also forgot to include the DS data directories, on both this AND the mug prop. Windigo gave me the heads up over on ShareCG about it. I am in the process of updating the zip files. The bead string here HAS been updated to include the missing data files now, though. I'll have the mug updated shortly with it's missing data files.
My apologies for the goof-ups... I didn't even realize that DS made the data files automatically with object items like this. I'm so used to Poser where we have to manually save out our OBJ files to the Geometries folder if we are using external geometry... rargh. SO sorry, guys. This will not happen again.