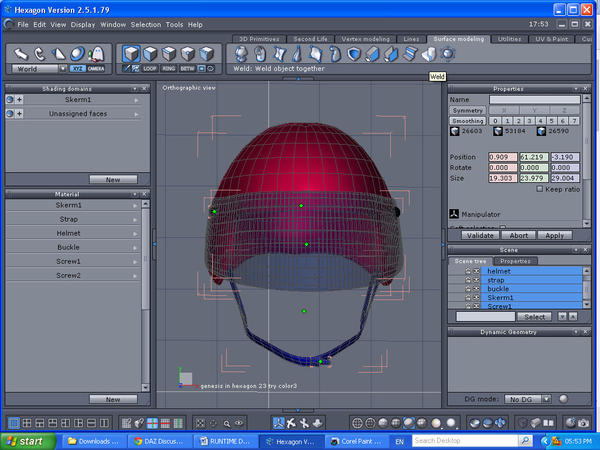
Try playing with color but can't weld keeping color!
 launok
Posts: 793
Today I have tried playing with color but obviously I am doing something wrong. The moment I try to weld all the pieces as I had done before, now with color, it goes back to grey as before (losing color). Can anyone direct me here on how to keep the color after welding the item as 1 model?


HEX_COLOR_PROBLEM_1.jpg
1024 x 768 - 193K
Post edited by launok on


Comments
Hi Laura, glad to see you have not given up on this project, I think its coming along nicely.
When you weld all the pieces together they become one object, with no colour, you select a face then press the Shift and + key to grow the selection until all the faces of that part are selected, add a new shading domain (name it) then rename the material it created. Repeat for the other parts.
This seems a long job to do unless I am misunderstanding you. The helmet for instance is the largest item and have quite a lot of faces and it's roundish. Do I have to do the 'shift and + key' on every face of the helmet of which there are faces galore!!? I have tried that, but if I do something wrong or clicking wrong, all the already 'grown' faces (blue ones), disappear and I have to start all over again! :smirk:
When I had done the glass screen on it's own I haven't used this key combination. I have followed a tutorial by Roy on the making of the screen part and added material as described, but have to go and check it up again. So many things going through my mind, I actually can't keep up! :-)
Holding down the shift key and the + key (the plus key on the number pad) at the same Hex will eventually highlight all the faces.
I've just tested this using the original helmet - no welding, just giving each part its own material. It imports into Studio fitting perfectly onto the head, with all shading intact. Parent it to the head and it follows the pose without problem :)
One thing I couldn't get was a nice shine on the helmet - but then I know next to nothing about Studio's shading system - did try different settings and shades in the surfaces tab, but it remains stubbornly flat.
In D/S further down the long list on the Surface Tab is the option for what type of shine one wants. There's gloss for plastic, gloss for metal, matte for whatever, etc.
I have on many occasions had several groups each with their own color, welded the groups into one ... and the colours stay.
Checking for holes may or not zap the colours.
Edit > undo will zap the colours.
Welding, even though the colours may stay, will definitely zap the uvmap. As it's easier to start a new uvmap with no colours, that they were zapped for whatever reason may have been a good thing anyway.
Once the uvmap is unfolded, then one can re-assign the Shading Domains and fix the colours.
It helps a lot if the materials are named exactly the same as the Shading Domain. Esp. if reimporting said object back into Hexagon. It does have its own way of doing things with materials. Sometimes the colours might look the same but are actually still all in the separate shading domains. Something to do with memory and default materials from "any" program present in the project file.
Thank you Patience :)
I've managed a nice sheen on the visor, strap, screws and buckle, but the helmet remains stubbornly matte :)
Roygee, on the right pane you have Surfaces, on the main panel you'll have Preset, Editor and Shader Baker. In the Presets tab you'll find "DZGlossy", with your prop selected, choose that shader and then goto Editor (main tab again) open up your prop and go down to General where you will now find the Glossiness dial.
If one of the shaders doesn't fix the matter, check also for any attached images and remove them. Check opacity. Sometimes glitchy little things happen between the programs.
? any chance the faces are reversed?
Thanks john - that setting gives a sort of specular sheen, but very artificial and contrived - not at all the natural highlights I'm used to in Carrara and Blender.
Not that it really matters - i don't use Studio for renders; was just puzzled that I got good, natural highlights on the visor and screws without any particular settings. :)