Wings 3D Triskelion Tutorial
 Fencepost52
Posts: 509
Fencepost52
Posts: 509
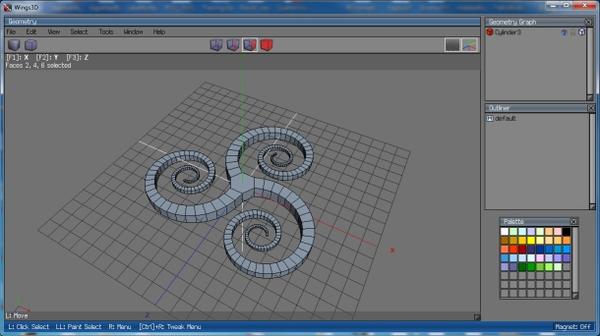
I prepared a pdf tutorial for creating a triskelion shape as shown in the screenshot below (a video tutorial is forthcoming). Experiment with the various sweep settings and see what other cool shapes you can create. Try adding a number in the 4th slot of the sweep settings to get an additional twist. :D If you're not into the whole modeling thing, I've included an obj/material file of the model to use as you wish.
https://www.dropbox.com/s/okzk3eoy78l8sj0/TriskelionTutorial.zip?dl=0
The zip file has been scanned for viruses, but I always recommend you do that on your end as well to ensure nothing happens. Hope you enjoy the tutorial and make sure to post your renders.
Art
Daz 3D is part of 
Connect
DAZ Productions, Inc.
224 S 200 W, Suite #250
Salt Lake City, UT 84101
Licensing Agreement | Terms of Service | Privacy Policy | EULA
© 2024 Daz Productions Inc. All Rights Reserved.
Comments
Thanks for the tutorial, it looks interesting. I use Blender and not Wings3D, but I can't see my not being able to create it, though with different tools and methods.
I also use Blender for custom shapes, but I gotta say: some of Wings3Ds functions for replication and mathematical symmetries leave Blender for dust.
Thank you for this tutorial. I don't use Wings and am just starting to use Blender, but I know it will be valuable to me,
Thanks for the tutorial, i will work through the tutorial.
@Art: Another nice tutorial. And the instructions are really clear. Thanks Art.
I think, there is a error on page 9. If i hit the Tab key, the displaying change fron wire to shade. I use a laptop.
@Roland: The Tab key serves two purposes that I know of. If you haven't selected anything from the context menu it provides a shaded view of the object. If you've selected something from the context menu it pulls up another window which allows you to input numbers to make precise movements. Make sure you have made the selection on page 5, so you'll be in the Sweep mode when you hit the Tab key on page 9.
Oh dear, it looks as if I had done something wrong.
Thank you Art for the tute. I gave it a try. Left one is based on a Octotoad, centre on a cylinder (your tute) and assembled in Bryce, and the right one is based on a sphere. Was fun.
Ooh I really like that righthand one.
Thanks for the comments and showing me your renders! The renders look great! I love it when it when really neat shapes are so easy to make.
@Horo, I like all of your experiments, but like chohole, the one on the far right is fantastic!
@Roland, Guss is right. If that happens again (I do it all the time), just hit the tab key again until it switches back to normal mode. Fortunately, you'll still be in the right where you were when that happened, and in this case, you can select the appropriate face and not have to start over. As far as doing something "wrong" with your shape, I don't consider that wrong that at. It just didn't look like the one in the tutorial, but still looks really cool! Those are what I call "happy accidents"!
I'm glad you said that and not me, the Blender fanboys are already hunting me down with pitch forks and fire for not bowing before their golden Blender idols!
@Art, thanks for the great tutorial! I started with a Dodecahedron.
I'm glad you said that and not me, the Blender fanboys are already hunting me down with pitch forks and fire for not bowing before their golden Blender idols!
@Art, thanks for the great tutorial! I started with a Dodecahedron.
Those people should understand every piece of software has its shortcomings, and it's not slighting the software to realize it.
Thank you all for the comments about the shape based on a sphere - the one above at right. Here it is again, only this one in three different positions. And those having anaglyph goggles, true 3D.
Those look really nice! And in 3D too, yes, also really good in 3D. I always keep my 3D glasses handy for such.
I get that, too, David. Like the dodecahedron!
Loving the shapes, Horo! Must dig out my 3D glasses!
I ran into a problem while trying to create the swirl object. I thought I skipped a step or two and ended up going through the tutorial several times. To my surprise I hadn't missed any steps, but did find out something not mentioned in the tutorial.
During the Sweep step, making sure (4) is set to Thaw, I discovered this option wasn't responsible for allowing the scrolls to form those tight patterns. Each time I used Shift-D to repeat the Sweep step, those three arms never formed the tight patterns but keep spiraling as big as you want to let them go. Through trial and error I found that (1) is the setting which allows the tight patterns to form. If (1) is set to Region Center those arms keep going and going and going. If (2) is set to Selection Center then the tight spiral patterns will form. I thought I might be mistaken on this but after several tries, (1) Selection Center must appear in this option to form the tight spirals.
And speaking of spirals...
Oh these are very nice. Ammonites visit the isle of man and talk to a glass blower.
@Art - thank you and yes,get them goggles out.
@David - thank you. That sort of shapes are really made for looking at them in 3D.
@Jamie - those came out very nicely. You did miss a step on page 8 where Thaw Base is mentioned.
You're correct about the other settings. I have to admit that I don't completely understand all the ins-outs of this particular tool and the one that kept giving me the most fits, was (4), which, for whatever reason, would randomly change on its own. Sorry about that, but glad you figured it out and I will make sure to add that in when I convert it over to a video tutorial.
Love the shapes. I can see those as real-life objects.
@Horo: I too thought I'd missed a step, especially the step of changing (4) to Thaw Base. But I worked through that tutorial several times making sure Thaw Base was selected. I finally figured out it was (1) which had to be set properly or the arms didn't form the tight spirals.
@Art: Not a problem, but it felt good to finally determine my problem.
Here are five of ten images showing different option settings for the numbers in the lower right corner. And the resulting spiral using Shift-D. Images show (4) set first to Thaw Base then Freeze Base. Then (2) set to both choices and the results. Then (1) set to both settings and the results. Notice in this particular instance (4) has no affect on the results of the spiral.
Continuation from previous post:
I Googled to try and find a newer user manual, one containing the Sweep command but it seems the only one available is before the Sweep command was added to Wings 3D.
Art thanks a ton for the tutorial, I know I’m going to have a ball judging by the beautiful work by Roland, Horo, David and Guss
Horo- love the anaglyph. I got a pair of the 3D glasses only last week, just in time :)
Guss- l really like the material you applied to your spirals
@David: Thank you, glad you like them.
@mermaid: Thanks. It was neat watching them change appearance just by changing material. Changing material of the plane really changed their appearance.
You're very welcome!
@Guss: Thanks for the screenshots. I'm going to take a look at those tonight. I think for this tutorial, I'll just note the necessary settings for each and maybe experiment with the others for another tutorial.
Art
@mermaid010 - thank you. Good timing ... :-)
@Art: You're more than welcome. It'd be nice if an updated Wings 3D manual were available which contained information about the Sweep command.
Had lots of fun playing with this tutorial, although I did not end up with many cool objects. ;)
@mermaid: I think those are pretty cool objects, especially the first one and the material you used.
Thanks Guss these were the better ones, the rest I trashed. ;)