Unleash Your Creativity : Skin Masters For Keiko 6 [Commercial] Coming Soon!
 V3Digitimes
Posts: 3,216
Skin Masters is a huge collection of Skins, Eyes, and "Smart Tattoos" for Keiko 6 rendering, with strong controls of skin properties, color and opacity controllable tattoo layers, and the following features :
- render faster, and with no freeze when render starts,
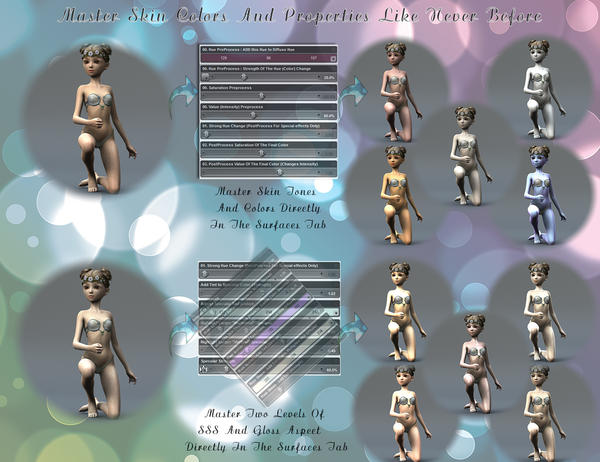
- Tune the skin (and eyes) Hue, Saturation Lightness on 2 levels directly in the surface tab : directly acting on the diffuse map, and acting on the final color once specular and SSS have been added.
- Manage your gloss by acting directly on specular highlights sizes and strengths, with an anistropic specular independent of UV set.
- Handle two layers of subsurface scattering defining skin scatter and sheen strengths and colors, as well as the amount of SSS you want.
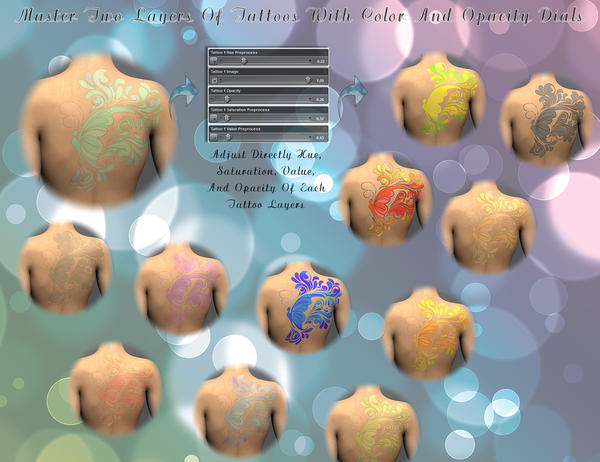
- Add two independent layers of tattoos and adjust their colors and opacity.
In brief, the base skin is Amazing Skins, and above that you have two layers of "color and opacity controllable patterns".
A lot of presets are included in Skin Masters :
- Variations of base skin tones and caracteristics (and more colors for fantasy)
- Eyes, Eye reflections, Eye map swappers, lacrimals options
- Gloss, Make-up and Bump options,
- Plenty of Tattoos or Body Paints presets
The tattoos:
- are already coming in different colors and opacity, for which of course you can tune color (change hue, saturation, lightness) and opacity directly in the surface tab.
- can be loaded on each layer independently, and in order to use more different pattern of tattoos on a same layer, their LIE version is also included (which remains faster than general LIE on diffuse maps due to the nature of maps).
- can also be loaded directly as LIE on the diffuse map, then the tattoos color are driven by the dials acting on the skin.
The process is simple :
1. Load Keiko,
2. browse to skin masters, choose your base skin tone, you can already render and benefit the advantages of Skin masters.
3. But if you want more :
you can eventually chose to add your tattoos of layer 1. Not the one you wanted? Use the "!ResetLayer1" file. Try another tattoo. This one is nice, but you'd like to change the opacity or color. No problem. Just go in the surface tab, select the surfaces with the tattoo 1 on them, and hit in the "enter text to filter by..." : Tattoo 1. Then you will access all the tattoo 1 dials : Hue, Saturation, Lightness (value), Map, Opacity.
4. You can add more tattoos on layer 1 as LIE, or also load other tattoos on layer 2 the same way.
5. You can always reset Layer 1 and Layer 2.
6. You can swap everything beneath the tattoo layers this will keep your tattoos : you can load other the skin bases tones or colors, or the face make up, your tattoos of Layer 1 and Layer 2 will remain the same.
7. Just one thing : never remove manually the maps of the tattoo layers. Use the reseters instead, or if you want nothing on a surface place the inclued map "ZeroAlphaBase.png".
Can you use them on other textures sets ?
yes, you canuse it on any Keiko textures sets, here is how to :
- load your figure in the scene with another texture set
- You always have to begin by this : go to tattoo layer 1 and apply "!UseAnyKeikoTexture" file. This will apply everything needed to load the tattoos. Then you can choose the tattoos you want, if you want some.
- If you want ALSO to use one of the skin base tones/colors provided for Keiko, but on your other texture set, just CRTL+double click on the main skins preset you want, and chose in the option : Images : "Ignore". This way you will apply the Color, Gloss, and SSS characteristics of the preset but you will keep your maps. BUT, don't forget that before doing that, you have to apply the !UseAnyKeikoTexture, otherwise your figure would render very white. This is for the base skin tones only, for the tattoos, just double click them simply, they anyway ignore the maps beneath them when loading.
Any questions, remarks, feedback, here as usually.
Well that's all, now a few images 3 illustrating the principle, and two examples of DS renders using Skin Masters.


Comments
Is it Keiko only? As in, only works on the Keiko UV?
Hi jakiblue,
The tattoos are dedicated and built upon Keiko UV set. Yet, the base skins presets i.e. the base shader including the opacity and colouring tattoos option could work with any texture and UV set. For this, you have to make the procedure indicated here (it is longer to read than to make) :
1. Load and select your figure, let's say in our example V6,
2. go in the "06Layer1Tattoos" folder and double click the "!UseAnyKeikoTextureSet" file.
3. Now it will look awesome, and this is because you have kept your maps, which are made for V6 in this example, and the Keiko UVs have been applied on them. One or two steps to repair this :
4. First if you want also the Skin Masters material to apply on eyes too, you go to the main folder, and "CRTL + double click" any of the main preset of your choice, and in the pop up window, in options, make : "Images : Ignore". This is the step that will apply the materials properties everywhere on V6. But you need to make first the "!UseAnyKeikoTextureSet" so that some empty tattoos are loaded on the figure.
5. Then, after step 4 if you want also the eyes material, or just after step 3 if you just want the skins, to So you select ALL the surfaces of the figure, and in the surfaces tab, in the "enter text to filter by.." at the top, write UV. This way you will access the UV of all the surfaces simultaneously. There you just have to pick up in the dropdown list the V6 UV set. And the figure is ready to render. (well you may have to increase a bit the specular strength for V6 for better renders).
Now what about the tattoos for the other UV sets? The ones make for Keiko Textures sets will not be compatible with other UV sets, they will only work on any Keiko UV based texture set (well any Keiko Texture set), and they do not interfere when loading with the underlying texture.
But if you already own layered tattoos for V6, you can use them on your V6, only if they are in a png format.
So if you have a png this is fine, otherwhise you have to
- go in Gimp or photoshop to erase the image background (everything which is not the tattoo pattern, eraser tool is fine) and create a png with transparency for the jpg. This takes less than 5 minutes - I made it in one minute.
- Then you have to add the png yourself in the "Tattoo 1 image" or "Tattoo 2 image" of the surface tab.
- Then you will be able to adjust the Hue, Saturation, and Lightness of them.
They are not visible in preview mode, so the best way is to activate your IPR!!
Please note that, for now in this material, some "colors" cannot be changed for mathematical reasons :
- Pure white or pure greys will evolve as grey levels only because the saturation is null, and whatever you saturation change you make, since the saturation dial is based upon the initial saturation multiplication, you will remain to a 0 saturation, so grey levels.
- Pure black - which is not a color - will remain pure black, because initial "value" (lightness) is 0 too, so whatever you multiply it by with the "value" dial, it will remain a 0 lightness, so black.
This is why when some tattoos appear full black in my images here, actually the initial images are not black but red, dialed with a 0 "value".
I'm already thinking of several ways to override this, but this has to be created, tested and optimised before appearing in a commercial product, but I'm confident there should be a way to colorise black and white.
Please also note the eyes and lacrimals materials do not include tattoo layers options. The materials allowing that are : Skins (all), Nails (all), Teeth and all Mouth parts.
Now here is the example of what I made using the full procedure on V6. I took a tattoo from inked volume 4, erased the white background of the image in photoshop, saved as png and loaded it on V6 Shoulder. I played with the opacity and colors...
I look forward to trying this out. :cheese:
This is really cool, tho I think you hinted at something akin to an "Easter egg" of sorts. I had used steps similar to load the AS set onto basic primitives to do some fooling around with maths, without rendering an all out figure in the process. I had assumed that was pushing the bounds of the AS purchase agreement.
So yes, if some one is cunning enough, and willing to go threw the process, they can indeed load the AS shader thing onto just about anything. A cube, sphere, skirt, or even a tank.
I had initially thought about making a makeup set, and kind of had difficulties with the open-top geometry made out of primitives. I've yet to try to figure out how to make things in Hexagon, yet.
In any case, the shader is made for skin, not other types of surfaces, so results may very.
Lol! Why am I not astonished that you made such experiments ;)
Yes, the underlying base is the Amazing Skins(AS) ones, with some internal variables changed for further compatibility. And for people who have Amazing Skins, they can load the shader anywhere since the shader versions are included.
Make up is a nice idea. I wanted to make make up on this product, but I had to learn how to make them, and for now, the results were not good enough to be included... For Hexagon I have never practiced it, I'm a blender addict :)
Yes, you're right, the shader is basically made for skin, but in fact, it works fine on many surfaces, as long as you cut SSS when not needed and configure properly the specular size and strength. Well it just asks a bit of customisation once loaded.
For instance, I took the latest Stonemason (what a great product!), and could not resist applying on it the Keiko 6 Skin Masters (I lacked of time to make "tattoos" on the walls, but I could have).
And here it is :
1. first load, set up light, don't touch initial materials.
2. Just apply the shader and don't touch anything (to much light, it is mainly because of SSS), for this I made, save as/ shader / then reloaded it with the CRTL+double click and ignore maps. No need to change the UVs, in this case for objects they are kept.
3. Playing a bit with colors to make a more "fantasy" environment. Total time : 20 minutes, including the render time. Not that bad knowing it has not been optimized.
Same lights for all. That's fun, now the next step would be to add patterns on the walls using the tattoo layers.. But I have to work on my next project already :(
Hi everybody, just before the release I wanted to share with you a few more presets of tattoos/patterns for Keiko.
One other thing that I wanted to mention, is that they will be visible in preview mode only if you use them in their classical LIE form, but it would be sad because you would lose the direct opacity and color controls.
The best thing to preview them, and eventually dial the colors directly, is to load them either via Tattoo 1 or Tattoo 2 (layer 2 being "above" layer 1), and use the Interactive Preview Rendering mode to see directly what is happening when dialing.
For those who are not familiar, I had made a small presentation on how to use IPR on Amazing Skins, but the principle is the same on Skin Masters (Skin master just have two more layers). The presentation is here :
Aux viewport and Amazing skins (NEW! with Daz Studio 4.7) :
http://youtu.be/LE9C2lEsBos
Now a few more images... The "underwear" are actually layers too..
May I ask what outfit that is in the last two pictures?
Of course you can.
It is Jungle Girl.
This is a must have.
Thanks. I'm currently playing with Skin Masters. It looks like a great add on for Keiko.
:)
Thanks a lot, I'm really happy you like it!