Yukata problem
 Tramp Graphics
Posts: 2,412
I grabbed this freebie Yukata: http://zenryokuhp.com/poser-free/archives/2007/01/yukiko_suit_for.html but am having a problem with the sleeves after using the transfer utility and also when using Autofit to fit it to Genesis. When I try an pose the figure, the sleeves basically get twisted, crushed, and turned inside out, as shown in the attached images. What can I do to fix this?
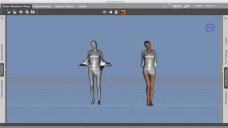

Yukata-issues-3.jpg
1000 x 561 - 159K
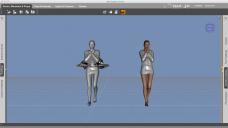

Yukata-issues-2.jpg
1000 x 561 - 159K
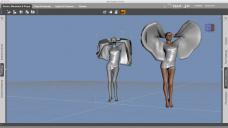

Yukata-issues-1.jpg
1000 x 561 - 201K


Comments
If this was poser, rather than genesis, the answer would be that the sleeves were too large & "blousy" to fit inside the falloff zones and the solution would be to edit the zones.
Since Genesis uses a weight map instead of falloff zones I would bet that the weight map is also not reaching the entire width of the sleeves and the answer will be to learn how to edit the weight map.
Congratulations! an opportunity to learn a new skill. ;)
I'd say going by the shape of the sleeves that this was designed to be a hybrid, conforms to the body but needs Posers cloth room for the sleeves.
Well, I tried another experiment by importing the base object file and using the Transfer Utility to make a Genesis rigged clothing figure, then moving the draping sleeve polygons for the left sleeve from the abdomen and hip face groups to the left shoulder group, using the Polygon Editor (I haven't done the right sleeve yet) and, while this got rid of the "exploding issue", the part of the sleeve in question still remains locked to the hip and abdomen, instead of moving and twisting with the arm. As a result, if I pose the figure with her hand on her hip or straight at her side, the hand ends up going completely through the sleeve near the hip. That portion of the sleeve remains locked in place to the hip and abdomen, and only moves if I move the hip or abdomen bones of the garment. Here's a few new pics.
The first picture shows the face groups. The purple is the hip, abdomen abdomen 2, and chest groups (including the pixels of the right sleeve connected to those groups), the yellow is the left shoulder group, including the sleeve pixels I already transferred from the torso groups to the left shoulder group.
The second and third pictures show the figure posed after making the Polygon edits to the left sleeve and shows the inner part of the drape still locked to the torso causing the hands to punch through it when posed.
Is there something I'm not doing? Is there something more I need to do to get that portion of the sleeve to move with the arm properly?
Did you reassign polys to that group in all three rotations (x,y and z)? If you select the scene tab and select the hip, chest, or whatever, then look at the weight brush tool in the building room, you should see no purple or red in x, y or z rotation no matter which you select. If you see anything but blue in that sleeve area, you did not paint fully to the shoulder in all three rotations and should try using the rectangle select with the grouping tool to make sure polys aren't missed.
Alternately, there may be a problem because you have smoothing on and the sleeve would be clipping with the arm or body when the arm is lowered. That will cause weird visual artifacts. See if things look very different with smoothing turned off. If that's the case, you're not likely to get the results you want without extra morphs to move the sleeves down in a clothlike way for use when the arm is lowered. You could try making a custom bone for the lower sleeve that sprouts off the forearm, but it's probably still going to clip.
I reassigned them with the Polygon Editor tool , not Weight Brush tool. I went and checked the weight maps like you suggested, and both sleeves show red parts when the Pelvis, Abdomen, Abdomen 2, and Chest, are selected in the scene tab. They even get a hint of red on the elbow when the thighs are selected. What do I have to do to change that?
Polygon editor is much faster when you want a hard paint. Weight Brush is necessary to ensure actual bending is appropriate.
Right-click in the viewport with the editor up and choose selection mode-rectangular select. This mode selects all the way through the model, so make SURE you are in front view.
Drag a square around the sleeve area that you want to reassign. It will select all the target verts. Reassign them in the Polygon Group Editor, but don't deselect yet. Instead, switch to Weight Map Brush. Don't worry, you won't actually have to brush anything! Select the forearm bone in the scene tab, then go look at the WMB tool settings.
You should see things that say X Axis with Xrotation under it, and the same with Y and Z. For this item you can probably ignore the Bulges (xbulge, ybulge etc).
Now, if you have the polygons still selected, you can click on Xrotation and see how much or little they are painted to the area you want. Right-click in the viewport and choose Fill Selected Faces and 100%. Now you have red. Repeat for Y and Z.
Optionally: For smoother deformation, while you have a group selected, choose Smooth Selected Faces and choose around 1/3 of the slider length and 40%. If this doesn't provide a "hard" enough paint, undo and leave it at 100% at all the edges and just leave smoothing on.
Tried all that, and while it is getting rid of the " jagged wings" from the parts of the sleeve that were mapped to the torso, it isn't stopping the clipping, just moving it behind the figure. IF I don't leave the edge closest to the body at least partially weighted to the torso, the entire sleeve just ends up sticking out horizontally behind her or through her back. If I do, the cloth weighted to the shoulder bone ends up clipping through itself. It isn't creating a smooth arching drape from the ribs to the elbow and around to the wrist nor clean rolling folds with the arm down at the side.
I posted the link to the original garment in my first post, download it and see if you can figure out how to fix this issue, and let me know what works and what doesn't. I need a solution because I'm using this garment on my girls for the current freebie contest.
You're not going to get either of those without adding morphs to each sleeve. I'm afraid right now I have too many projects to do something like that for you.
Well, I got the sleeves weight mapped pretty much as I needed them, they could be better though; still a little wonky, but a lot better than what I had to start with.