UV mapping problem(s)
 Pinzelmeister
Posts: 114
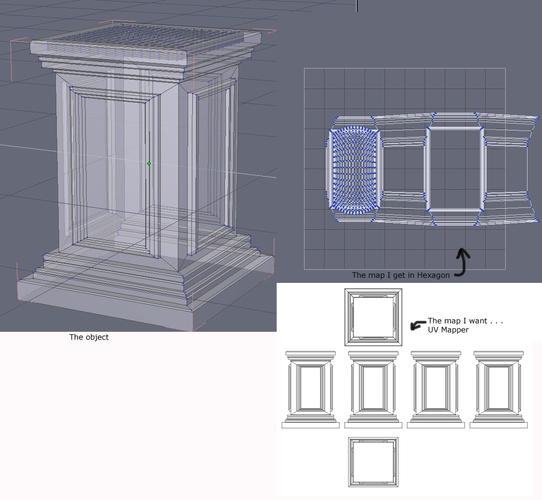
I find UV mapping in Hexagon anything but straightforward. For example, this box-like object. The UV map I get with Hexagon is obviously messed up . . . I tried all sorts of things to get it right (I have worked through multiple tutorials etc) . . . finally I just gave up and took the obj into UV Mapper (i.e. a different UV mapping program) . . . that took just a couple of clicks to get the map I wanted (below).
The point is . . . I did the polygon-related work on the object in Hexagon, that went quite well. But when it comes to mapping . . . clicking on various boxes and gizmos doesn't really seem to get me anywhere, at least not in a predictable, straightforward way. For one thing, it seems Hexagon just sort of gives up on complex tasks with larger files. Or maybe that's just my lack of experience (I've only been working with it a few months). Suggestions?


Comments
hexagon is horrible for uv mapping. no way around it. just use the programs that work. some models in some modes like box or cylindrical will look better than others, but in the end, hexagon's UV mapping tools should be avoided entirely because they generally take more work than necessary to line things up properly.
photoshop's 3d tools are actually surprisingly good for uv mapping too, and they have pretty much all the tools you need to make custom textures.
Thanks - I feel less thwarted somehow to know others find it problematic. Also I wasn't aware I could do mapping in Photoshop.
I wouldn't go so far as to say the Hex's UV mapping is horrible - it is pretty competent, used correctly.
I do agree that it is better to use a dedicated mapper, because you get a lot more options.
The two main reasons I don't use it are that it doesn't keep seams and pins when you save, so you have to do this in one sitting. This becomes a real obstacle if you are doing something complex. Secondly, it has no idea of proportional unwrapping and will give more space to an insignificant island and less to a bigger portion of the model, then you have to get the islands in proportion by eyeballing and scaling.
To get to the specifics of your model - if those blue lines I see on it are the seams, it is no wonder it didn't work out - they are cut in all the wrong places for a good unwrap.
It appears you have done a cubic (or box) projection in UV Mapper - if you did the same in Hex, you would get pretty much the same result. Neither result would work well for texturing - the frames around the panels need to be separated and unwrapped flat and this could only be done by a full unwrap, rater than a projection unwrap.
To put my money where my mouth is - made a rough copy of your model and mapped it in Hex - one using cubic mapping (black background), the other unfolding with seams :)
still not great if you want to use the UV map as a template to draw textures onto. also, it's very difficult to effectively control the size of the UV map when exporting from hexagon, it only exports based on the size it is on screen. this isn't great if you want 1024x1024 textures or larger and such.
the only thing I would use hexagons UV tools for is to create UV spaces and separate sections.
I totally agree. As for exporting the map, the best bet if you don't have a dedicated mapper, is to export the UV mapped model as .obj to UV Mapper Classic (free) and use that to export the template. .You will get far better resolution that way.
UV Mapper Classic only does projection mapping, which is not good enough for anything complex
I have been using UV-Viwer since Patience recommended it in another post.
http://d3d.sesseler.de/index.php?software=other&product=uv_viewer
Very simple to use and I prefer it to UV-Mapper Classic.