How can I get renders like this
 defstar231
Posts: 13
defstar231
Posts: 13
So I wanted to know how I could get renders simular to this. I really like this art style. So I was wondering how I could get something simular for myself. I know they are not all the totally same art style.
But I still like to re-create one of them some-how. If not make a combination of them both.
Most renders I make look good, but they all end up looking like generic daz renders. Even when I follow most youtube toturials they still end up looking like generic daz renders.
Thank you so much for reading this.
Daz 3D is part of 
Connect
DAZ Productions, Inc.
7533 S Center View Ct #4664
West Jordan, UT 84084
Licensing Agreement | Terms of Service | Privacy Policy | EULA
© 2025 Daz Productions Inc. All Rights Reserved.
Comments
Without seeing your own renders it is hard to comment.
However:
Do you set up a camera or do you render from the active viewport?
Do you set up the lighting or do you rely on the camera headlight?
Do you use "depth of field" DOF?
If the answer is No the any of those questions I would strongly recommend that you watch the "In the Studio" tutorials on the main DAZ website.
I don't think there's anything all that complicated about the examples you posted.
What are you having trouble with?
"Like this"? So, renders using warm lighting?
In addition to the suggestion above to look at things like how you render, use of things like Depth of Field and placing lights to get the effect you want rather than using just either existing scene lighting or the (shudder) camera headlamp, you should think about what you like about those renders and what drew you to them.
The camera angle?
The lighting?
The inclusion of extra details, such as the part of the plant on the desk?
Something else?
Once you have an idea, then you can work on replicating it. It might help to try to copy one or both of these, and see if you like the results, to get a feel for what you need to do.
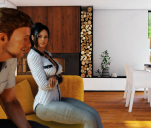
(though if I copied the second one I would make sure the woman was actually sitting on the couch, rather than floating a couple of inches above it...)
These look like they are from a game ad probably use a differnt renderer outside of Daz Studio
are they from Houseparty or something? if so it would be Unreal Engine and DAZ figures
I have done both Camera's and and viewport. It mostly look the same the only real diffrence is the Depth of field (Yes I use Depth of field).
I often setup my own light. Having one back light (behind the character), area light (Just a genral light to light up the scene) and one front light (One from where the camera is pointing from). I often have the camera headlamp turned off.
One of my newer renders
No they are from a vison novel type games. This images was per-rendered, then put into a game.
Nope I am pretty sure they are from Daz, or atleast using some daz models.
Well I like their style and both of the models to being with. Also like how they don't look like generic daz renders. I've played a lots of games where the renders look like generic daz renders.
I like the lighting a lot. It's simple get good looking. Does not seem like they have 20+ back lights and stuff.
I do like the depth of field (Never feelt like I could get that fully right).
I like how they look a bit cartoony (in a good way).
Is that all they did you think. What kind of lights?
Use warmer light, DOF, and bloom.
Try the warmest preset (upper right corner on the promo picture) from this free set: https://www.renderosity.com/freestuff/items/76735/sc-hdri-lights-for-daz-studio
Except for the female characte model that is the only thing those two images have in common. They even use different lights between them and the only thing those lights have in common is the colour temperature.
If you want help TELL US what you need help with instead of leaving us guessing randomly.
I think we are all a bit confused trying to understand what you want, and what you don't want (what you like and what you don't like?). To me, the first two images are images I would immediately think of as DAZ or Poser. The first one is the better image of the two, the second one has a couple glaring errors. The female figure is not actually in contact with the couch and the bottom of the front of her shirt/blouse looks like it is clipping into her legs. Additionally in the second image the male figure has a bit of helmet hair syndrome. These aren't necessarily horrible problems, just common issues I've seen with DAZ/Poser. I actually think most likely neither is done in DAZ Studio (maybe in Poser??). For the first image the give away is the deformation on the inside of the girls elbow, something I haven't seen with DS in years. The clipping of the shirt in the other image could be just a poorly make shirt, but not something I would expect from a commercial product. Anyway, that's all just speculation and probably not relevant.
I'm guessing your looking for realistic 3D images where everything looks 3D, but not photorealistic? IMHO One of the biggest differences between the two example images and your image would be the lighting. Both of your sample images appear to have much softer lighting. Using a soft lighting studio style HDRI can help with that, or making your light sources larger will also help produce softer lighting. There is also a bit of blur in the first example image. this can be easily achieved by using a mild blur filter in Photoshop or Gimp. Beyond that, like others have already indicated, I'm not sure how I can help since it's not really clear to me what you like in your examples vs your sample render.
Probably the best way for me to help would be to have an example I know how things were set up, and help you to work toward similar visual results with your sample image. If your interested, take a look at one of my galleries (my DA gallery is probably the best one to look at, but it does have a few NSFW images, my DAZ gallery is the "safest"). If you find an image with a style you like, just let me know which one, and I can give you suggestions on how to move forward with your image. I have everything from toon like renders to things bordering on photorealistic, so you might be able to find an image similar to the style you want? But I don't do a lot of contemporary renders.so you may not be able to find one you like with the proper setting (or you may just not like my style too).
Few thing to consider when rendering with iray, the actual environment bounces light in the scene and infuences the lighting. Your character has a standard 3 point light setup with strong white lights against a white background. Little to no bounce and cold.
The images you are trying to emulate are within environment and lit with warm lighing. Very different setup.
First thing I suggest is take Hylas' advice and get that WARMER HDRI set from rendo and see what your character looks like just using that warm yellow HDRI to light her keeping everything else the same. The only light you should keep from your previous setup should be the over shoulder rim light. Delete the other ones. Post that new version and we'll take the next step.
Sorry I did not mean for anyone to be randomly guessing. I am just not very good with words.
Maybe I should have just asked how I can re create one of the images instead of both.
What is the right models for me to get simular effect to the first images? What is the right lights? What is the right setting?
Yeah I kind of relize now that asking how to re-create the style for two completely diffrent images was not the best. And not being very clear on what I liked about them images from the start.
"I'm guessing your looking for realistic 3D images where everything looks 3D, but not photorealistic?" Yes you pretty much nailed it. I am looking for good looking 3D renders where they look good, but not real.
Wen you said they use the blur filter, do you mean they uses it on the background or character?
First of all looked at your DA page you are amzing. They are all so pretty. I found one images I really like (I like all the images :D ).
The image with the warrior girl is the one I love to somewhat re-create (I am not looking to re-create the reflation in the water just the gernal look of model and lights). I really like that it is not trying to photorealistic or super coplex. But still looks really really good. Could I it be done in an in-door setting?
Yes I know it does not have a background. I always have a hard time working on images with a background for some reason(I can never get the depth of field right). Ethier they take for ever to render or they just don't look totally right for some reason.
Here I did two versions of the image one with and one wothout the back-light
Rant On...
Arrg .... I really wish DAZ would fix the totally fubared post quoting system/procedure. I was almost done with my response, picked up my mouse, accidentally hit the back button on it, and lost the entire post!!! (Yeah, I know. I should have copied the quoted material, hit the back button, and completed my post in the main thread, but sometimes I forget).
Rant Off ...
Rant Back On ....
So I did what I should have done in the first post so I didn't loose it again, the I get the blasted Cloud Flare Error and lost more work. It seems to me that DAZ can't fix their forum server problems. Seriously it like DAZ wishes the forums would just go away, which is just plain stupid!! The forums are the best knowledge base you have! So now I'll just use Word to finish this post ......grrrr!
Rant Off -
Sorry for the slow reply. Issues with the forum (as noted above), and my getting too creative in an attempt provide some examples really slowed things down (and probably didn't really help - but they are attached anyway in case you do find them helpful). Hopefully it all makes some sort of sense. If not feel free to ask questions. I probably didn't fully answer your questions, but in general the key to getting the look you want in a render is manipulating the shaders on your figures/content and manipulating your lighting. Your sample render could easily fit what you want as the skin doesn't look highly photo realistic. A bit a manipulation of the shaders (reducing the glossy shine a bit) and better lighting should get you closer to what you want.
For the first example image, I think a blur filter may have been used on the whole image to give it a soft focus effect (but it can be done via the renderer as we). For the Valissa image I used the following process in Gimp (but you could use any image editing program that uses layers). After rendering the image I opened it up in Gimp, then adjusted levels (usually needed, but not always) to improve the brightness/contrast of the image. Then I made a copy/duplicate layer and used the un-sharp mask filter (some applications call it the sharpen filter) to enhance the apparent detail of the image. This helps the details to pop a bit (I usually increase the radius a bit from the default settings). Then I copied this layer to a new layer and used a Gaussian Blur to provide a soft focus. I then adjusted the opacity (transparency) of the two top layers to give a bit of sharpening to the base layer with the second layer and a bit of soft focus using the last/top layer. Typically the opacity of the top two layers is set between 15%-35%. Note I usually use a bit of vignette too, that helps to bring out the center of focus too.
Thanks for you kind comments!! I'm still learning and working at getting better too.
Yes, it can definitely be reproduced with interior scenes. One thing I often due with interior scenes is to use and HDRI for lighting and use Iray section planes to let the HDRI light in. Depending on how much of the HDRI lighting I want in the scene (and if the walls/ceiling can be turned on/off) I'll use 2-4 Iray section planes. They "hide" everything behind them from Iray (essentially allowing you to remove things not in view from the scene). You can get soft lighting using your own light set ups too, the key is to either have large lights, a lot of small lights, or a combination of the two (you can still get "dramatic" lighting with soft lighting, just the shadows won't be super sharp). The Valissa image uses an HDRI for lighting, I often use a spotlight to help highlight the face too (I usually try to place the spotlight between the camera and where the main light from the HDRI is coming from, but sometimes will use one to illuminate dark shadows on the face). Another factor that influenced the look of the Valissa image was the shaders setting for her skin. I increased the translucency and adjusted color values for the diffuse and translucency. The shaders on the outfit and the sword were also adjusted a bit to help match everything else in the image.
I've attached some a quick examples of an interior scene to illustrate the postwork process, using an HDRI to light and interior scene, and the same scene lit with the HDRI light coming through a window, Lights that came with the scene, and 4 spotlights (using geometry). In case anyone is interested in trying to sort of reproduce the scene/renders for practice. The character is based on Charlotte 8 with several additional morphs and some shader modifications to her skin (slight color changes). To give characters a bit of a toonish feel i almost always add a bit of The Girl 7 for Girl 8 to my characters. I think it just help keep things away from uncanny valley (probably totally wrong, but I just like the what the Girl 7 adds to the characters). The hair is Amelia Hair for G8F with textures/shaders set using UHT2 for G8F (it's a fantastic product for making great looking hair). The outfit is Mystique for G8F, and the scene is Duplex Living from here.
The HDRI used for the first image was the default Iray Ruins HDRI in DS rotated 30 degrees. The general color on this image is rather cool, this is due to the sky in the HDRI. An HDRI with warmer tones would actually be better for an indoor scene, but it shows what can be done with the HDRI that comes with DS. The second image used a comination of lighting that came with the scene, four spot lights (two highlight her face, two for rim lighting behind her on the right). The Ruins HDRI was also used to give light through a large window and contributes a lot of light from her left side, it is the source of the cooler light in the image on her left side. The other light were all warm tones. The exposure value was set to 7.5 in Tone Mapping was adjusted to lighten the image and match the indoor lighting. Note the big differences between the two images due to different lighting.
Original HDRI lit Image without post work: (Please zoom to full resolution to see the details)
Original HDRI lit Image with post work:
Image lit primarily with lights included in the scene and 4 spotlights (all using warmer tones. The Ruins HDRI contributes a lot of light from her left side through the window, it is the source of the cooler light in the image on her left side. The exposure value was set to 7.5 in Tone Mapping was adjusted to lighten the image and match the indoor lighting. Note the big differences between the two images due to different lighting.
Here is a short video to show the simple post work results. No real major changes from each step, but the subtle changes can really enhance an image - the image used for this was the one done with the HDRI and Iray Section Planes (first image above).
https://www.deviantart.com/dust-rider/art/Post-Work-Example-909815213
I've really had difficulties trying to figure out how to improve these. My comments are all very subjective, and may not reflect reality (i.e. they may not help, I usually have to muck around with the lights a LOT to get things right, my quick examples in my ast post really need a lot of little light improvements - maybe another 30 min. to an hour) My first impression is that the rim lighting is too harsh and bright. In the second image the rim light placement is much better, but it's still too bright. Your key light (main light) is on the same side of your figure as the rim light. Try putting the key light opposite the rim light, I think that might help. I often use a low intensity rim light on the same side as the key light, but you really need a rim light opposite the key light.
Yes, adding a scene to put your figure in is another level of complexity and will often increase rendertimes simply due to the fact that there are more surfaces and shaders in the scene which also requires more time to render. Using and HDRI and Iray Section Planes with improve render times a great deal. I use the default HDRI that comes with DS a lot. It provides a nise key light and good rim lighting as well. I also really like Fast Procution Lights for Iray from Valzhiemer availabe in the store here. A free alternative to try out is a free HDRI light set from Valzhiemer that can be downloaded from here . The image below was done using the neutral lighting from the free set (note: I did need to move things around to get the free set to work properly in DS, I can help you get things in the right place if needed).
I tried out those lights mentioned by Hylas above.
It is certainly easier to light a character at zero position for a straight portrait or character study, but if your long term goal is to render panels for a Visual novel or a comicbook/graphic novel, then you need to take the time and learn how to light interior scenes and manage exterior lighting.
First of all wanted to thank you so much for helping me out. You don't owe me anything. So it is really nice of you that you take the time, to help me. Thank you so much.
I actually never knew about Iray section planes. So that was a big help for my renders.
What kind of HDRI light do you useally use, and what kind of settting you useally have it set on? I used a few diffrent HDRI lights for my renders, with a few diffrent settings.
I took some of your tips and made 3 diffrent renders. With 3 diffrent models/characters and 3 diffrent background. I thought if you had more of my work too see from. You could get a better idea on what I get right and what I get wrong and could do better.
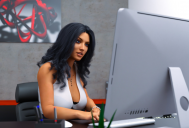
The first is the girl with the black hair, in the bedroom. She just has the HDRI light and a spot light on her face. (I know her hands does a bit of cliping, saw that after the render was already done)
The secound is the blonde girl in the messy room. She has 3 spot lights on her one orange back light coming from the back, meant too look like light from the TV and one light from bellow (Making her feet less dark). And lighting up the side of her face. Also used a HDRI light that I made slightly darker than normal making the room look darker.
The third, the asian girl with purple hair. Also used a HDRI light that I made slightly darker here. To make the scene look darker and more like night time. Also have two back light on her here. One coming from bellow and one coming from up top. As always a have spotlight facing the side of her face.
I have not used any photoshop on any of the scene. it's just the raw renders.
Not sure if you're still trying to get renders "like" the examples from the original post; I don't think I can help you with that, beyond advising you to use much warmer light in general (look how orange the skin of those characters is!)
But here's some general feeback to your last 3 renders:
All your renders:
- Composition is not the most interesting. It looks like that's not something you have been paying much attention to. The almost-but-not-quite-square format you seem to prefer is pretty hard to pull off!
- Pictures tend to be grainy, you need to render a little longer.
Girl with black hair:
- Something is up with her lips, they're green! Could be DAZ Studio bugging out on you. Try re-applying the materials and/or restarting the program. In Render Settings under Optimisation, switch from Memory to Speed, or vice versa. Not sure what's going on there...
- Her skin is too glossy. Increase Glossy Roughness (or perhaps some other slider that contains the word Roughness, depending on how the skin is set up.)
- Hair clips through her shoulder
- Her face looks like she's trying to solve a math problem. Assuming this is a pin-up, I'd give her a more engaing expression.
- Not sure about her hand/finger posing, beyond the clipping. What is she doing?
- I feel a girl who took the time to put up her hair like that and put on lingerie would maybe wear more make-up? Perhaps a stronger lip, stronger brow, and some blush?
- Lighting is realistic but a bit boring. I think a pin-up needs more drama.
Girl with purple hair:
- Lighting is pretty good, she looks like she's walking past a night shop and is lit by those white neon lights.
- I like her expression and pose, too. She looks natural and relaxed.
- There's a speckle or something on her forehead. Can possibly be solved by rendering longer.
- Don't fully understand the scene. If she's out running, why is she holding a sundae and why is her hair and face all done up? If she's just out and about, why is she wearing athletic gear? Do people really drink sundae's at night?
Girl with blonde hair:
- Screens give off cold light and light bulbs are warm; you did it exactly the other way around :) Otherwise pretty good lighting, I like the rim light on her hair.
- Black lines on her forehead. This is a common problem, make the scalp of her hair just a little larger to fix this.
- Adjust the DOF to make her feet just a bit blurry. This will give the image more depth.
- She has what I think of as "Zeddicus face". There's no easy fix for this... facial expressions are hard!
- A little confused as to why this 22 year old is being all sexy in a 12 year old's bedroom.
I hope at least some of that is useful! Cheers!
Wow!! Looking much better!
The HDRI that I've used the most is the default HDRI that comes with DS. It has nice key lighting and rim lighting as well. I typically have the dome rotation with it set to 20-35 degrees (IIRC I've used it set at around 150 t0 get the light to come from the oposite side of the scene). I've also used HDRI's from HDRI Haven quite a bit, and more recently the Fast Production Lights from Valzheimer. What often helps to figure out what rotation you want on the HDRI is to put a chrome/mirror ball in the scene so you can see more of the HDRI (just ass a sphere, and put a chrome or mirror shader on it). Depending on the light from the HDRI and the effect I'm looking for I will adjust rotation and intensity, and that's about it.
Hylas had some great advice. I won't repeat what was already said, but where appropriate I will give a few addition comments.
For this image (below) the most obvious improvement would be to adjust the skin shaders, and possibly the clothing as well. This is one of my greatest complaints about content sold here. There is no requirement that all vendors adjust their shaders to a base lighting environment, As a result shaders are all over the place with gloss, roughness, and translecency (oh, top coat as well). Noe this isn't a huge problem for experienced users, but for new users it's a huge issue. From the image it's hard to tell exactly what might be causing the unrealistic shine. I would try what Hylas recommended first, if that doesn't work you can try lowering glossy reflectivity. If that doesn't work, then the vendor probably uses meatlicity or metal flakes to "enhance" the glossy effect - if so completely turn tem of (0%) and adjust the other parameters to taste.
Her clothes have a bit of a plastic look to them. Maybe increasing roughness just a bit will help? It's also "hanging" a bit unnaturally but this probaly is not your fault, as often this type of clothing looks unatural (if iits dforce, slightly adjusting the settings might help).
On this one I don't have a lot to add, it's really well done. Her left had looks slightly un-natural, her ring and little fingers just look a bit off (this is just a minor thing, but it's often these little details that make an image much more appealing). I often try the same pose in a mirror to help figure out what things should look like. A series of low intensity rim lights (spot lights) would help to get her to stand out from the background. The key with this image would be to make them bright enough to set her apart from the background, but not so bright that they are obvious.
In addition to what Hylas already noted, the rim light from the TV could be improved by reducing the intensity quite a bit. as well as changing the color. What I often do for an effect like this is to use a plane primative with and image applied to it that is similar in color/pattern to the item that is "providing the light" (might be able to use the image used for the TV). This is an extra step that isn't needed, but will help to sell the scene in the viewers mind (again, subtle things gan help a lot).
To me her skin looks a bit lifeless. I think increasing translucency just a bit might help. Again, not a huge issue, and it may be the style you are looking for "as is". I just typically prefer a bit more sub surface scattering on my characters, which increasing translucency will help with (though you may need to adjust the associated colors to make thing look good).
One other slight niggle, and not an easy fix without additional morphs sets or using something like mesh grabber. Her behind is too hard and the soft fleshy parts are not conforming to the flat chair under her weight. Again, this may be something you chose not to fix, but it will help sell the image, even without trying for photorealism if can be very important. Not everyone with consciously notice (many/most won't notice), and for many people it's simple not worth the extra effort to fix. But .... once again it's these minor details that can help sell an image (I'm very guilty of not addressing these little details from time to time).
Hopefully this all helps a bit!!! Bottom line though, these are a huge improvement over your previous image!!!!
Thank you both for your feed back.
I had some more questions
I was just wondering what is the best way to change the increasing translucency, bc l did ttry that on the blacked hair girl, and I think that is why her hair ended up looking weird. I've always had a hard time messing with textures maps in Daz. It is very diffrent from other 3D programs I have used.
I read the comment that I need to render longer. Already feel like my renders takes for-ever. Not sure why that is. Slow pc maybe, Wrong settings, idk. Thanks too my slow render times. I useally try to fix the grainy stuff in photoshop, but it often makes the images look a bit blurry saddly.
Not sure I understand what you're saying. Changing the translucency of her skin doesn't affect the look of her hair. There's nothing wrong with her hair, except you need to adjust the pose of her right pigtail so it doesn't clip through her shoulder.
As for skin translucency: more recent characters usually have pretty high translucency out of the box, usually around 0.7 - 0.9.
You can adjust translucency a little bit within that range to brighten or darken the skin. I find that this doesn't change the look and feel of the skin much, beyond making it brighter/darker.
Especially older characters (Genesis 3) generally have lower translucency (0.5 ish). You might want to increase translucency to make the skin look more "alive", but then you generally have to adjust some other skin settings as well, or the skin comes out much too dark. It's a whole science and not an exact one, and it's different for every skin depending on how it's set up, so it's hard to give specific advice... a lot of trial and error.
In any case, I recommend experimenting with lighting before experimenting with skin settings. Not that you should be afraid of changing skin settings. But the most refined skin will look flat under mediocre lighting, while great lighting can make mediocre skin look good.
It sounds like you might be rendering with CPU? If so, then there's not much you can do. There's some tricks to speed things up, look into HDRI's and Section Planes. But ultimately it will always take forever.
CPU rendering is fine for getting yourself addicted to dipping your toes into the world of DAZ and IRAY. But if you're getting more serious you need to either be very, very, very, very patient or get yourself a system that can handle GPU rendering.