Postwork and composing
Hello!
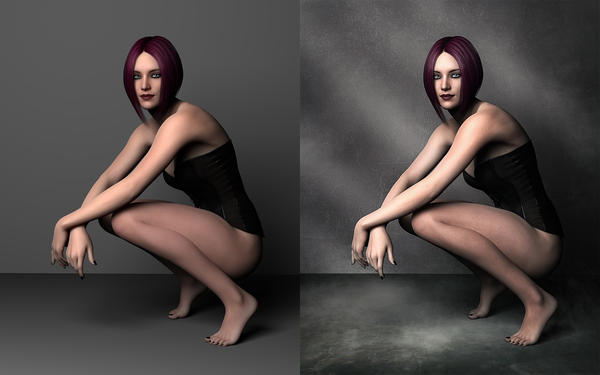
Currently I am trying to improve my postwork skills and composing with Photoshop CC. Here is a first try with some things I have learned. You can see the original render, which is just a figure, two planes and one UberArea Light. The second one is the final image. I added some textures, filters, color corrections and stuff. What do you think of it?


1.jpg
2000 x 1250 - 441K
Post edited by XoechZ on


Comments
I too am very interested in post work. This is a nice improvement. Good show.
An excellent group of filters can be found in filter forge.
I do not own Filter Forge, but I own the Nik Collection. However I use it very rarely. The more you get to know with Photoshop, the less you need external plugins, because you can do really everything inside Photoshop. Plugins are sometimes faster, like a one-click-solution for a certain look, but they are not magic. They just work with the pixels.
Anyway, here is another one. One bad thing is, that I only have a cheap, non calibrated monitor, so I don´t know if colors and brightness are ok.
Colours and brightness look fine on my not-so-cheap but also uncalibrated laptop screen.
More playing with textures and colors...
Interesting thread, I usually try to do everything possible in DS but that has its reasons as well in not having a good idea what is possible and how in postwork. So thanks for showing before and after postwork.
Interesting thread, I usually try to do everything possible in DS but that has its reasons as well in not having a good idea what is possible and how in postwork. So thanks for showing before and after postwork.
Thank you!
Well, my approach is that the render is only the source for creating a nice piece of art. For me, postworking is a lot of fun with endless possibilities, which work much much faster and better than in DAZ Studio.
If anyone has any questions how things are done in postwork, just ask. :-)
Hello again!
I have just finished another image. The background and fx in this one are made completely with various Ron´s brushes.
And another one. Texture fun again :-)
I always use more than one texture and overlay them to get a more interesting and unique look. Here I used two textures for the floor and another two for the wall. Fx with Ron´s stuff again.
The postwork is good, gives a moody, high key gothic look.
One easy improvement: you're doing your backdrop as a ground plane and then a vertical plane, creating a distracting seam between the two, particularly noticeable in the first shot.
Follow the example of real world photography, and use a seamless backdrop, gives much better results for this kind of shot.
I'd be really interested to hear how you did the background for the image with the lady with purple hair?
Thanks for the tip!
This is very easy to do. As mentioned above, I used Ron´s brushes. In this case the following:
http://www.daz3d.com/ron-s-apocalypse
http://www.daz3d.com/rons-fog-ii
and http://www.daz3d.com/rons-particles for the fx.
In Photoshop (you can use these brushes also in Photoshop Elements, Gimp or PaintShopPro) simply create a new document (I prefer grey, because the color can easily be changed later) and start painting with the brushes. This way, you get such a background in about two minutes. Below is another example of this method. Nice and easy :-)
Thanks for the insight, and a follow up question: with the purple haired lady you used the paritcle brusch then again after merging the scene?
Thanks for the insight, and a follow up question: with the purple haired lady you used the paritcle brusch then again after merging the scene?
Yes, I used the particle brush after merging the layers, on top of the image so to say. On a new layer of course.
Thanks for the insight, and a follow up question: with the purple haired lady you used the paritcle brusch then again after merging the scene?
Yes, I used the particle brush after merging the layers, on top of the image so to say. On a new layer of course.
He, yes, I'm slowly getting the grip on using layers, using Gimp though, thanks for the info
Another one I have just finished. This time with a little Voodoo-touch. Smell the danger :-)
They are amazing!!! I wish I could make works like these
I'm curious how you put in the versions before the post work the wall and the floor haha... (might be a silly question but I'm still lv.1 in 3d :))
Also, what render do you use?