Compelling Images - An Iray Journey
 Blacksting
Posts: 10
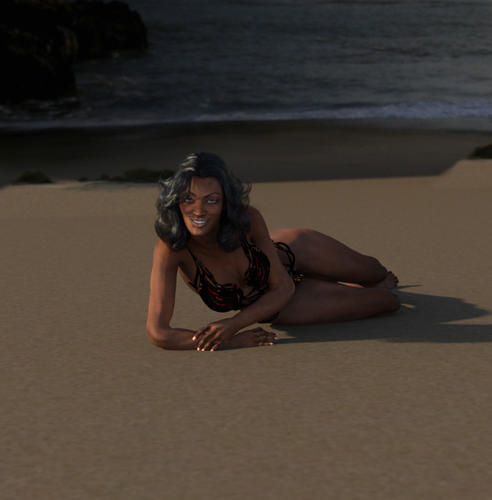
I am new here (this being my first post) but I have been an artist, both actual and virtual, for two decades. I have never used Daz/Poser for final rendering of projects but I might change that now that Iray is fundamentally a part of Daz Studio. I am not a huge fan of discussing the nuts and bolts of how our sausage is made but I did my first artistically compelling native Daz render after downloading 4.8 yesterday. The image is far from perfect of course, but it immediately sent me down the old artistic path of questioning when to quit... when to be done with an image. This took ten minutes to set up and about fifteen minutes to render on my least powerful PC (amd 3.0 ghz cpu, nvidia 9800gt graphics.)
After happily discovering that the first Iray endeavor was actually a compelling image I tried to fix problems. I fixed some of the odd looking lack of gravity and tension with the original pose. I corrected the focus of the camera, which was completely off, to a more Sports Illustrated photo style. I composited more of the shore line and water in to the image. I tried to fix the "Poser Face" problem of the characteristics of every face looking like the same person with different plastic surgery. I also changed the Environment time from 6pm to 5pm. In the end I removed what was compelling about the image.
So here is the journey I am putting myself on. How will I fix the problems of the original image and still have compelling art.
The first thing I am going to do is convert to Iray shaders. Yep... those are all legacy materials. I am waiting for the Lights and Shaders content to show up to continue.


Comments
I know what your talking about. All to often I do a render and really like it..but there are a few little things that I think will make it "perfect".. I then get sucked into this mire of fixing those little things (sometimes over and over and over) and never really being as satisfied as I was with that "first glance" render. I think part of it is that when you do that first version you sort of go "wow that actually looks really good".. and then you start to look at things and start finding "flaws". I know that at some point I just have to say "I've fixed the bits that bugged me and it worked or didn't work with those fixed" and either save it or start over.
I went back to the original image and started again (thankfully I always save edits as different scenes as I work which is one of the HUUUUGE advantages of digital artistry over real world art.)
I added a normal map to the sand and put in a small amount of reflectivity to make it look wet. Taking the first option I see that I like usually works out better than trying to compare multiple options. In this case I came up with the same original problem, though. I like the look of the sand and then I start to see the imperfections. Composition wise the main depression clashes with the body shadows. It just isn't a pleasing set of light and dark. I could go looking for a "more perfect" sand normal map but will it be worth it?
I set the skin shader to Iray but I did not mess with the parameters. The result isn't much of a difference (which is to be expected with darker skin.) The lips did end up brightening some... probably too bright.
I left the camera focus the way it was for now. As soon as I set the focal point to the face the imperfections in the eye materials become too evident.
Eyes are a reasonably easy fix. Set the uber Iray water thin on the cornea and change the index of refraction to 1.47 is a good start. You can also make sure that the corneal bulge morph is set to 1 and change the eye reflection surface to water thin as well. If your getting an odd "fog" on the iris make sure there is no specularity on it.
Based on all you've said, I'd like to point out a few things about your image.
Your light is all wrong based on the beach you're using. The beach has light (sun) coming from way out on the horizon and off to the right. Your light comes from the left of frame. You said you were going for 5-6pm time of day so your light should be warmer and lower, way lower. I would also suggest MORE light, this is waaaaaay too dark. One tip would be to duplicate the key light you're using and move it 180 degrees so it's opposite the other light, then dropped its intensity to 20% max (leave color at white). This will give you some "bounce".
If you're sticking to IRAY, look into HDRI/IBL lighting set ups.
Perhaps maybe push the camera closer to your subject as well. There's a lot of beach. What is it you find compelling about this scene?
The the first image has the beach object moved back in order to take the bad depression out of the shot. I also removed most of the metallic flaking from the sand and slightly upped the normal map value. Finally I put the camera focus back to where a portrait photograph should be on the face. There are still some notable things to fix but I think image one is getting near "done." At least that is a good artists lie.
A big problem I have with image now is that the body shadow (even with removing the bad sand) is compositionally jarring. The original image was interesting in that all of the shapes in the scene seemed to be vectored at or near a forty-five degree angle to the camera. The body shadow is pretty close to being at a right angle to the lens. It is certainly real but real doesn't make for good art most of the time. Unfortunately with unbiased rendering changing shadows means changing light. In order to get a better shadow shape I rotated the camera dome to 345 degrees (after being a bit annoyed that -15 wasn't an acceptable value.)
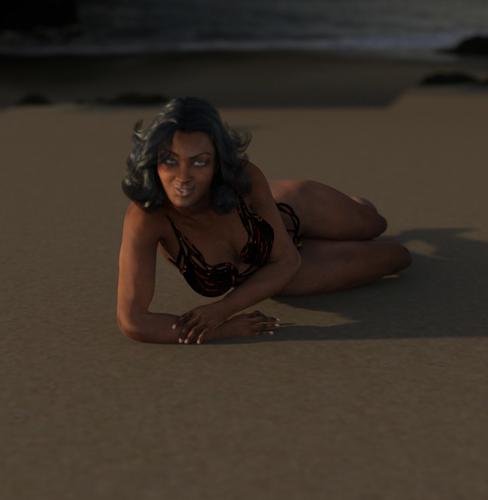
As it turns out, Khory, I already had most of the eye fixes present. I had applied the G2 iray MAT already. I just needed to set the proper refraction index and bulge the cornea. That does it for image two.
The second image is, thankfully, even closer to being done without killing the original image's feeling. Now that the focus is correct the hair has become problematic, though. The out of focus hair looked good. In focus the hair specularity is too noisy and bright. Also the new lighting has made two symmetrical reflections at the bottom of the hair that draw the eye too much. Fixing hair is not easy, of course. I now have to start considering Photoshop post render fixes versus trying to convert the hair, which is still the default, to an Iray shader.
With proper focus the sand is starting to feel too dark now too. In the original image the out of focus blur added to the overall mood of the dark beach and it felt cohesive. The darker sand now is starting to feel like a lack of good image contrast. I have to decide on how to brighten the sand. Post process seems like a bad idea. Lightening a shader with an originally dark diffuse map usually ends in disaster but I think I will try it first. I will probably end up digging out the diffuse map and color correcting it in Photoshop.
I think the final piece of the puzzle will be adding sand ridges around the body. Unfortunately I think that ultimately means I will have to do some remodeling of the beach object outside of Daz. I cant see trying to do that with Daz primitives. By the way... is it possible to add Iray shaders to Daz primitive objects? At this point I have not been able to find a way. The primitives are not given the option of shaders in smart content.
Shawn, I do not subscribe to the notion that lighting can be "all wrong." Any number of combinations of lakes, beaches, and cliffs in any section of planet earth can create almost any type of lighting. This image is art not an architectural visualization.
What makes this compelling? The amount of beach might not appeal to your sensibility but it gives the overall composition more shapes to imply a real world "movement." I use movement in a sense that everything appears to be working in time and space and the camera just grabbed one moment instead of, let's say, a portrait crafted in a studio.
Just because you don't subscribe to notion of light being wrong only hampers you. Your lighting ignores the physics of light. You ignored your own set up. Wether you like it or not, your lighting is wrong. Perhaps learn about lighting, take a solid criticism and improve. My career has been in movies and television as a camera person and cinematographer (all about light), so I have spent fifteen years learning about, playing with and controlling light. Don't cite, "it's art" as an excuse for a weak image you created. Light is light and behaves as it does.
Landscapes do not create light. They can bounce light though. In the real world, light comes from the sun and man made sources (I'm leaving out life that emits bioluminescence). Water and cliffs simply bounce the sun's light.
I gave you solid feedback and you got butt hurt instead of taking the advice and improving yourself as an artist.
Depending on the number of polys that the sand has you might be able to do some of the adjustments with a d-former. You should be able to add the Iray shaders to a primitive just like you would any other shader. I've done it myself as part of testing and setting up shader projects. Be sure you have both the object and the object surface selected when you apply the shader.
Thanks for the d-former tip Khory. Since I never did final rendering in Daz previously any vertex modifications I needed I did in the final rendering program. I did not know it existed.
I am still having problems with attaching an Iray shader to a primitive. Here is how a simple workflow goes for me. 1) Create empty project. 2) Create primitive sphere 3) Select sphere in scene and surfaces
At this point the Shaders section disappears. My guess would be I am missing a step... and that step would be a primitive to vertex object conversion? Or is there something else I am missing?
Hrmm.. I create/new primitive/sphere and select it with the surface selection tool. I have no idea why the shaders are vanishing on you. It can't be needing to convert it to an object because all the Studio primitives are objects (with UV maps). I admit to not having a clue what is going wrong.
It does seem to be an odd problem. I can create a prop in the same scene and select it. The shaders reappear. Selecting the primitive again and the shaders disappear. Are you still using the beta content? I never did use the beta and the incremental update of the new content may be the reason why my environment is not working properly.
And it happens when you use any/all of the Studio primitives? I did use the beta but I'm not sure if the primitives would be effected by that. I think that they are part of the core install of the program.
I have tracked down the behavior (if not the cause). If I select any prop or figure the smart content panel updates correctly. If I select any primitive the smart content panel shows no selection. See images 1 and 2. I guess I should take this to the bug report section.
I absolutely would never have gotten that one. I don't often use smart content and never with shaders. Too many of them are organized in files. Yes you should let them know about that. In theory the primitive should work with all shaders and may just not have the right meta data.
4. In surfaces tab (dont switch to smart content tab after you have selected surfaces) click Presets menu (upper left part of the surfaces tab)
5. Under Presets menu select Shaders menu and you shoud see iray uber base.
Alternative, select the primitive and its surface and go to your content library tab DAZ studio formats- shader presets - iray and apply shaders from there.
Thanks Ben. That works. There are a few things with this "bug", if it is actually a bug, that I will live with. I like dragging materials and shaders in to the Viewport. Since primitives are not officially selected, even though you get the apply dialog, nothing happens. Double clicking it is....