Now Four Tutorials - Stuff for Genesis 3 too
 patience55
Posts: 7,006
Working on some ideas for texturing tutorials IF there be an interest.
1. Dots
Why dots. Well one day a long time ago I came across a set of free textures with dots on it and one of the most ridiculous copyright/usage restrictions/etc I have ever seen. There truly is nothing all that spectacularly difficult about making dotty textures.
So there is also a little tip on how to quickly make a new uvmap to swap to, in the tutorial, the Basic Wear bikini top.
Programs required: image editor that works with layers, D/S [has the ability to swap uvmaps] and of course, Hexagon :-)
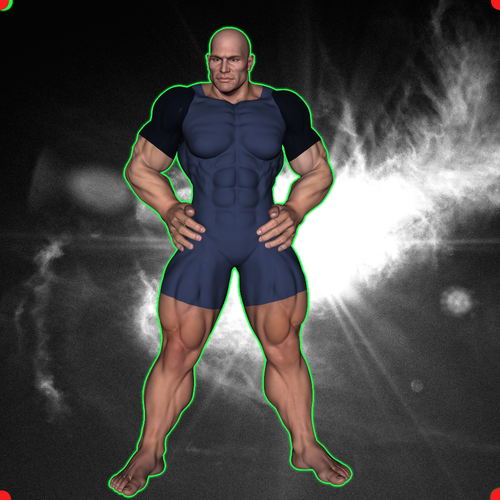
2. Making edges around figures.
Maybe one wants a black outline, or a glowing "transporter beam" ... there is an easy way to get a good start for that edge.
Programs used: Daz Studio [should also be doable in Poser] and an image editor that works with layers.
3. ???
................
Okay :-)


Comments
Yes please, I want to learn those things. That outline looks great. What I need also is good texturing tutorial, I mean I need to learn textures on my own :D
Managed to illustrate the technique of making the outline in but 4 images :-)
So will post those here. If you require more information just ask.
For the postwork, I am using Corel's Paint Shop Pro. One could use GIMP or one of Adobe's fine programs too.
For the "really nice" images one would render as normal.
For the "silhouette" image, in Daz Studio one only requires one light and that turned "off". Nothing in the background of course.
I just used the default 3Delight rendering engine for these.
One may or not get better results with an "on" light from behind, results may vary per project and version of D/S.
Also for "really nice" images, one would not be rendering to only 1000x ;-)
Thank You very much, that will be useful. Though I wished it was in PDF just for easy storing :)
np [no problem] ... will glue them to pages later for you ;-)
Here you go ;-) .pdf tutorial "Making an Outline"
Thank You very much, downloading now. Really much better to have it in one place ;)
Here are the next two tutorials.
One has the dots etc. The other some modeling ideas which may or not be helpful for those using Hexagon towards 3D printing. If somebody who knows better than I if I'm on the right track or not reads this ... if it is all wrong please to send a PM and I will take it down. ty
Other Modeling Ideas
Texturing Existing Models
Thank You for tutorials, they look really good. Will have to read them few more times :)
You're welcome. Working on some modeling for awhile now.
That is good, I was mostly working on painting fence it was much harder to do then I though and still have almost half of it. But today I will rest as much as possible. Lets see if I can finish that Bryce render I started.
Painting a fence ... curiosity grows ;-)
One painting discovery which works in SOME image editors if trying to paint a straight edge is to dab the 1st splash then hold down the Shift OR the Ctrl key and click where the last splash goes in the same line.
........................
Worked a little on some template ideas ... may or not put one together that can be used for .png files with or without skins attached. Depends upon my mood at the time of completion. I keep thinking you know, that in buying a muffin pan, I have yet to have it come with instructions as to what type of muffins to bake with it, recipe ideas yes, but taboos, no. And certainly not past the point of sale. Thankfully that type of situation does not happen with Daz products :-)
Anyhow, when you're making your skin clothing items, be sure to double check "what" the end result looks like on the model in a render.
Maybe this problem doesn't exist with the higher end image editors but it certainly does with what I've got.
Any "merged" works of art MUST be .png at least, NOT .jpeg ... as you can see here.
The exact same settings are on both images, only the type of image was changed on both the defuse and bump.
It is just fence on my house front balcony :) I painted it green over white that I used to do before. I finished front one but need yet to do left and right side.
That looks good, 2nd skin tutorials are very interesting for me. I might try doing some, or at least collecting those that are available on the net for now while busy.
Oh a "real" fence lol ... okay. :-)
Yes collecting anything while it's available is a good idea. I remember years ago while working on a genealogy finding a great website source of information very late one night. It being so late I wanted to wait 'til the next day to glean the required information but thankfully decided not to and pulled an all-nighter. The next day when I returned to the website, it was "all gone". No 404s or anything. Strange.
It can happen :) I am trying to get as much as I can really, but somehow it seems there is more then I can get, but I am doing good for now. Really amazed with my progress, and I am hoping that I will work in the future and just get better. I just need to plan things good and work things out will I get them done, then move to another.
Sounds like you have a good plan working for you :-)
I think I have, though we will see how reality will influence all that, and if I will be able to make it trough and not play some FPS games all day like it can happen :/. Atm I was thinking how to make some buildings in hexagon or any other modeling tool but I need to set exact dimensions for example length and widith 12m. I hope that is possible, then I actualy might build something on my own too :). It would be nice to have my own buildings set and to make terrains and then add other things to it like vegetaion and so on. I am hoping it is possible, but I will need to work on it.
Oh yes it is very possible with Hexagon. Check out the "lines" tab ... pick the one that is a rectangle for example and click somewhere in the viewport, move the mouse over some and click again. One rectangular line drawn. Then select "all" lines and holding down the Ctrl key put the lines "up". Now you have 4 walls ;-) That's the real easy part ... the rest takes a little more time lol ...
Ok, thank You very much. I will have to try it :)
i don't know, maybe everybody has a 3D paint program that can work with the new uvmaps that Genesis 3 has, but I do not.
So yes there is a way to use an older 3D paint program to paint textures for Genesis 3 albeit it's a bit of a walk through the park.
I used Hexagon which I think a must have for this project ... or one that works the same way with the maps.
Daz Studio 4.6 is the edition I was using.
And of course my ol' Black's 3D Paint program which can be quite the gem at times :-)
If your 3D paint program doesn't support the way the new UVs are laid out, you could always
select "Collapse UV Titles" in the export settings and magically it'll be just like the previous figures. :)
Okay that's great to know about, thanks. Don't recall seeing that option in 4.6 but I do have 4.8 on my laptop so will go that route :-)
^^ I only noticed it in the new 4.8 myself :)
I haven't tried in 4.8 yet, but in 4.6 there does not seem to be a way to give it a new uv set. Have you found a way? Or anybody else?
I did it! I did it! :-) :-) :-)
I found a way to make a new uv set for Genesis 3 :-) Yes I did :-)
If others have fancy programs that can do all that, wonderful ... for the rest of us hobbyists, HEXAGON ROCKS MAN!!!!! YessirreSir.
I used the beta 4.8 which can co-exist with 4.6.
And I've got a bunch of MR stuff with permissions to use them for freebies so ... do NOT get expectations too high for textures ... my first one I pulled because somebody rated it low but didn't bother to say why and you know, I still don't know what was so wrong with it ... unless of course their expectations as to where "certain" parts of an alien's body were located did not happen to agree with where whoever the heck thought of that character's physique for a Scifi program in the first place. Kneecaps. I dunno either.
... oh this going to be 'fun" lol ...
Patience, you rock, girl.
Thank you :-)
Spent the day editing images and got most of the last chapter's work done.
Tutorial will cover the 2 ways to get a workable map in Hexagon, Shows a start on matching the face because somehow I suspect that would be the primary goal for many [me too] however that is a bit much for some to do on a first project of this nature so am covering the "fingernails" from start to finish [including how to save it] so everybody can grasp the workflow.
I hope it will be soon available, though I am a bit busy lately no time to download things :/
Well we do need to let the ink dry ;-) Needs proof-reading and a little culling, and then gluing together ... big maybe for the weekend.
Well the ink has dried although the white-out [correcting fluid] might still be tacky ... so plod through carefully.
Here is the link:
http://patience55anotherone.deviantart.com/art/Stuff-for-Genesis-3-pdf-tutorial-543793000