Removing Limits
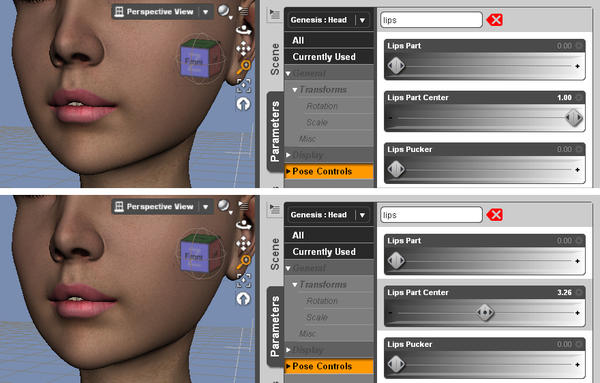
I'm using DS4 Genesis models, when I remove the limits on "Pose Controls" on facial expressions (ex: lips movement) or breasts movement, there comes a point when that certain part doesn't move further anymore. Those that have a minimum value of 0 doesn't change when you turn them negative and any value more than 1. Unlike in DS3, it still moves (even if it's beyond human capabilities).
How do you make them move like how I wanted?
[edit] I added an attachment


Untitled-2.jpg
880 x 562 - 303K
Post edited by useless_1975_837db407db on


Comments
You need to make sure you are removing limits on the actual morph or body handle, not just on the remote control property (which is what a lot of the Pose Controls are). Property Editor will let you tease out the chains.
I'm still new with this.
How do I remove the limits on the actual morph/body handle like what you said?
Also, how can I access the property editor?
This thread may be of some help: http://www.daz3d.com/forums/discussion/3379/
^
How do I open that Pose Preset window?
also, I don't understand that holding CTRL thing.
The dials doesn't move when I hold CTRL.
Help! Anyone? ):
You hold the ctrl key (cmd on a Mac) when you double-click the preset to apply it.
^
I don't understand.
Let me just repeat what I'm after since I think the discussion is getting somewhere else.
Any facial / breast values doesn't move any further beyond positive 1 and less than 0 even if you turn off the limits.
I want it to move just like how it works in DS3.
Anyone know how to make it work like that?
Some morph dials are actually controller dials that set several real morphs at once. The Eyes Closed dial is an example of this, it sets the right and left eye closed dials. At the bottom of the settings box is a list of the other morphs the controller dial sets as you can see in the following image. The limits will have to be turned off for all of those also.
^
There are morph dials that aren't controller dials that I want their limit to turn off but still limits their value from 0 to 1.
Anyone else know how this works?
Could you please post a screen shot of the parameter settings box (like I did) of one of these morphs you are have problems with?
I chose Lips Part Center as an example.
The max value of it is 1, when I remove the limits, any value greater than 1 (or less than 0) doesn't make the lips move any further.
DS3 isn't like this.
How do I make it move even further?
This also applies on other parts of the body.
Hi Weiner...
As the others have said, the parameter that you are removing limits from is a pose Controller (CTRL). It's not the actual morph.
To do what you want you need to remove the limits of both the controller and the morph.
Most controlled morphs are hidden by default and you will need to click on the Menu (the little triangle with the lines) on the Parameters pane and check Show Hidden.
Next you need to locate the actual morph, see the first image below, click on the gear cog for 'Lips Part Center' and select Parameter Settings.
In the below image, circled at the top, you will see the internal property name (CTRLLipsPartCenter), in the lower box you will see where the morph is located (Genesis:Lips Part Center)
This means it can be found on the Genesis root node.
I've shown the Property Editor and Highlighted the morph. In the Hierarchy panel you can see that CTRLLipsPartCenter is the controller for PHMLipsPartCenter and in the Grouping/Settings panel PHMLipsPartCenter is located in the Lips group under Pose Controls.
In the second image I circled the hidden Lips Part Center morph in the Parameters tab. You can see that it is located on the Genesis root under the Pose Controls group just like the pose control on the head.
Click the gear cog and select Parameter Settings and you can see where I've circled the Controller showing the Lips Part Center controller located on the Head.
Un-check Use Limits and Accept.
Now select the head and when you adjust the Lips Part Center slider the morph should move past the limits.
If the controller listed more than one morph like in the image jestmart showed, you would need to do this for each morph listed.
Now here's the bad news, once you close studio or create a new scene all of these limits will revert back to being on, even if you save the scene.
The reason, the limits are set in the Genesis .duf and morph .dsf files. So when ever studio reads those files it sets the limits. The only way around that is to re-save all of the Genesis files, and I WOULD NOT recommend doing that unless you know what your doing.
Well I hope this helps... :)