How to achieve this Skin quality ?

MelonLordMelonLord Posts: 45
edited June 2023 in New Users

I've been rendering for sometime and Iam trying to achieve the same skin quality as this one shown below but I cant seem to get it right (both with G8, G8.1 and even G9 !!!). Is there any special steps I need to take or apply a specific asset or something ? Any help is appreciated, thanks.
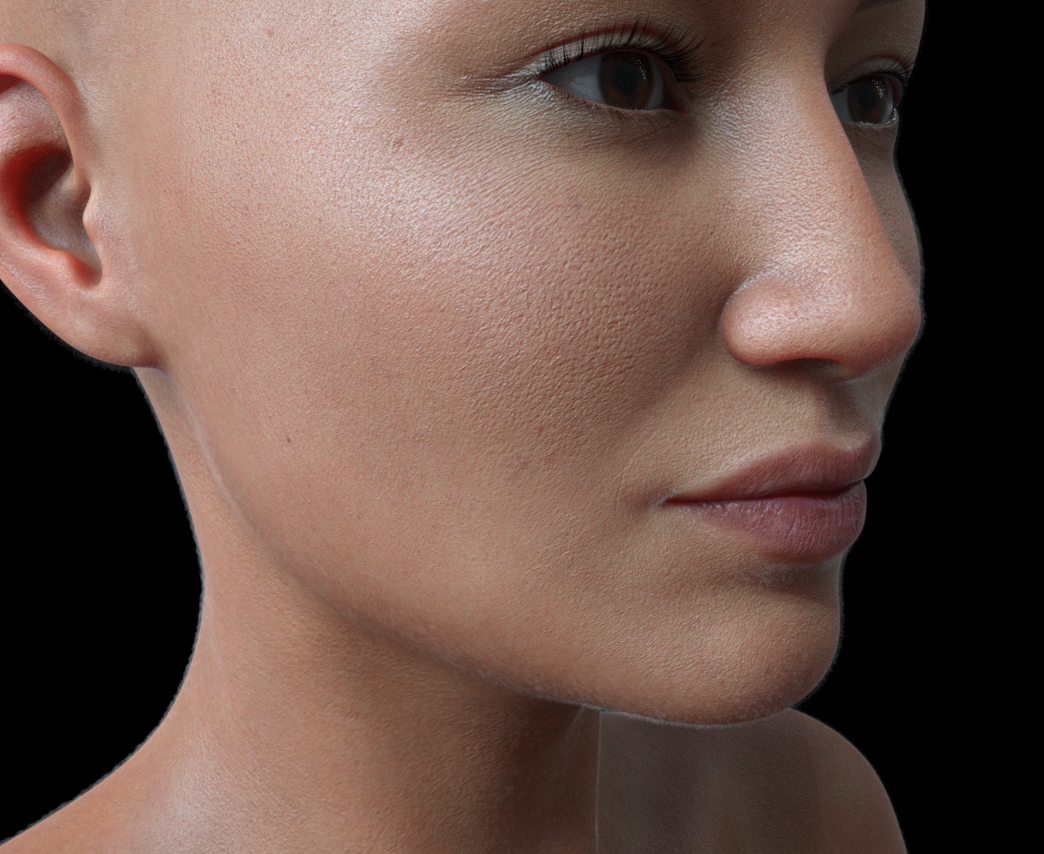
The render I want :

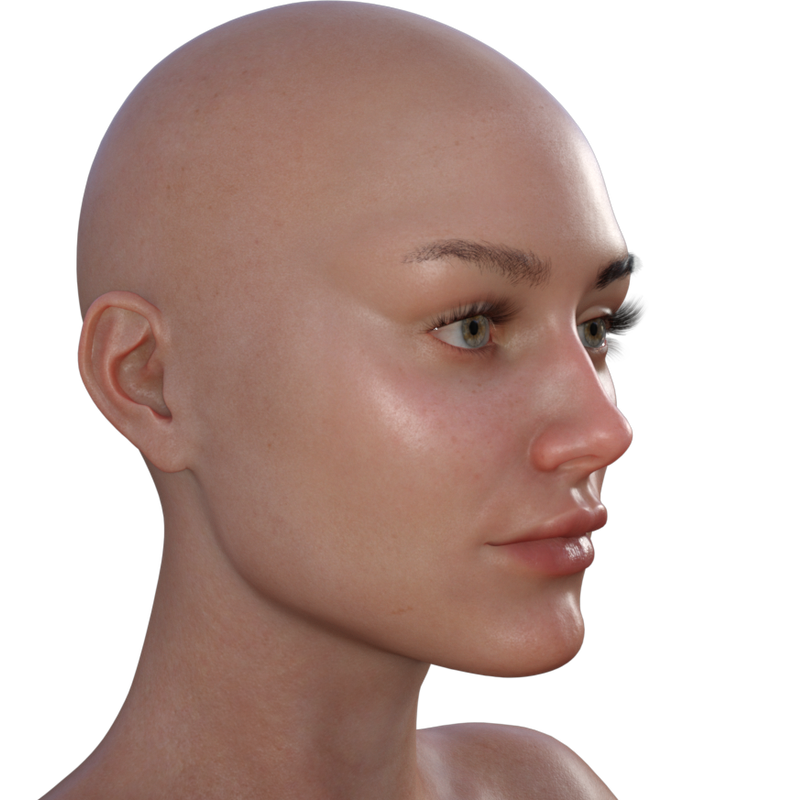
The render i usually get :

Post edited by MelonLord on

Comments

  • lilweeplilweep Posts: 2,406
    edited June 2023
    • High Definition details: Use either HD morphs in conjunction with high SubD level (e.g., ~ level 4) or otherwise use Normal maps and Bump maps.  You can use a combination of all three, of course.  Just be aware that Normal Map details will often just be a baked version of the HD morph details, so depending on what maps and morphs you are using you might not want to use both HD morph and Normal map for a given character at same time or it will represent doubling of the HD detail.  But you can always eyeball what looks good. 
    • Skin microdetail maps: The PBR Skin shader has slots for skin details, so can plug some micro facet detail maps in there if you want. (I dont think this is generally necessary)
    • Specularity: Use good quality specularity or roughness maps, ideally they should have speculairty details that correspond to the High Definition details, but probably not totally necessary.
    • Vellus Hair: That character in your example picture is using Those Things's vellus hair product.
    • Skin Shader: Use skin shader with good SSS settings and specularity settings.  MelissaGT has some tutorial somewhere for setting SSS for Uber shader, and there are also some advice buried within various forums like this one.
    Post edited by lilweep on
  • FenixPhoenixFenixPhoenix Posts: 3,071

    Your render shows signs of the "denoising" filter being turned on, which will make the skin looks extra smooth and will lose a lot of the detail. So also ensure the denoiser is set to off in the render settings.

  • MelonLordMelonLord Posts: 45

    lilweep said:

    • High Definition details: Use either HD morphs in conjunction with high SubD level (e.g., ~ level 4) or otherwise use Normal maps and Bump maps.  You can use a combination of all three, of course.  Just be aware that Normal Map details will often just be a baked version of the HD morph details, so depending on what maps and morphs you are using you might not want to use both HD morph and Normal map for a given character at same time or it will represent doubling of the HD detail.  But you can always eyeball what looks good. 
    • Skin microdetail maps: The PBR Skin shader has slots for skin details, so can plug some micro facet detail maps in there if you want. (I dont think this is generally necessary)
    • Specularity: Use good quality specularity or roughness maps, ideally they should have speculairty details that correspond to the High Definition details, but probably not totally necessary.
    • Vellus Hair: That character in your example picture is using Those Things's vellus hair product.
    • Skin Shader: Use skin shader with good SSS settings and specularity settings.  MelissaGT has some tutorial somewhere for setting SSS for Uber shader, and there are also some advice buried within various forums like this one.

    I did tried Vellus but dropped it cause of how long it took to render and honestly, didnt see much difference with it. Besides that, I am absolutely clueless about all the other points you've mentioned. Also one more thing, I've tried experimenting using Skin Detail Resource 2 and got a similar result but it's still nowhere near the one above


    forum_q2.1.png
    878 x 873 - 825K
  • MelonLordMelonLord Posts: 45

    FenixPhoenix said:

    Your render shows signs of the "denoising" filter being turned on, which will make the skin looks extra smooth and will lose a lot of the detail. So also ensure the denoiser is set to off in the render settings.

    Yeah normally it's set off but again the skin pretty much looks the same even without denoiser

  • GordigGordig Posts: 9,903

    It's worth pointing out that the example of a render you want to achieve is zoomed in significantly more than your render. There might be detail in your render that you're not seeing because it's a wider shot. Other than that, using PBRSkin shader with a micro detail normal map, like the ones included with every (I think) 8.1 core figure will get you a lot more visible detail.

  • MelonLordMelonLord Posts: 45

    Gordig said:

    It's worth pointing out that the example of a render you want to achieve is zoomed in significantly more than your render. There might be detail in your render that you're not seeing because it's a wider shot. Other than that, using PBRSkin shader with a micro detail normal map, like the ones included with every (I think) 8.1 core figure will get you a lot more visible detail.

    It feels like you're speaking in another language. Does it have to do something with using PBR Skin Manager ? About the zoomed part, I've tried using the same camera settings but still it doesnt hold on par with the image

  • GordigGordig Posts: 9,903

    PBRSkin is the skin shader that was introduced with G8.1, and is used on all the core figures as well as many PA characters. You can find it in your default resources. Whereas Iray Uber shader has a single normal map slot, PBRSkin includes a micro detail slot. A typical normal map for a figure will be 4K and cover the entire UV island, like the entire face. The micro detail maps are 4K or even 8K and cover a small area of skin, but are tiled so that you get much finer details, which will help you get to the skin quality you're after. If you have any 8.1 core figures (Victoria, Brooke, etc.) try applying their skin and give that a render.

  • MelonLordMelonLord Posts: 45

    Gordig said:

    PBRSkin is the skin shader that was introduced with G8.1, and is used on all the core figures as well as many PA characters. You can find it in your default resources. Whereas Iray Uber shader has a single normal map slot, PBRSkin includes a micro detail slot. A typical normal map for a figure will be 4K and cover the entire UV island, like the entire face. The micro detail maps are 4K or even 8K and cover a small area of skin, but are tiled so that you get much finer details, which will help you get to the skin quality you're after. If you have any 8.1 core figures (Victoria, Brooke, etc.) try applying their skin and give that a render.

    Oh okay now I get it. I often wondered what those pbr and uber files were for (i thought those uber files were for iray and pbr for interactive render mode). I have another selfish request. Can you guide me on this, I'm absolutely clueless on how to do this. Really appreciate it

  • GordigGordig Posts: 9,903

    They're both Iray shaders, but Uber is an all-purpose shader while PBRSkin is specially configured for skin, as the name suggests. The easiest way to get started is to either apply an 8.1 material preset to your figure and/or select an 8.1 figure material preset and hold CTRL while you add it to the figure. In the dialogue that pops up, change Maps to "Ignore", and it will load that figure's surface settings on top of your existing texture maps. This will give you an idea how PBRSkins are set up. If you chose the latter option the micro detail maps won't be applied, so you can just add those manually.

  • GordigGordig Posts: 9,903
    edited June 2023

    Here's Monique 8 next to Jada 8.1. Monique's skin looks pretty good, but even farther away from the camera, you can clearly see that Jada's skin is more detailed and realistic.

    MoniqueJada.png
    2400 x 1350 - 5M
    Post edited by Gordig on
  • lilweeplilweep Posts: 2,406
    edited June 2023

    MelonLord said:

    lilweep said:

    • High Definition details: Use either HD morphs in conjunction with high SubD level (e.g., ~ level 4) or otherwise use Normal maps and Bump maps.  You can use a combination of all three, of course.  Just be aware that Normal Map details will often just be a baked version of the HD morph details, so depending on what maps and morphs you are using you might not want to use both HD morph and Normal map for a given character at same time or it will represent doubling of the HD detail.  But you can always eyeball what looks good. 
    • Skin microdetail maps: The PBR Skin shader has slots for skin details, so can plug some micro facet detail maps in there if you want. (I dont think this is generally necessary)
    • Specularity: Use good quality specularity or roughness maps, ideally they should have speculairty details that correspond to the High Definition details, but probably not totally necessary.
    • Vellus Hair: That character in your example picture is using Those Things's vellus hair product.
    • Skin Shader: Use skin shader with good SSS settings and specularity settings.  MelissaGT has some tutorial somewhere for setting SSS for Uber shader, and there are also some advice buried within various forums like this one.

    I did tried Vellus but dropped it cause of how long it took to render and honestly, didnt see much difference with it. Besides that, I am absolutely clueless about all the other points you've mentioned. Also one more thing, I've tried experimenting using Skin Detail Resource 2 and got a similar result but it's still nowhere near the one above


    Sorry i just browse the forums using the 'New Threads' feature and sometimes dont see that they are in New Users subforum before responding.

    I can simplify what I said. 

    • High Definition details:
      • The genesis character base mesh is very low poly (in other words it doesnt have a lot of geometry to work with). You can see this for yourself if you turn on any of the wireframe viewport options.  Anyway, you may want a highpoly mesh to be able to get more detail using HD morphs.  The base mesh can be further subdivided into a highpoly mesh on the Parameters tab, under Resolution (the options are Base and High Resolution).  The High Resolution option enables Subdivision, which means you can increase the geometry by virtually subdividing it with the Render SubD or Viewport SubD values.  (These two options give you a highpoly mesh only when you render or only in the viewport respectively.  It will slowdown your viewport if you have the viewport SubD on, so typically I leave this at 1 and only have a high Render SubD.)
      • Now with a high poly mesh, you can use HD morphs. HD morphs are made to change the shape of the character at very small scale to get fine details like pores, wrinkles, etc.  On Daz Store, any character that has "HD" in the name comes with HD morphs. Some may be better than others.  You can activate these by dialing in HD morphs in either the Shaping or the Parameters tabs.
      • Besides HD morphs, another way to get detail is with texture maps.  Most characters will come with Normal maps and Bump maps. These are just images that are intepreted by the render engine as height details on the skin like pores and wrinkles etc.  When you load a character or apply a character's skin material preset, usually the normal maps and bump maps will be loaded.  You can see these under the Surfaces tab.  Unlike HD morphs, Normal maps and Bump maps do not require high SubD, so will work even at low poly.
    • Skin microdetail maps: already covered in other post
    • Specularity: Some characters will come with high quality specularity maps. Once again, these are just image textures that the renderer interprets as a glossy effect.  The textures assist with the appearance of skin details by adding a glossy effect and roughness to skin where needed.  If a character is well made, it will have high quality spec map that complements the HD morph/normal map details.  You can see this texture map (and all other maps) used in your skin shader on the Surfaces tab.
    • Skin Shader: There are different approaches to rendering skin.  Some people use the all-purpose Uber shader and some use the newer PBR Skin shader.  The shader is just telling the renderer how to render your scene objects.  Both the Uber and PBR Skin can achieve realistic skin, and both have advantages and disadvantages.  The PBR Skin despite being newer and made specifically for skin, is lacking some SSS settings that the Uber shader has.  Either way, whichever shader is being used, it will make a big difference on realism if the skin shader has good SSS settings.  SSS = subsurface scattering.  A lot of vendors dont have this set up very well off-the-shelf.  So tweaking SSS can improve the skin quality a lot.  Again, these SSS settings are adjusted on the Surfaces tab, but if youre new, you might want to just focus on orienting yourself with other things first.
    Post edited by lilweep on
  • The shadows in the render you hold up as an example are, while not knife-edged, sharper than the shadows in your own render. You also seem to have light coming from more directions (which may be part of the softening). The softer the lighting, the more detail will be blurred out - this is why candle-light is seen as more "flattering" than electic light.

  • Is there a master class somewhere with all this information on skin-specific surface settings? Seems like a lot of very important information to learn.

  • I think Digital Arts Live might have doen one, but most of what i say above is fairly generic - some, such as the effect of the size of the light source, aplies to real-world photography (hence the use of soft-boxes).

Sign In or Register to comment.