Struggling with Weight Mapping for rigged ArtStation clothing [solved]
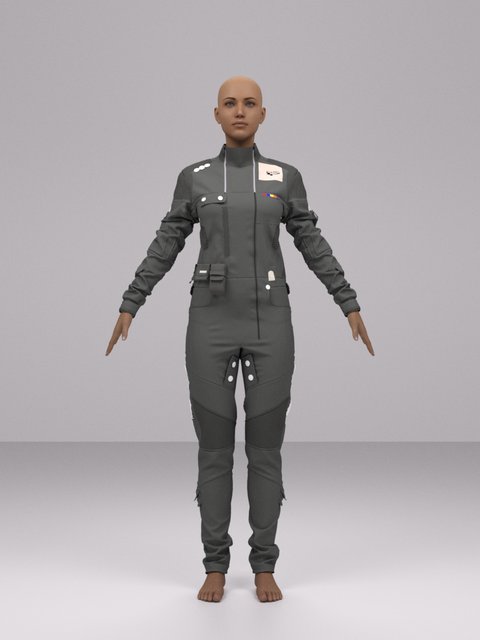
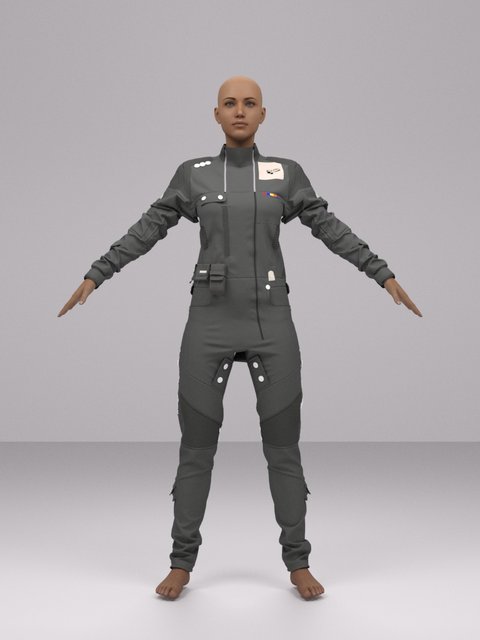
I am trying to rig a jumpsuit that I bought on ArtStation for Genesis 8 Female. The clothing was created in Marvelous Designer using an Genesis 8 avatar that was not in the default A pose (arms and legs were not spread apart enough).

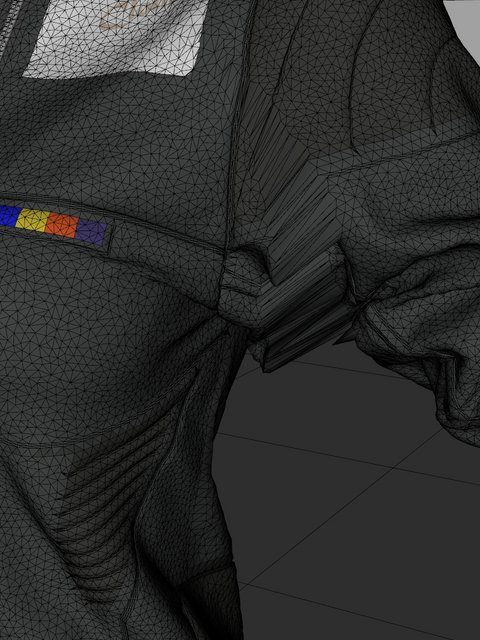
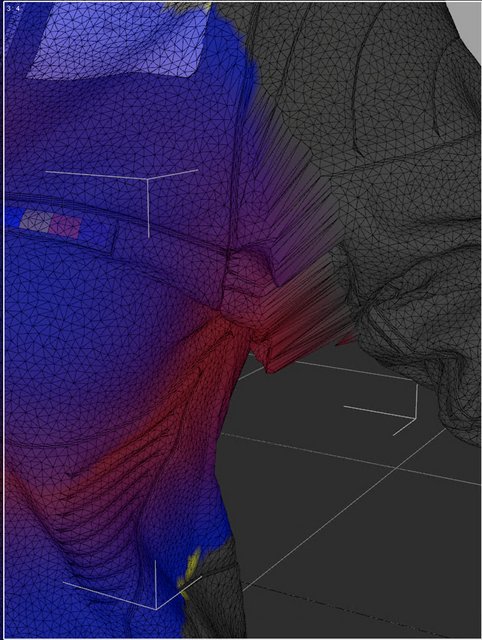
As a result, Daz's transfer utility is mapping vertex weights in the armpits and crotch regions to the wrong bones.

When the arms are moved from the torso, the vertices in the armpit sections are sticking to the chest region.
 |
 |
I have tried redistributing the vertex weights in the affected area(s) to the correct bones with no success. I have also tried manually assigning the responsible vertices to the arm with less than optimal results.
From other models that I bought, I think that this seems to be a frequent problem with ArtStation models where the avatars are a non-standard shape or pose. From what I have read online, artists frequently deal with this using morphs and/or manual weight mapping but I can't seem to figure out how to do that for the jumpsuit. I am hoping that there is a native solution in Daz to correct and fine-tune weight mapping misalignments.
Any advice, assistance or references (e.g. tutorials) on how I can correct these types of issues for clothing with complex geometry would be greatly appreciated.
Thanks!


Comments
In principle, pose the figure to match the outfit and disable JCMs affected, then activate the Joint Editor, right-click>Edit>Bake Joint Rotations. Run the Transfer Utility, then pose the outfit to match the base figure and use the Bake Joint Rotations command on the posed outfit.
Richard,
Thanks. You are a fount of wisdom as usual. I will try this and post the results.
If you have Marvelous Designer I would try redraping in the correct pose as well as making the mesh density a bit lower. Dense triangle mesh like that is very hard to weightmap, I have only had limited success with it -with long thin triangles especially don't play well with smoothing and morphs.
In Marvelous Designer, resimulate using morph target to the default pose. Or create an animation from current pose to default pose and record simulation over animation timeline in marvelous designer.
As Mada said, In MD, you can use Remesh or Retopolize options to get quads. Remesh at relatively low poly (=high Particle Density) to make ideal mesh for DAz Studio. Remesh is a lot easier than Retopologize, since it's just a one-click button. There used to be a Quadrangulate option, which just converted every pair of tris to quads, but im not sure if that is still in the most recent released of MD. I cannot find that option anymore.
You should also make very tight version of the clothing in MD before doing Transfer utility. After you get the weight painting from Transfer Utility, you can swap out the tight version for the looser/final drape version.
Also, if you already have Marvelous Designer, do you really need to rig the clothing? You can just simualte it in MD. If you are doing content creation workflow for selling of daz content, would that be covered under the artstation license?
also was the pictures posted in OP after selecting the 'reverse source shape from target', or whatever the option is called, when doing transfer utility?
lilweep, Thx.
I rigged the suit using that reverse option. For whatever reason, the suit does not retain its basic shape when simulated in marvelous designer with a correctly posed avatar. But TBH, having just gotten MD, I am not very knowledgeable with that software so I am not sure if this is due to a flaw in the clothing design, or if it's something else.
I believe that my best bet is to fix it in Daz and/or use Blender to do post work. It's part of a project for my personal use and my own edification.
Mada, Thx for your comment.
I am not very knowledgeable with MD, but during the resimulation, the clothing starts to fly apart. As for reducing mesh density, mb I can do that in Blender before rigging the item.
MD is a very basic program and easy to brush up on how to use it in a few hours.
It will probably give a petter result to just simulate in MD to the correct default pose than do anything else to get it into that pose.
The fille you purchased presumably comes with a .zprj file.
Important concepts when exportting:
If go for resimulation in MD with a G8F default A-Pose , more or less is as above steps by using Morph Target. Then export the garment to obj, import into DAZ for fitting to the figure with Transfer Utility (no need to set Current / Reverse Deformations in this way) . Lots of tutorials could be found on youtube.
Well since you're familiar with Blender, you may export the garment (in Pic 2) to blender, smooth the armpits with smoothing brush, then export to obj file. In DS, use Edit - Figure -Geometry - Update Base Geometry to change the Vertex Positions with the obj file. Done ~ Most of the time I myselft go for this way as it's faster...
~ I simulated your case as below, the mechanism is almost the same ~
PS: You better do Quadrangulate in MD...
Lilweep & Crosswind,
You guys are so fantastic! Thanks to you all your advice. I am going to try both approaches this week and post the results. I think that I was hoping for a pret-a-porter solution when I purchased the clothing, but given the pointers that you have given me (and the nice hefty license fee that I paid for MD), I am going to spend some time trying to understand the basics of clothing design. Just from the deeper understanding that you both have, I think it's definitely worth the investment.
I will post my results here.
Thanks again!
So I am clearly doing something wrong because when I resimulate the garment using an imported pose transition animation, this is what happens.
that image resolution is really tiny to me, so cant see most details, but are you using high particle density (e.g., 10+) on all garment pieces to make animation easier?
in any case, animation may be too fast. In the animation box to the bottom right, there should be a time warp setting. Increase that parameter to something like 5 or 6 to make it as many times slower.might help.
Another thing, since it's very minor pose transition, you can also just select the whole sleeve or leg in the 2d window, and then move it in 3d window. Move so the cuff is around the wrist. and then resimulate.
You can also select everything and freeze everything. then select and unfreeze a sleeve/leg at a time. so youre just simulating one thing at a time, might make it easier to compute the simulation. then unfreeze and resimulate it all once it is behaving a bit better.
It seems not really correct... pls refer to the steps as below:
I simulated such a 'appr. minus 15 degree arms bend' pose for the avatar... you prepare an obj file of G8F with default A-Pose beforehand...
Hmmm... I followed your steps and this was the result...
Is there something about the garment that is causing the distortion?
Thanks.
Pls use Normal (Default) to simulate...
No change with normal simulation setting. Could there be something about the garmet properties that prevents it from moving with the avatar?
something could be frozen or pinned.
you can rotate/zoom play around while simulating, pull and prod the offending parts of outfit while simulating to deduce what is happening to them
or there is a hidden avatar, delete all avatars. Avatar> Delete All Avatars
I don't know how you do it, but that did the trick. That ... or there were some pins that I didn't see before.
Thanks to everyone for all your help. I really appreciate it!
Tighter outfit that hugs figure more closely will give a better result from the auto weighting of Transfer Utility.
You can replace the geoemtry with a better drape after Transfer Utility has given you the weight mapping.
to do a 'tight' version of outfit, you can put a negative pressure value on pattern peices so that they hug the figure more closely. Alternatively, change Warp/Weft to smaller value does the same thing to make a tight outfit.
The armpit and crotch on clothing are the areas that usually need a lot of tweaking with weight mapping and pJCM to fix them.
Another option, if you want to continue using MD (which admittedly is expensive after free trial) is to just use MD to drape to pose, rather than making a conforming rigged outfit
Yeah, the armpits and crotch are problematic.
I came across a pJCM tutorial on here a while back - I will do some addtl research into how to fix those.
Thanks again for your help.
Nice! but you have to fix those 'pJCMs' first... before making her dance quite a few tutorials there...
LOL, yeah the dance was just to see what was breaking in the fabric.
I found a clothing tutorial by Catherine3678ab that should cover it. I will look through it later this week and hopefully move on from there. Sounds like this is pretty standard fare for designers - kind of the same problems that tailors dealt with back in the day.
Thanks again for the help.
Yes, indeed ~ and Catherine's tutorial is great. Good luck and Happy Rendering !
I think SickleYield has a free tutorial on fixing weights and then doing pJCMs for underwear on youtube. If i wasnt so lazy i would search for it
Making conforming clothing is so much work, that's why it's easier sometimes to just have MD as a tool for doing soft clothing so you dont have to do any of that stuff and can use all the clothing on artstation etc without having to worry about it. Maybe worth the money for an MD license, maybe not...
Yes, Sickleyield's 'Tanga' fixing tut: https://www.youtube.com/watch?v=wHfe6t2J4EY
and better take a look at:
Mada's Daz3d University series (making and fixing): https://www.youtube.com/watch?v=Ii16tUmLzD8&list=PL2SdKrOTXeXA1qMgNE84AsM8_Wq63gOBF
Fugazi1968's Channel (lots of Marvelous Designer / Pt tutorials): https://www.youtube.com/@3dmegaverseJohn/videos
Thanks to the PAs like them who're willing to show their workflows and skillsets in the tutorials!
And yea, if one loves making garments with MD, it's worth having an individual license. I was happy to get one 7 months ago even if I was just a MD newbie at that time...
Wow... What an awesome thread!
I don't have anything to ad, but I wanted to thank the OP for the question and give a big thanks to all the folks who have chimed in with their advice.
Definately bookmarking this post for later use!
Lilweep, that makes a lot of sense about posing in MD. In fact, this all started because I was looking for a realistic, "non-sexualized" jumpsuit product for an Expanse themed render, and I couldn't find one that I liked in Daz or Rendo. I figured that I don't want to be too dependent on any one software product so I would like to understand how to "roll my own" for things like animations or multi-posing. I just want to get the Daz workflow right once just so I have the option in the future. Maybe later, I'll even dive into learning garment making on MD when I have more time.
Crosswind, I agree about the MD license. Luckiy, I am a student so I was able to get the discounted rate.
Thanks all for the extra tutorial suggestions. I'll give those a look as well.