Questions: Shaders and Mats Old and New
 JasmineSkunk
Posts: 1,906
Hello. 
I am trying to catch up on all I missed out on and refresh my mind on whatever I once knew. I am really struggling with Material settings. I don't think I ever really properly learned DS settings in the past anyway. I was using Poser alot back then and sometimes Carrara, so though I am aware that things have changed, I have no idea how to approach or fix the problems that I'm encountering. My bigest struggle is trying to figure out how to change settings that were standardized with old DS settings that make everything look really bright and white in Iray.
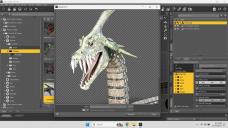
For example: My Dinokonda here. He looks like he saw a ghost! How do I fix this? Where can I find info on using the Shader builder thing? It looks like it's node based, which I'm kind of familiar from using Filter Forge years ago, but I can't find current documentation to teach me how to use it or what the nodes do or how they can work together, etc?
Also... those old settings for DS don't seem to have an option that I can find to allow me to update them.
Any help would be greatly appreciated!! Thanks in advance! 


Comments
This might help you http://sickleyield.deviantart.com/journal/Iray-Surfaces-And-What-They-Mean-519346747
On your image looks like you have a 3Delight Uber shader you might poke around and find the shader script file !iRay Uber Base In the content library under Default->Shader->iRay->Uber is where you will find it. Treat it like a shader so select the figure in the scene then go to the surfaces tab apply the shader to all regions.
Thank you, DollyGirl!
Having a map in the original shaders Reflection Colour will do that. Iray traces light, so you don't need or want maps faking reflections.
I see!! Thank you, Richard!
I'm still tweaking as I try to understand, but I think he looks much better!
Thanks again, guys!
Yes! You're getting it nicely! Great job!!!
For teeth and other things, try playing with the Translucency Weight slider. If it's on 0.00, turning it up by any amount will grant the Translucency Color node. Try dropping the base color map into that!
There are often other maps that can work nicely in the Translucency Weight parameter (the one you turn up to make Translucency work). For example, if there's a map for the above creature that's white where the prominent scales are and somewhat darker or even black everywhere else, try that in the Translucency Weight. If it gives an opposite effect than what you need, click the image and go to Image Editor, click on Inverse Off, and toggle it to On.
These sorts of tricks work great in other parts of the shader as well. Play around, saving when you have something you like before going any further. You never know, right?
Have Fun!!! I sure do!
When I bought Sol for Genesis 3 & 8 Females, I liked the materials so much I started looking really close at the settings and what maps were set to control what. This is an excellent way to learn! If you have something in your library that looks Fantastic in Iray, try having a really close look at the materials to see what you can learn from them!
Once you get used to that stuff, you can also make your own maps in an image editor to control things like Translucency, Refectivity, What parts should have Metalic properties and the like. It's a Blast!
Just use existing maps to get you started and, as soon as you start editing, save it with a unique name before you accidentally Ctrl S over the original! ;)
Thanks, Dartanbeck! Those are great tips! Very much appreciated!
It's truly my pleasure! I love what you've done so far so I wanted to give you a nudge to keep that going! Bravo to you!
Thank you! The encouragment is helpful too!
This one is a bit more confusing to follow/type, but it works great for me:
Note - I'm using "Sol" as an example, because she's my Goto for this sort of thing. Just replace Sol for any figure you already have that has good Iray shaders - even those that come with Daz Studio are Excellent!
Now, most legacy figures won't have all of the maps. For now, if it's using one of Sol's Roughness maps, just use your Bump map and see how it goes. If the effect is too strong, use the color chip next to it and add some gray.
Go through each group of sufaces like that and you'll have a professional Iray shader for your legacy figure.
Cool! Thank you!
Have Fun JasmineSkunk!!! I know you will!
You are so right! I am having fun!! Thank you!