Transfer Utility
Hi all,
After looking at every single tutorial on youtube im still no closer to fixing my problem so here we are....
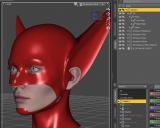
i exported a figure and modelled this headgear to fit (not concerned with ears visible will just hide at later point) see pic 1
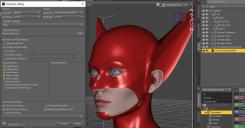
Used transfer utility and used those settings see pic 2
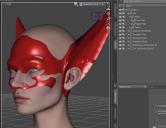
Result see pic 3
Ive tried every different combination i can think of and seem to end up with the same result, the main problem i have is the "crease" above the ears,
ive tried to redo the weight maps and it does absolutely nothing , smoothing modifier nothing. What i have noticed just before i posted this is
that it seems to be to do with the head morph, as you dial it up it becomes more pronounced and using different head morphs seem to
produce the same effect. I have tried the transfer utility on a figure direct from characters AND just loading gen 9 and applying the morph then running
the utility. same out come.




Comments
on image 2, you have 'reverse source shape from target' unticked. If you are using a non-default shape, you need to tick that. If unticked, transfer utility is applying rigging from default base figure.
As an aside, you should arguably start by making the outfit for base shape, not a morphed shape. Since the reverse source shape from target approximation will be more imperfect.
Ok i took on board what you said and quickly altered the mask to fit base gen 9 figure and applied it with transfer utility again
and it works, However once a head morph is dialled in,the exact same effect above the ears are present so still have the same result.
i tried multiple head morphs from various characters and all seem to affect the mask in various levels of severity.
Yes, that's why we have to fix auto-followed full head morph on the wearables...in quite a lot of cases....
As for the ears, you can use auto hide function with Geometry Editor, i.e. when fitting, the ears will be hidden automatically.
So im back to square one at the moment? what do i do now to get rid of the crease?
No ~ you just need a simple fix instead... Pls refer to my video clip in here - https://mega.nz/file/XCx2ybbS#JTQWwh044PusIVtGA0lO0FdZzb7mMzWFH98Ev15X_Qo
Well im not sure you can say youre back to square one because you would have a fitted/rigged mask now, which you didnt before. Youre at least at square 2.
If a character head or body morph is causing issues on clothing, one way to fix is to make a corrective morph for the clothing (i.e.,make a corrective autofollow morph as specified in the post above yours).
You will notice that whenever you dial in a morph on the base figure, an auto-generated autofollow morph gets applied to your fitted clothing. You can see autofollow morphs on clothing by showing hidden morphs. To fix issues with that, you can manually create a corrective morph, load onto your clothing with the exact same 'Name' as the autofollow morph so that it overrides the autofollow morph.
Alternatively, you could consider changing/manually painting the weights that were automatically transfered during Transfer Utility. During transfer utility, i can assume that some of the mesh was weighted to ear bones, which may cause issues - hard to predict de novo.
Not very happy about having to mess about correcting a mesh that daz has screwed up but have little choice - i have used the method crosswind supplied to correct the mask and can verify it works
Thankyou very much for that, at least i can progress with my project now - i was hoping that resetting the vertex weights would alter things but no amount of resetting weights, smoothing etc has made any sort of difference. which doesnt fill me with much hope if i ever do anything more complex in the future.
It's a shame that Daz can't automatically make perfectly rigged clothing for users automatically. I guess if it could, then everyone would be a vendor on the daz marketplaces.
if you want more confidence in the content creation pipeline, there are tutorials about the sequence of steps you need to take to make clothing work. The good all-in-one tutorials you may have to pay for, though.
Another thing/hack to consider with Transfer Utility, is that usually people will use the base Genesis figure as the source (occasionally opting in to use a Projection Template for the Genesis Figure), but another thing you can do, which i guess youre technically not 'allowed' to do if you want to distirbute your clothing, is you could transfer weights from an existing face mask. I.e., if you own an existing face mask that is similar to the one you are masking, you could use that as the Source in Transfer Utility instead of using Genesis figure as the source.
I well understand what you mean since I had the similar feeling when I started to learn and do these things... then it turned me into an "evil tinker", haha ~
Let me tell you why we have to fix these things all the time... because all these wearables we make or we use always have different mesh (polycounts, topo, wireframe) from Genesis figure. Then if we dial a head / body morph, we see the distortion / crease / intersection, etc. on the conformed wearables...
I show you a simple case below - I cut G9's head to make a "mask", rig it on G9 Base with Transfer Utility... Dial Death G9's head morph ! Then you can see no distortion at all, very smooth... just because of the above reason.
So pls just relax... When "fixing things" turns into a routine, you may get used to it... like me...
That last paragraph is indeed not allowed under most license agreements, except for strictly personal use.