Various Questions About Jill Valentine in Battle Suit.
 n.aspros123
Posts: 207
n.aspros123
Posts: 207
Hi.
I've been using DAZ studio for a month now and still have lots to learn. I'm mainly focusing on Resident Evil characters especially Jill Valentine from RE3 remake and Leon Kennedy remake. I've acquired the characters from Shinteo on Patreon and have adjusted them into poses. Next step is to place them into environments.
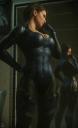
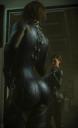
I came across a couple pictures of a render of Jill in a battlesuit. It's a hybrid of the RE5 suit with RE3 remake Jill head with a toned fitness body with pronounced toned glutes and body with ample breasts. I searched on the net and eventually found the creator, alf3d, of the renders. I did ask to buy the files but they said it's too complicated to zip them up. I did ask questions of what they used. They advised me that they used a base Jill character with a bought battlesuit and body morphs. I've looked at said body morphs but not sure what would be very close to images.
So I have questions and they are:
Which body morphs might have used?
How is everything brought together, e.g. Jill's head, body morphs, suit?
Which body morphs were used and were they adjusted with the sliders?
Where can I find these bodies?
I'll attach the pictures of Jill in the suit and the chat I had with the creator.
Battlesuit purchase page
Any help would be very appreciated.
(Edited by mod to remove commercial link)
Daz 3D is part of 
Connect
DAZ Productions, Inc.
7533 S Center View Ct #4664
West Jordan, UT 84084
Licensing Agreement | Terms of Service | Privacy Policy | EULA
© 2025 Daz Productions Inc. All Rights Reserved.
Comments
First, there're a few Daz character products of Jill Valentine sold on the net, you may buy 1 or 2 that you like.
Lots of folks are not satisfied by the out-of-the- box character's Head / Body morph, so they'll further customize the character with various morph products, even sculpting. As for the one shown in 1st and 2nd renders, different combinations of morph package can make the effects but it's hard to tell what morph packages that the creator used. In my exp., I believe if you own a couple of morph packages (e.g. for G8F), like 200 Plus, Shape Shift, Breast Control, Glute Control, etc, you can easily make it.
As for the bodysuit, if you like that one, you surely can buy it as it has a G8F version. But you have to make sure if there're some partial body morph provided in the product, which making the crease above the breasts... If there's no such a morph, I'm afraid you have to sculp it yourself.
How is a body morph like the battlesuit combined with a Jill Valentine head and the suit? When I was mucking around about a month ago, I loaded a Shinteo Jill G8F. Then I loaded a stock G8F but there were 2 bodies standing there at the axis. I know I was loading 2 bodies.
I found this and would like to combine it with a Jill head and the Battlesuit: https://posercontent.com/eleanora-for-genesis-8-female-3d-models-for-daz-studio-and-poser/eleanora-for-genesis-8-female
This is what Studio is really great at - mixing and matching. You'll need to buy the Eleanora character from the store and the battle suit.
There are many ways to go about this but this will work: Load the Eleanora character and then switch to your parameters tab. Click the 'Currently Used' option and dial the Eleanora head morph to zero, essentially reverting the head shape to the default G8F. Just below Currently Used you will see the actual character which you should should switch to. In the filter at the top of the right hand side of this pane (contains the text 'Enter text to filter by') search for Jill and dial in just the head morph. Now load the suit onto your hybrid character.
One of the best bits of Studio is that you don't have to dial in these morphs at 100% or 0%. Try playing about with 60% of Jill's head and 50% of Eleanora's, or any other character you like the look of. Same for the body. You don't have to slave away trying to reproduce someone else's work when you can add your own touch to it. Perhaps people will ask you how *you* did it...
Another way to do this is to load a base G8 figure and then use the parameters tab to find the head and/or body morphs you want. Getting something you like and resembles what's in your mind's eye will take some time and effort as you learn what works and what doesn't. The technical side of it can be explained by pretty much everybody on the forum; the artistic side of it is up to you.
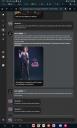
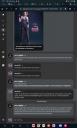
Thank you for the helpful instructions. I'll have to try it. I have Daz Studio 4.22 installed. I noticed with the Eleanora character there's options for just loading the head. See helpful attachment. I'll attach the Jill BattleSuit image again
I tried...
I'm meh about how it turned out. It's hard to get the mirror pose without a mirror right. I wonder if I can find that mirror pose out there somewhere?
There's skin patches poking through the BattleSuit and her shoulders appear to be torn or ripped at the joins. I'll attach the renders I'm trying to duplicate, pathetically. See attached pictures
Regarding pokethrough. It looks like there isn't a smoothing modifer on the suit. If not Edit > Object > Geometry > Add snoothing modifier.
Not sure about the shoulder, but I would check the weightmaps. Looks like they need smoothing of weights.
I eventually found the correct suit and the correct poses and mirrors.
I mucked and adjust a fair few things and generated a simple render pic with no camera. See attachment. @felis Those adjustments helped, thanks.
I suggest you remove those links are they are definitely not legitimate. DM's mirror talk is sold at Renderosity for example.
Removed the links. Apologies, still learning.
I would like to ask about how is Jill's suit in the original render has a more realistic surface material texture and colour and what process is needed to achive this?
Look for the normal or bump settings.
Are there a texture in either, and you might have to increase the settings.
In the Parameters or Shaders tab with the suit selected? @felis
No, in surface settings with the suit selected.
I assume it uses Iray Uber shader. As part of the Base section there is Base Bump and Normal Map. When a texture is applied there will come some more settings.
A bump map is a greyscale map. A normal map is a blueish map
@felis and everyone
Just for curosity, I reached out to Alf3d again and replied with some helpful info.
"Metallicity" slide in the surfaces tab, also try testing with Glossy, top coat, metallic flakes options, don't have to use all three together.
Want to try and change the colour of the suit from a Purple to like the orginal render or is it supposed to be like that?
Also, adjust her skin tone so it's a little bit less taned and saturated. Similar to the render. Any suggestions?
It is kind of guesswork to determin how Alf3D has made his surface settings.
Is the suit only one surface zone or more?
I would increase the glossy roughness a bit, to get it less shiny.
And as Alf3D has mentioned metallic flakes, you could try to set metallic flake weight to 1, and metallic flakes color to something darkish (val 100-130), and something yellowish and see how that affects it.
Basically it is a matter of trial an error.
For her skin I would try to lower translucency weight, i.e. if 0.8 set it to 0.6. But again you can obtain similar results with different methods, dependent on the current settings.
This video magically appeared in my recommended watch list. It helped me with poke through and felis advice as well.
https://youtu.be/gSUqZ-9Y99A
I played around with those settings. What you suggested helped. See attachments of what I ended up with. What do you think of it? I had to link it to my google drive as it's a large file. https://drive.google.com/file/d/1FDij5GzO2mJIEeaEt2JShuvyOXPcxs0y/view?usp=sharing
Still would like to figure out how the suit colour is changed to that shade of Alf3d?
Next I would like to position her into a apartment. I do have the files. Not sure if I can post the link to them so I'll provide a few snips.
@felis
For Purple > Dark Turquoise, as there's a UV based diffuse texture map in Base Color slot, so you may directly change the color slots in Base, Glossy or Top Coat to Turquoise, see if you can get expected result. If not, you may bring it to an image editor (Gimp, Affinity, PS...) to weak Hue value on the selected areas.
@crosswind What colour do you think it is or how can it be determined what it is?
What kind of lights are being used, temperature colours and Flux levels?
I just gave you some tricks... you still need to find a proper setting thru experiments. For instance, like you said, if it's a Purple texuture, you may add Turquiose to the color slots of Base, Glossy and Top Coat, (screenshot 1 -2 )
Or, adust Hue / Saturation values in external image editing software (screenshot 3 - 4)
As for the lighting pattern and settings, it may be always up to the preferences of your own rather than chasing down to what the vendor used in the promo or sth. For instance, if I made this scene, I would like to use Scene Only in Environment Mode, then add 3-points spotlights into the scene, give high values in Temperature of Key + Fill lights, lighting pattern : Rembrandt, so as to make some mysterious atmosphere...Lumen: no more no less, at least no "over exposure", like the example in screenshot 5.
Thank You for the advice.
Wondering if adding Turquoise to Base, Glossy and Top Coat, colour slots, Will it affect the Black areas of the suit which I would like to avoid?
Yes it will... to a certain extent. So I also mentioned in one of the above posts, you may tweak Hue / Color values on the selected areas, in purple color, or use a mask for tweaking.
Which file/s out of the Data, People and Runtime folders that come in Zip file needs to the purple to turquiose adjusted? Can a lasso tool be used to select only the purple areas?
I think suit/scene colours got more to do with the lighting as you suggested and post render affects in say PS, Gimp. A green tint post render.
Sent dm
Just the texture map file in Base Color slot, as you posted above. Lasso tool will certainly do ~