D-Formers: Multiple handles on a base, linking movement, and animated morphs
 OVD
Posts: 254
OVD
Posts: 254
Hi all
I'm trying to do a thing. I can make it work, but I'm just wondering if there's a better way to make it easy on myself.
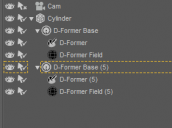
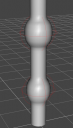
In the screenshots I've attached you can see a basic cylinder. I have applied two different D-Formers to it and simply scaled up the handle to create a bulge at each one. The idea is that it's a cartoon-y pipe, and as fluids are flowing through it, the bulges all move down the length of the pipe. Here's a YouTube video of some cartoon clips to get the idea across.
1) First of all, I'm wondering if it's possible to have just one D-Former base that can controll ALL bulges/handles that I put along this pipeline. I feel like this is NOT possible because of how the movement of these d-forms is based off of the handle's relative location to the base, right?
2) Assuming #1 is not possible, is there a way that I can make the position of one D-Former base dependent on another? The idea being that if I move one along the y-axis, all the others will follow it, maintaining their original distance from the one being moved?
I can't group them together under the cylinder because putting them in a group stops them from influencing the cylinder. (My understanding is that they influence the mesh of the thing they're directly parented to? Unless there's a way to alter what it influences?)
Is there some other way to make one D-Former Base follow another? I'm thinking that maybe an IK chain might be a solution, except I have very little experience with those.
3) Finally, is it possible to make an "animated morph" from these D-Formers?
I've made plenty of custom morphs for a variety of assets, and I know that it's possible to make "animated" custom morphs where a variety of dials can be altered over a timeline, then doing an ERC freeze can capture them in another custom dial, but I don't know how/if that could be done with D-Formers in this same way.
So the idea would be that I'd be able to set up the timeline, run the multitude of bulge morphs down the pipe over the timelines, then capture them in a morph.
But how might I go about turning the D-Formers into a morph in that way?
Thank you in advance for any advice you might have to offer!
Daz 3D is part of 
Connect
DAZ Productions, Inc.
7533 S Center View Ct #4664
West Jordan, UT 84084
Licensing Agreement | Terms of Service | Privacy Policy | EULA
© 2025 Daz Productions Inc. All Rights Reserved.
Comments
1) Yes ~ Switch Influence Mode to Weight Map, paint the weight properly as needed ( Select polygons first, then Fill Selected and Smooth Selected with Node Weight Brush tool... and give them different weight if you want to have different size of bulges)... and then tweak Scale XZ of the d-Former ~ (ss1 ~ 2)
2) No need... (I'm lazy to try... but I think that may work to some extent.)
3) Yes ~ set mutiple key frames with different scale value(s) with the d-Former. But I suggest you export the dFormed result to OBJ and import OBJ as a morph with Morph Loader Pro. Then animate with the morph, which'll be neater. (ss3)
It turns out that for my second question, if you parent the D-Former bases to a Null object, and then parent the Null object to the cylinder, the D-Forms will still apply to the cylinder and just skip over the null. (I'm assuming because it doesn't have geometry and it just "passes the buck" up to the next parent that does?)
1) Maybe I'm misunderstanding, but I thought that if I had changed the Influence to a Weight Map, wouldn't I be weight-mapping the geometry of the cylinder itself? I didn't consider it because I thought then that the cylinder's mesh itself would be moving rather than the D-Form through its space?
Please help correct my understanding on which part is actually being Weight-Mapped, but I will give it a go.
3) A few clarifications needed here:
I get what you mean, where I can take the D-Form's position on the timeline and set its y-position to the different spots along the cylinder, but I'm confused about the OBJ file. Can an OBJ file store data about animation like that? (Again, I'll take your word for it and try it, but I want to make sure that I'm understanding the way it works.)
Thank you! I will keep you updated on the results
Yes, rotation/scaling are centred on the dForm's base.
I played with it and I realized where the miscommunication happened:
I don't just want the different bulges to expand and contract, but to "slide along" the pipe, like in the video in the original post. So the Weight Mapped Influence isn't the way to go. I tried it and it only affects the specific geometry of the cylinder, not allowing it to move down its length.
That just brings me back to your point on #3 in my original reply; with the Morph Loader it will absolutely scale the bulges outward, but I need to figure out how/if I can use the D-Formers to make the bulges move long the pipe and put that into a morph dial. Still experimenting!
Thanks for the reply, and please let me know if you have any further insight on the matter.
I'm sorry man ~ I was not able to watch that video on youtube without VPN which didn't work last night.. Now I can see it and got what you want !
So, in this case, you keep going in the simplest way: use one dFormer with default settings... and animate the Transform values of d-Former Field with keyframes on the timeline.
As for the way of morphing, the way I mentoined was for static case. If going for making an animation, the traditional way in DS is to make and import sequential OBJs (with dFormer or Blender...) Like this example, I exported OBJs and sculpted them a bit in Blender as it was quicker than using multiple dFormers, then import OBJs as morphs and animate them on the timeline... to make some subtle changes, roughly like this vedeo: https://mega.nz/file/aWwU2JIS#tr6a9vmwfiS_8vCEIX7l7nQaFnUxQ7a7se4kScU-lm0
Thank you!
That is pretty much the conclusion I'd come to as well. Each individual OBJ morph could be hidden so as not to clutter things up.
Honestly though, I think that simply having the null hold all the individual D-Formers and simply having its y-position change over the timeline and converted into an ERC freeze is the way to do it. It gives that much more control. It's just too bad there isn't a way to make an "animated" morph happen.
Thanks again