Released : "Wet And Tanned Skins For Genesis 9" (Commercial)
 V3Digitimes
Posts: 3,216
V3Digitimes
Posts: 3,216
Find it here : Wet And Tanned Skins For Genesis 9 | Daz 3D
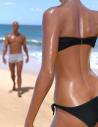
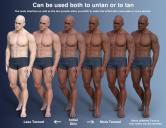
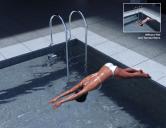
Wet And Tanned Skins For Genesis 9 is finally coming! Based on the same, but improved, principle of the wet and tanned version for Genesis 8, with more bonuses and features. Control the tan, tan lines, and wet look of your figures like never before. Here is as a summary of what you will find:
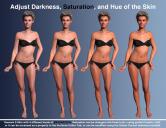
- The ability to browse easily wide ranges of skin tones, from super pale to super tanned,
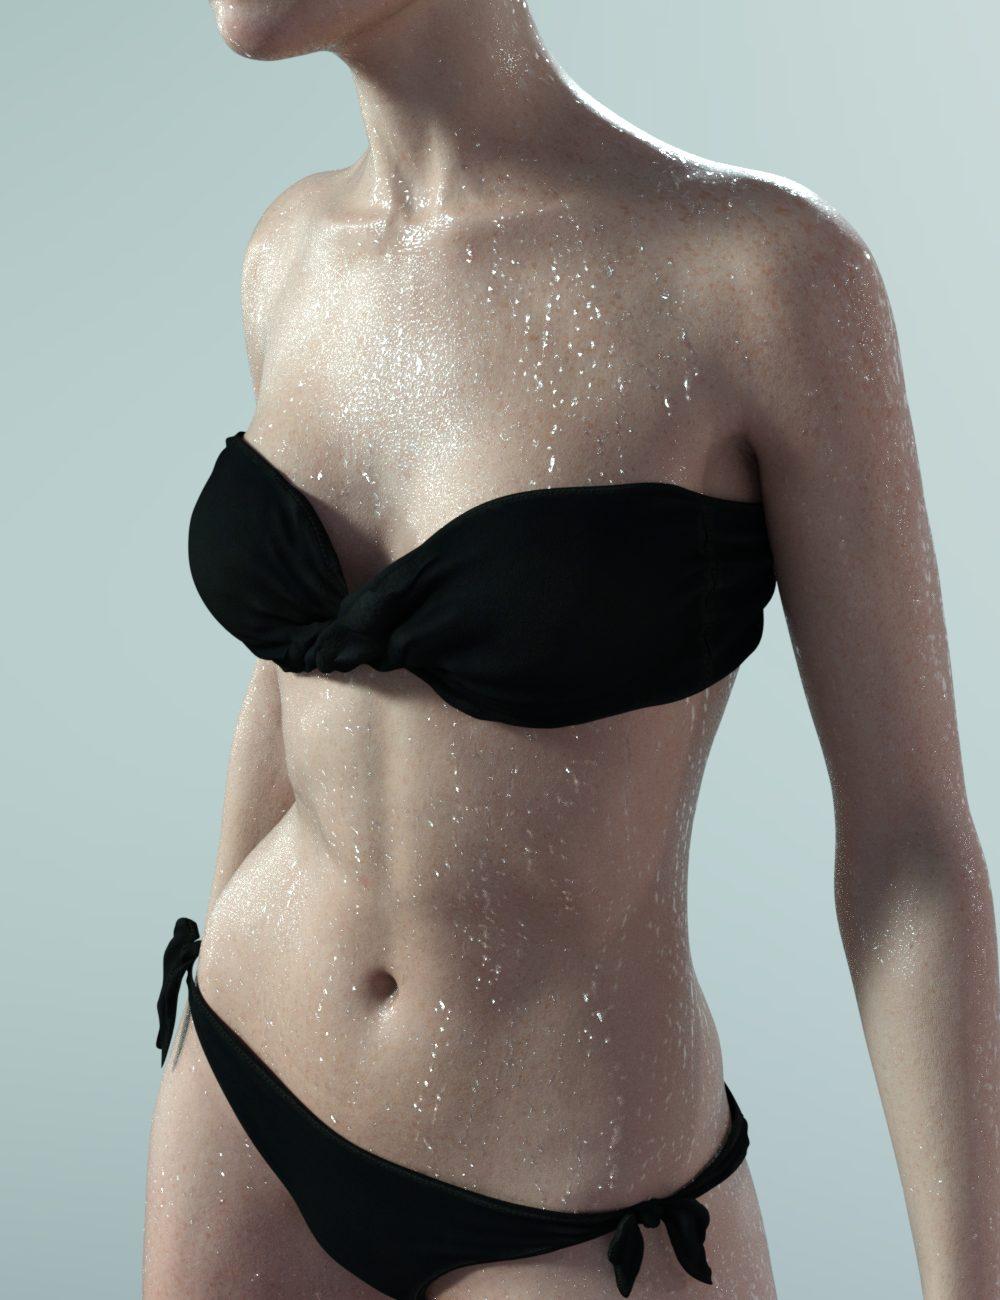
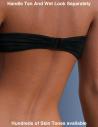
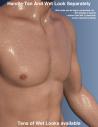
- The ability to adjust the wet looks from dry to super wet, with or without drops or drips,
- Based on a custom made shader relying on the PBRSkin shader,
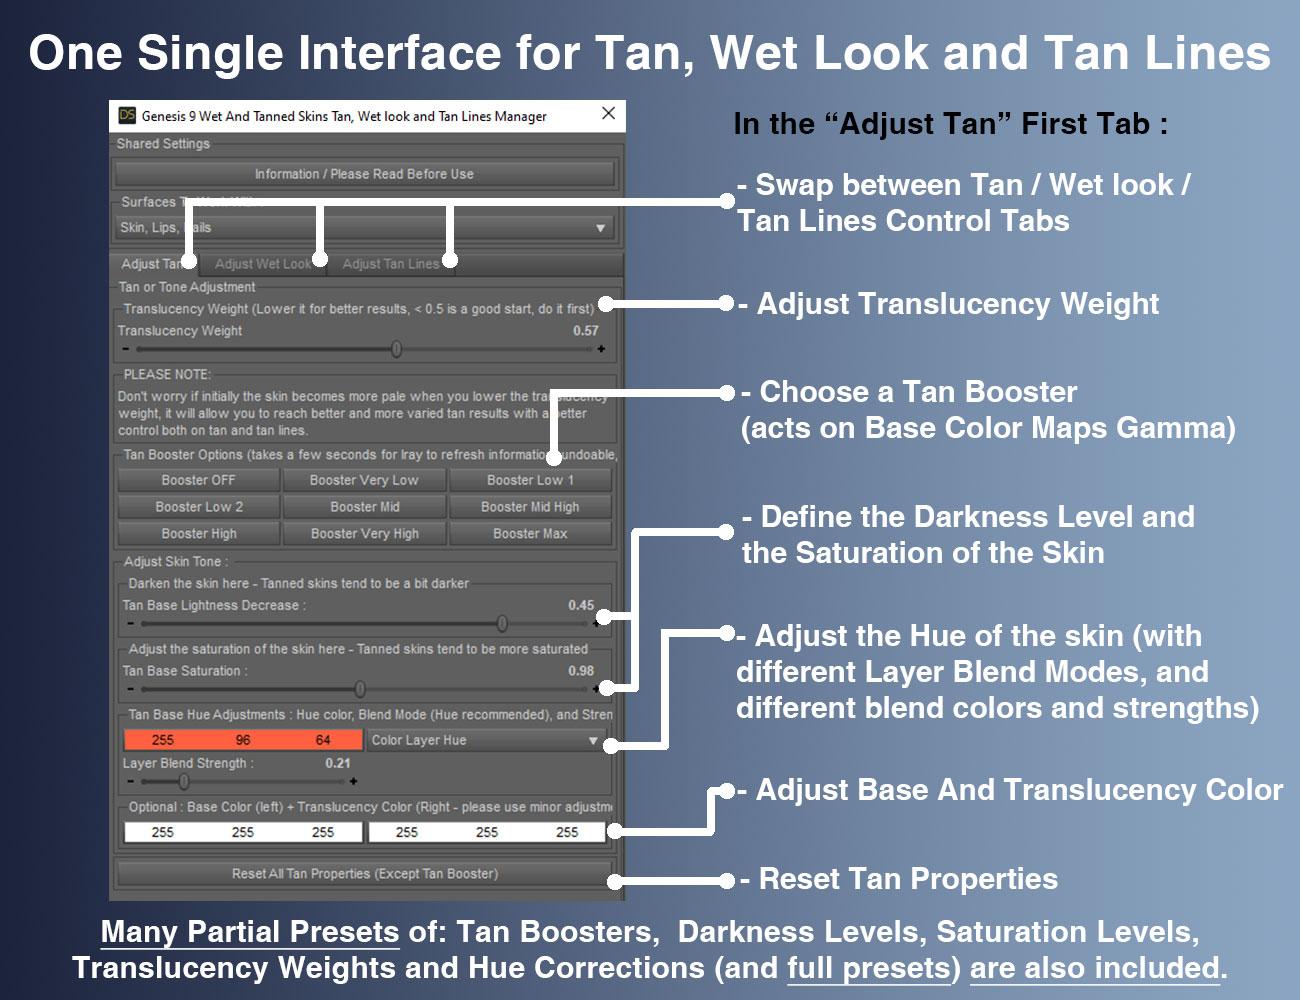
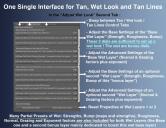
- All the tans (+skin tones) and wet look effects can be made three ways, depending on what you prefer :
- via partial or full presets, or
- via a simple global control interface,
- or via the surfaces editor (enter “tan” for tan or tan lines, and “wet” for the wet layers)
- with even more possibilities for the wet looks (partial presets with 2 wet layers and/or 2 other additional methods and/or Geometry Shells)
- All this so that you can really create your look using the method you prefer.
- Volume tan boosters were also included as bonuses
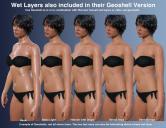
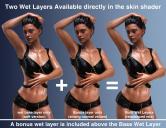
- Two wet layers and several wet maps are included for each layer, you can control amount and various other aspect of wet look to adjust it to your lights if necessary (maps and maps strengths, roughness, exponent, grazing and normal factors)
- Additional “Fast Wet” methods were included as bonuses (based on metallic flakes or on the dual lobe and normal properties).
- All the wet layers are now also available as Geometry shells if you prefer. Fast wet, Geometry Shells and Tan boosters can be used on even non converted figures.
- Tans and skin tones sub-tools include lightness, saturation and hue controls associated with tan boosters (Base and Volume) and translucency weights tools. They also include a huge amount of full presets to cover a wide range of initial figures, lighting, and desired tan.
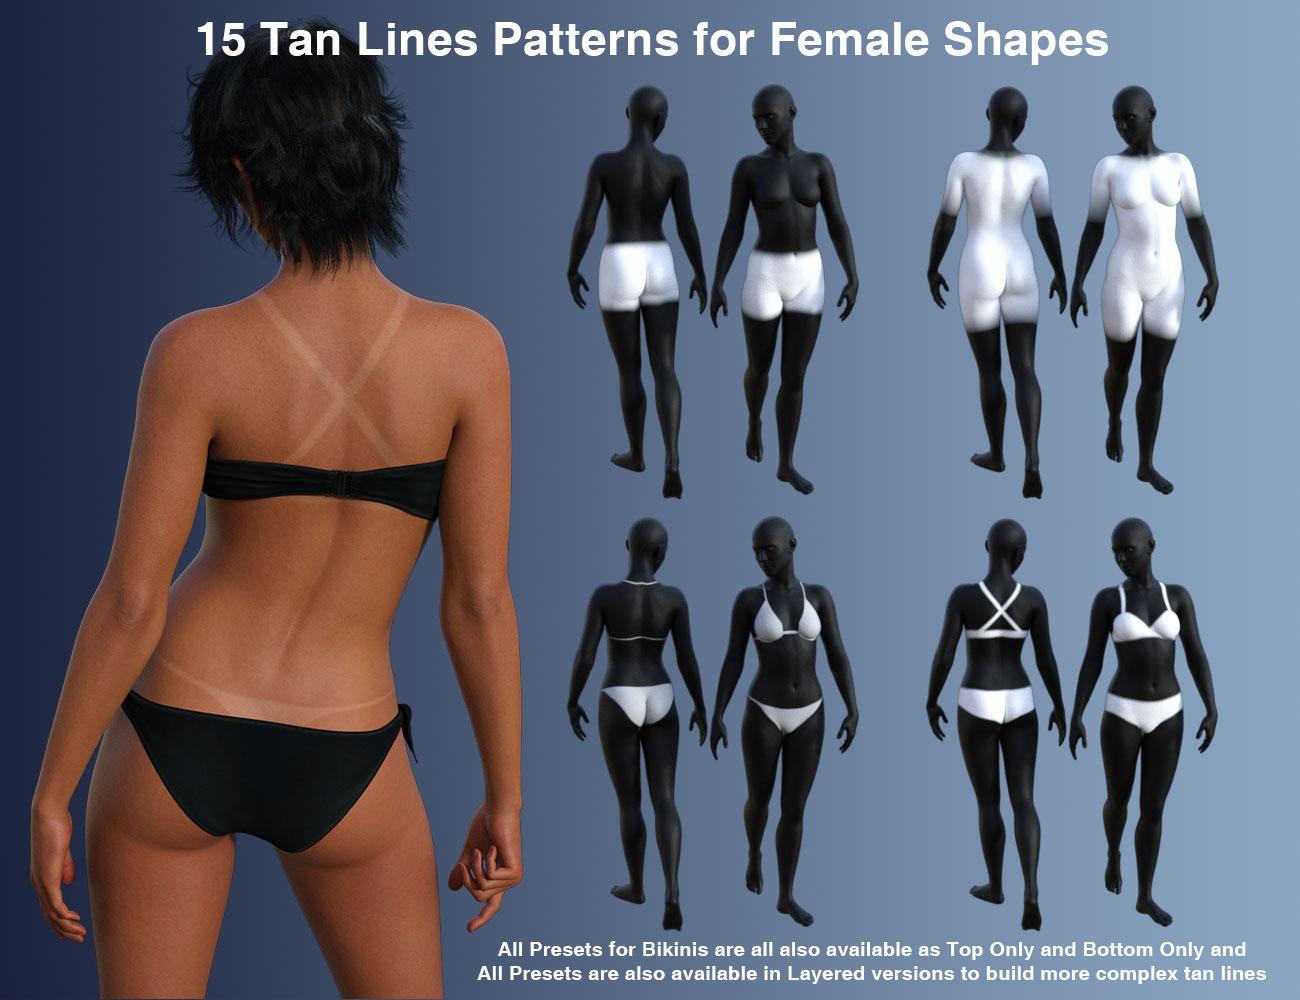
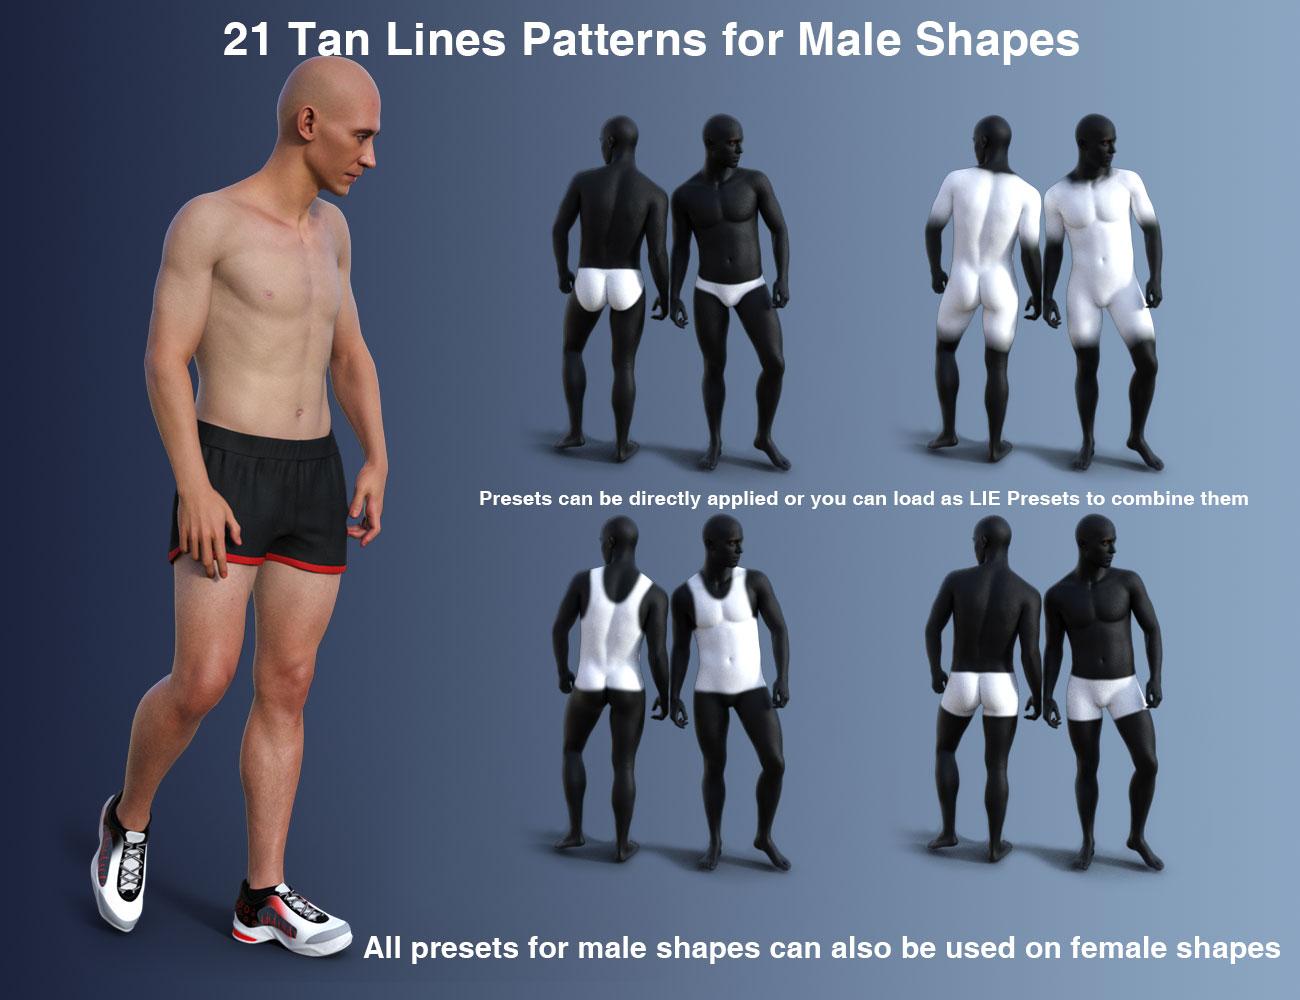
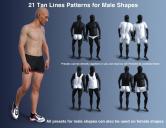
- Many tan lines patterns are provided, both male based and female based even if you can apply female patterns to male and inversely, and once they are applied, you can adjust the tan lines saturation, lightness and hue.
- Tan lines can be applied directly or combined as overlays to build more complex tan lines patterns.
- Even if most the users will probably not try this, I mention here that the shader mixer shader is made “like in photoshop” were layers can be used above each other with different mix (saturation, hue, blend, lightness, color burn, etc..) allowing to create their own unique skin tones and effects via the Surfaces Editor.
- Genitalia support (shader transfer and correct maps application) is included by scripts (one male, one female) which will handle everything except the tan lines (but you have the tan lines presets for the Genitalia available for almost all tan lines patterns for the gender the tan lines were made.).
- Two documentations, one 2 pages for people in a hurry, and one “big” for the most curious.
Compatible with your Genesis 9 figures.
Feel free to use this post or PM for feedback, remarks or questions.
REMARKS :
- on the release day, I'm not 100% satisfied with the metadata where "main scripts" folder should have been first (instead you/I presently have the bonuses folders at the top of the folders/options, and they should be at the end). I may ask Daz for a metadata change later on. It does not impact how the product works, I'd just like them to be more straighforward for the users.
- There are tons of options, so don't get lost : main script first for conversion, then either global interface. If you prefer working with presets go for or partial or full tan (+ tan lines) presets, then wet partial presets (and/or geometry shells). Just read the names of the folders in the metadata - I personally prefer to work in the Content Library folder where the subfolders are exactly sorted the optimal way for the most comfortable development.
I won’t show all the images here because I there are too many, so only a few of them here. You can click on the images to enlarge. You can also click the image bottom of this post that I did not enlarge in this text.


edit : additional mention : recommended to install with DIM (or manually).


Daz 3D is part of 
Connect
DAZ Productions, Inc.
7533 S Center View Ct #4664
West Jordan, UT 84084
Licensing Agreement | Terms of Service | Privacy Policy | EULA
© 2025 Daz Productions Inc. All Rights Reserved.
Comments
Wow, this looks awesome, something I might actually buy while I wait patiently for Meshgrabber 4
I'm also patiently waiting for Meshgrabber4...Thanks very much for this nice feedback....
looks great
Thanks a lot! And it's here as your new Golden Ticket : Wet And Tanned Skins For Genesis 9 | Daz 3D
Thank you!
It feels like Christmas in September
''
''And it's here as your new Golden Ticket : Wet And Tanned Skins For Genesis 9 | Daz 3D''
Thankyou for your generosity . . . .
Ooh very very nice, thank you so much!
Edit: I just bought it, the many many options are amazing! It seems really a great product. Thanks so much for putting it out here as a Golden Ticket.
You're welcome !
Purchased, downloaded and installed as soon as I saw this in the store! I know what I'll be doing this weekend, reading the full documentation
Quick question, is it possible to apply wet skin to just the body, e.g. not the neck and face?
Thank you for this!
Thanks for your support. Note that you have a 2 pages documentations if you don't feel like reading and something like 30 or 40 additional pages if you feel like reading. The two pages mini docs come from you making me such a remark almost each time, you should be proud :)
The wet is applied by default everywhere, yet, you can set manually the Wet Base Strength to 0 or increase the wet roughness on the surfaces you want (face) via the Surface Editor Pane (said differenty, you can switch off the wet on any "Surface" of Genesis 9 you want). You can find easily the wet strength using "wet" as the "enter text to filter by" line. This was if you are using the shader version. If you are using a shell, you can set the head to off (in the shell settings of parameters pane). In both cases the transition wet-dry may be sharp (it depends a lot on how you setup your light). In this case the solution is, if you are familiar with painting, to paint a black and white grandient mask (in blender, 3dcoat, substance painter, zbrush, photoshop, well where you prefer) between neck and face that you will use as multiply overlay with the wet layer strength. But before doing this, I would if I were you rather adjust the lights to see if the transition dry-wet on the face can be tricked this way with a low wet weight on the face. At the end, I could make an add-on with wet masks to define various wet and dry areas which would be compatible with all the wet looks provided, which could be overlayed to create more complex wet-dry areas (like for the tan lines). But first just try to lower the wet strength on the head, or increase the wet roughness maybe it will be enough for what you want.
Wow! Thank you so much V3Digitimes! I knew when I saw you post the coming soon that I'd pick this up, but I didn't expect it to be the golden ticket item! What a wonderful Friday surprise! I have lots of your products and use them all the time, including the wet and tanned skin product for G8.1. Love it! Somehow, I don't have the one for G8 yet, so I'll grab that one too. Thank you for your hard work and your excellent customer support!
You're welcome. I really appreciate your message this warms my heart. i'm glad you love Genesis 8.1 wet and tanned skins, you will see the Genesis 9 version is even better with now even more wet maps, and wet maps available both via Geoshells and/or via shader depending on your preferences. I hope you'll love it too. Thanks again for your support :)
Hi there, I only use Filament drawstyle at this point. Questions : how much of this product creates visable results in the Filament viewport and what doesn't? And how much would that probably slow down an animated figure in realtime? Thanks / peace
One thing I'm noticing from the promos alone is how much more alive the characters look with the Wet Shaders applied. Most skins look really dry, even with some shine applied, and this is so much more natural. I'll definitely experiment to try and get a variant that doesn't look really wet / sweaty but merely naturally shiny, but maybe this would be an idea for an expansion as well? Settings for a naturally 'alive' look that would be reduced only to certain areas, like the T-Zone in the face?
@3DmentiaNull : I just tested to confirm what I thought : in FILAMENT you have no impact of the tan/tan lines settings in the viewport. This is really an "Iray made for and optimized for" product.
V3Digitimes Thanks for testing! / / peace
Is there an easy way to make custom tan lines to match my other outfits? I do have Blender, Photoshop, and an substance painter. I could hand paint them but if I need this for a lot of outfits it could take a while I am looking for a faster way,
An efficient way could be to use the Ambient Occlusion projected from the outfit on the figure either in blender or in substance painter (you export the figure and the outfit). This way you just have to invert the black and white map created, and you have a new tan line. Maybe it could require a bit of adjustement in the outfit size or AO settings to make sure the tan line is not perfectly covered (so hidden) by the outfit. I hope it will help.
Apologies for the very, very late reply to your response to my is it possible to apply wet skin to just the body, e.g. not the neck and face question.
That unfortunately doesn't solve my problem. Once the base shader has been applied, it seems that one can't apply e.g. an L.I.E. makeup set.
LIE makeup set is not the most recommended, the geoshell makeup sets being easier to handle. If you load an LIE makeup set, you can try to apply it before (when you try to apply it after, the new shader might not be correctly interpreted or maintained, depending on how everything was built). The conversion script does not change the image maps used, so these should be preserved. It's what I said in the documentation, page 4 : " If you are using a PBR material with the makeup being built as a LIE, you must apply the makeup FIRST, before the conversion. Remember then that all the “tan” modifications will also be applied to the makeup, and that the metallicity of the makeup might have to be changed manually after conversion."
If you want to go faster, save your WNT material as a material preset, write down your gamma value (because it won't be saved as your material preset), load the original material, apply the LIE makeup, reload the material, and reset the gamma to the one you currently have... I'm astonished because in general you read my documentation :)
Thank you, I'll have to experiment.
Oh super umportant : when you save as material preset, use "uncheck all images"! (eventually just save properties related to wet and tan, this time with images)