Filatoon tips and tricks
I don't know if this topic warrants its own thread! But I was noticing tips and tricks buried in the Q&A thread as people are also using that to get installation help, etc.
Am playing with the Filatoon shader now, and I found that for some of those heavier and darker textures, you can use the diffuse overlay color & texture slot to improve blending with the toon shader.
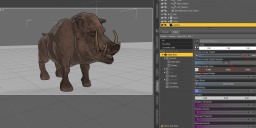
Here I applied the toon shader to the Battle Boar and kept the original textures, which were too dark/heavy. Then I turned up Diffuse Overlay Weight, enabled Diffuse Overlay Weight Squared (I don't know what that does but it looks better), set a Diffuse Overlay Color and applied the Battle Boar Roughness Map to the Diffuse Overlay Color texture slot. (The roughness map texture is greyscale, so it adds extra detail without affecting color.) It's not perfect, but it gives a lot more control without going into an image editor to manually adjust textures. Also increased the offset distance from 0.1 to 1.0 on the BB Battle Boar Toon Outline in the hierarchy to strengthen the outline.


Comments
I think a tips and tricks thread is a great idea. I've never used filament, so something like this for using the toon shader is great.
I don't know if I'm applying the Filatoon presets incorrectly, but when I add them to a Gen 8 figure I get blank eyes. I can sorta fix that by setting the Cornea base color to black, but I still lose the eye color and detailing. Found a lazy fix with the Dotify products - apply the Filatoon shader first, then the Dotify shader.
It seems to create a new PBR Metallicity/Roughness node that renders above the Filatoon node, but in a complementary way. The dotify dots don't render in Filament, but that product sets up some mats that really pop the lips, eyes and fingernails, and lets me quickly toggle a few eye colors. Can adjust the hue and intensity of the lips and nails in the Surfaces of the added "Dotify - Decal Blocker" node.
https://www.daz3d.com/dotify-for-genesis-8-female
https://www.daz3d.com/dotify-for-genesis-8-male
https://www.daz3d.com/dotify-
Image removed Acceptable Ways of Handling Nudity
Don't apply the shader to the cornea, it should remain transparent and the shader is opaque.
Right on, that did the trick for the missing eyes. Thanks!
I want to create my own “Material” for my Genesis9 Base Anime figure.
How can I do this?
If you own and know Substance Painter or Blender, you can paint texture on G9 Base Anime as per what you want and bake the texture maps for being used with Filatoon.
Is there a tutorial or reference on the workflow for using the filatoon on iray content?
Thank you for your reply.
I own Blender but would like to do it in Photoshop.
Color selection is very important in the character design of Japanese anime characters.
The combination of main color, shadow color, highlight color, brush color and shape is very important.
The combination of color and shape is especially important for eyes, luster, lips, eyebrows, and eyelashes.
However, the current choices are too few and we would like to increase them.
If you retouch an existing skin texture map or even "cartoonize" it with some plugin or action, Ps can really help. However, if you want to tailor-make skin texture for your toon characters from scratch, painting on 3D mesh is always the best, strongest and easiest way... especially making anime or toon oriented skin texture is much easier than making the ones for human skin ~~ Using Ps will be a detour in my exp. ~~
I want to treat these materials as paintings in Photoshop, not as 3D in Substance Painter or Blender.
In some cases, Japanese animation has a large element of painting at its root, even if it is in 3D.
And I have already drawn the material in Photoshop.
Right now, an extension of texture map retouching is sufficient, but the composition of the G9Anime Base figure material is so complex that I don't understand it.
G8, for example, was easy to retouch.
The texture material placement seems to be ‘\My DAZ 3D Library\Runtime\Textures\DAZ\Characters\Genesis9\Toon’, but it cannot be used just by placing newly drawn material here.
When applied, it appears to automatically combine multiple materials and export them to ‘C:\Users\’User Name‘\AppData\Roaming\DAZ 3D\Studio4\temp’ before referencing them.
I don't know how I can apply my own material and have it composited.
Dreamlight has a tutorial that came out in 2021 https://www.daz3d.com/filament-pro-lights-and-rendering-secrets--2-new-lights--video-tutorial that I bought but never had a chance to examine. Today I opened the first video and a lot of my confusion with the lights was cleared up. I checked and it is currently on sale. Now this is NOT Filatoon and it discusses the previous version of Filament Draw Options, but it is close enough for anyone who never used 3Delight or messed with Filament before. Dreamlight also touches on some adjustments that had confused me for the toons. (I have to finish the tutorial still.)
As for sets, if you have bought older products with SKUs in the 22000s and before, good chance they are 3DL and will work with the Filament shader applied. I used it on a set this morning with no issues.
You need space for outlines to show up.
Among other things, I've found I often want figures standing with a small gap to the floor, and I've found spreading fingers a bit to make sure I get lines between them.