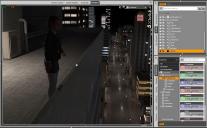
Need Some Suggestions On How To Light A Character At Night
As the title states, this is my first outdoor night scene and I'm a little confused on how to light a character at night, outside in a city.
I've turned on Sun-Sky and have set the time to 8pm. What would be suggested for realisticly lighting the character on top of a multi-floor building? I plan on doing several scenes somewhat close to the character. I will also introduce another character in the scenes.
Anything else I should know about night scenes with characters.
This is another question. Since the map is rather massive. It takes ages to find the character when in Perspective View. Is there a quicker way to find the character instead of having to MMB to zoom in and pan and rotate?
Thanks in advance for your replies. I'll try to understand your replies, there might be many questions to replies, so please be patient with me.


Comments
For zooming, you kind click the character in the scene tab, and then the icon with a plus surrounded by four brackets in right site of the viewport. That should frame the character. But it doesn't work too well if the character is far from world origin.
Generally for large environments, I tend to move the environment, so the area where the character is come closer to world origin.
For lightning, you can add additonal spotlights to get your character lit. But they shouldn't be so strong that they will create shadows; just lighten her so she is visible. Think of what might have lighten her when placing lights.
For some scenec it will be beneficial to just add more light, and then adjust tone mapping, so it seems darker.
For rendering night scenes I always keep this comment bookmarked - the image link no longer works unfortunately but the text is still there and relevant. What it helps with is more how to speed up rendering night scenes and minimise noise while using a rendering engine that really needs lots of light - so perhaps not what you are looking for right now but handy to have for later perhaps.
For your current issue you will have the problem of lighting her face while she is looking out over the street. Not sure if it suits your scene/character/story but having her smoking a cigarette is one way to bring light close to her face. Perhaps a better way tho is to place a giant emmisive sign on the building across the street which will illuminate her from the front?
For this one you might want to lose the light on the roof, or at least greatly weaken it (if there might be an open door behind her you could add a weak light there to define the shape) and then have an emissive plane shining up from below to fake the cumulative effect of the light bouncing up from the building and street lights.
DP
There's a small floodlight above the door and the light is coming from that. I've only used Spotlights in Disc and Point shape for indoor renders. Where are emissive plane lights found in Daz and/or created? I'll search YT and google as well. I don't think the door can be opened. I think it can be "opened" by changing the opacity to 0.
You could also use a spotlight with its shape set to Rectangular, but my suggestion was create a plane primitive, select it and its surface (e.g. click on it with the Surface Selection Tool) and aply the Emissive shader preset, then in the Surfaces pane adjust the emission properties
Exactly what I intended to have the character be doing is smoking and with another character. Any good cigarette smoking Posing and Props packs? I'm not familiar with creating emmisive signs, how are they created? @SofaCitizen
Firstly, personally suggest you use some good HDRI map rather than Sun-Sky mode, like the ones from Orestes Graphics , there're quite a few ~~, e.g.
https://www.daz3d.com/orestes-iray-hdri-skydomes--darkest-night
https://www.daz3d.com/orestes-iray-hdri-skydomes--a-night-in-august
Secondly, simply add one or two spotlights to lit your characters, with higher Temperature and/or cold color tone.
As for navigating the scene / manipulating figures in a big environment:
1) better activate keyboard navigation, tweak the Speed (Edit - View - Increase Move Speed... ) and then navigate with keys;
2) Alt + Drag a character preset or a scene sub-set... into the scene next to the existing character, or directly load the 2nd character. Then copy XYZ Translation values from 1st character to 2nd character.
@RichardHaseltine Does this tutorial work well for creating an emissive plane light?
https://youtu.be/dnEWXTHZgOI
@crosswind Thank you for responding. Do you simply double click on the HDRI map once it's found in the content Library to load it in?
What else do I need to know about night time HDRI's?
Yes, then tweak settings in Render Settings pane, under Environment, as needed.
Check Sickleyield's tutorial firstly... That was the only tut from which I ever learnt for the subject matter.
Then just have more and more experiments with various settings ...
Thank you all for your replies. They are very welcomed.
@crosswind I used this HDRI from the same creator you suggested. https://www.daz3d.com/orestes-iray-hdri-skydomes--winter-moon I turned the intensity way down .010 to simulate night as the moon was still tuning the sky a grey colour.
I also turned on Bloom. What do you all think?
My PC hardware is 10 years old. i74790K 16GB DDR3RAM and GTX 1080Ti. Should I try the Post Denoiser Tool in the Filtering Section to help with Rendering or leave it off? If I leave it off, what should I set the Progressive Rendering settings too to get a denoised but sharp render? I dropped the Post Denoiser Start Iteration to 2. Default is 8. IDK what I'm with doing with the Denoiser, first time using it.
Well, that seems not my preferences...
I think if you have no intention to go for post-work, you could've been bold to give it more tweaking in Tone Mapping (more contrast, more saturation, etc.)... BTW, Post Denoiser in DS is more or less a garbage, try not using it first of all...
An example using an HDRI map from Winter Moon product, as below.
@crosswind
From your settings, Which Tone Mapping levels to adjust to get the Moon sky blacker without sacrificing exposure for the buildings and streets?
cm^2 Factor and Crush Blacks. Besides, the focus should be on your characters rather than the buildings and streets... IMHO.
I've made a render. It can be viewed here: https://www.deviantart.com/thenic123/art/1120852389 It's rather a large file to attach here.
Critique all you want as I'm still learing and will definitley continue to ask questions. I'm not trying to win an award for best render. Just trying to tell someone's story.
I'm grateful for your responses
Sorry, I missed the notification for this reply at the weekend.
Firstly, some pose packs with both smoking poses and props:
The second of which also includes a lighter which may be a better source of light if you are struggling to get enough in there since there would be an actual flame rather than just burning embers.
An emissive sign here would just mean an object off-screen that has a surface that emits light - so it could be anything really. If you select the object in the scene, go to the surfaces and set the emissive colour to something that is not black then that object will emit light. You'll have to tweak the values to make it look realistic but that is the starting point. If you don't see the emissive section under the surfaces then run the iray uber shader on it.
If you'd rather buy something to suit then the following might help:
Also, I think it's important to say that what you are trying to do there is a little difficult and so don't get discouraged if it's taking a little time. Night scenes are not easy to get the lighting right and so you may have to try out a few different things before you get something you are happy with.
I have attached something vaguely similar I tried to do a while back. In my picture the woman is on the ground, in an alleyway behind a bar and so I could use a lampost off-screen to provide some fill lighting to compliment some coming from a "moon" but I still struggled to light the face. I was hoping to use the act of lighting the cigarette as a way to illuminate the face but I kinda failed and "cheated" here by using an actual spotlight hidden behind her hand. If you zoom in it looks quite obvious and so I never posted it in the end. Hopefully you will have better luck with your scene!
Provide feedback on the lighting in this scene.
I"ve placed three point spotlights at certain angles. I've dropped the Environment Intensity to .0.50 to simulate night.
Question: If I hide all of the buildings that are not in the camera view, will it save resources for the render?
@crosswind
@crosswind @SofaCitizen
Can the HDRI environment be turned off if not in the camera's view? These night scenes take ages to render 7+ hours at high resolution, 45+MB file. I've also been using a buildings map called Urban Spawl 3. It consists of buildings arranged in blocks.
Can just one block be used to render and outside scene to help with dropping render times?
I would like to have Jill and Leon just standing with a wall behind them. See attachment. I have rendered a scene and I set it at 9 hours as there was lot of noise when it was set for a short time. Iterations just managed to hit 2000. I was also thinking of using Scene Optimizer.
If you do not want the HDRI to be visible then you can click the button to turn off draw dome - however, since you are using the HDRI for lighting then it will still have to be loaded and so I don't think it would have any difference on the render time at all.
However, hiding other objects in your scene that are not visible will cut down the work that needs to be done since their respective geometry and textures will not have to be loaded. If any are in the way of light sources then you may be removing some wanted shadows by doing so.
Night scenes will always end up taking a while longer when using iray just because it really needs light to work best. 7-9 hours sounds like CPU rendering and so using Scene Optimiser and similar tools may help you shrink the requirments for the scene so that it fits in your graphics card's VRAM to enable rendering on the card (assuming you have an nvidia card). That will help reduce the time a bit - although you'll still have to let it render longer than usual for it to tidy up all the noise due to the low light.