Weird Shadows on Door
 CrissieB
Posts: 195
I'm modeling a six-panel door with a three-tier casing. The casing looks fine, but there are weird shadows on the door. The UV map in the right panel doesn't show any odd geometry. (I rotated the door's horizontal panels to vertical, so a wood grain texture and/or bump will run along their length.) The odd shadows don't show up when I render it in DAZ with a wood grain finish, but they do if I use a painted finish. You can see the oddness in the right-most top-to-bottom panel, in the off-white painted pic.
I've read about Hexagon sometimes generating odd normals. Is that the problem here? If so, can I fix that or do I need to start over?
Thanks for your help. 
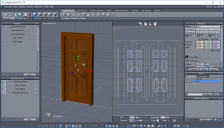

DoorWeirdSurface.png
1440 x 823 - 193K
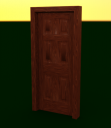

DoorAndCasingWoodFinish.png
450 x 520 - 159K
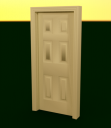

DoorAndCasingPainted.png
450 x 520 - 134K
Post edited by CrissieB on


Comments
I'm no expert but I think when you render an object with the surface facing the wrong way light will go straight through it, making it look like a hole (all black).
What you have here (if I'm correct) are stretched maps, not all is lost. All you have to do is unfold it by hand.
The weird shadows were there before I did the UV map. I followed these steps to create the door:
1) Created a Cube primitive with the door's dimensions.
2) Tessellated by Slice to create the left and right vertical 'beams'.
3) Deleted the three top and three bottom faces, and used Close to create single top and bottom faces. (This is when the wierd shadows appeared.)
4) Turned on Z-symmetry, so further changes would apply front-and-back.
5) Surface Tessellated to create the horizontal 'beams' (top, eye-level, knob-level, bottom).
6) Surface Tessellated to create the center vertical 'beams'. At this point the 'beams' defined six rectangular panels.
7) Selected the upper-left panel, used Fast Extrude to create a new face, and adjusted it so it was inset 1cm on each side and depressed 1cm into the door.
8) Selected that new face, used Fast Extrude again, and adjusted that new face so it was inset 3cm on each side and at the same depth as before (1cm into door).
9) Selected that new face, used Fast Extrude again, and adjusted that new face so it was inset 3cm on each side and halfway back to the primary door surface (0.5cm into door).
10) Selected that new face, used Fast Extrude again, and pulled the new face out even with the primary door surface.
11) Repeated steps 7-11 for the upper-right, mid-left, mid-right, lower-left, and lower-right panels.
12) Turned Symmetry off.
The weird shadows had grown weirder at each step since #3. I thought I might find some irregularity when I went to UV mapping:
13) Shift-selected the top, bottom, left, and right lines around the front and back surfaces of the door, and the lines where the left, front, right, and bottom edges meet.
14) Went to UV Mapping, selected Manual Unfold, added my selected lines as seams, then clicked Unfold and Validate.
15) That gave me six sets of faces: the front, back, left, right, top, and bottom.
16) Rotated each set so its long edges were vertical on the UV map, and repositioned each so the UV layout made visual sense, from left to right on the UV map: left edge, front face, top and bottom edges, back face, right edge.
17) Rescaled them up to (almost) fill the UV map space, so I could see the details.
18) Selected each horizontal front and back face, used Dissociate UV, and rotated the face to vertical (on the UV map) so a texture and/or bump would run lengthwise.
The UV map hadn't revealed any odd points, lines, or faces, so I saved it as a jpeg and defined my Shading Domains and Materials:
19) Selected the front faces, created a new Shading Domain, renamed it DoorAway, renamed its material DoorAway, and set the color to dark brown.
20) Selected the back faces, created a new Shading Domain, renamed it DoorTo, renamed its material DoorTo, and set the color to medium brown.
21) Selected the Unassigned Faces (the edges), created a new Shading Domain, renamed it DoorEdges, renamed its material DoorEdges, and set it to light brown.
As I said, the weird shadows began at step 3, when I deleted the three top and three bottom faces (made when I used Tessellate Slice to create the left and right 'beams') and use Close to create single top and bottom faces.
Does the Close tool skew normals? Should I have just left the three top and three bottom faces as they were?
Sorry Chris, I left a quick comment then coz I thought pictures are better than words I made a quick door and took a couple screen grabs.
Give me a moment and I'll see if I can upload the HXN file.
I think I see what has gone wrong, if you look at the first door, top panel, there is a dark triangle shape. Looks like you have what people call Ngons. Which basically means you modelled it wrong (sorry no easy way to say it). Not saying what I have done is the best way, far from it, but have a look at the HNX and see if that helps. If not, I'll do a step by step tutorial for you. I would make a video but the GOTD recorder I had stopped working for some reason.
Umm, I did everything but the pinning part. Is there anyway to unmake a manual UV map and start over?
(Edit: I'm still not convinced the problem is the UV map. As I said, the weird shadows began when I used the Close tool in Step 3.)
I think the problem is the approach you took. I'm not saying what you've done is wrong. If I read your work flow correctly, you made the side panel then a insert (the routered panel) and copied and pasted (adapted as needed) then unfolded everything. Which is fine, but not the way I would approach it.
The close tool does do strange things, it is a lot safer (I think anyway) to use the bridge tool instead. - Back in a mo' going to do a few screen grab example.
The close tool fills in a gap, but in doing so it creates a face with more than 4 points (bad) ideally, what you want to end up with is a face with 4 points, there are ways to get around it but I prefer a simple life so I take the easy route. This is one of the ways I would close an object, the last step is to de-select to opposite edges and use the bridge tool
Basically I tessellated to delineate the side 'beams', the horizontal 'beams', and the center 'beams' that outline the six panels. At that point, all of the faces on the door were (or should have been) rectangles. But I had an odd shadow before I did the horizontal and center 'beams', so I think I got an N-gon when I deleted the three top and three bottom faces and then used the Close tool to create single top and bottom faces. I've that happen with Close before, albeit with more complex shapes.
After I had the 'beams' done, I then used Fast Extrude (repeatedly) to inset-and-step the upper-right panels (both front and back, with Z-symmetry), then used Fast Extrude (repeatedly) to inset-and-step the upper-left panels (both front and back), and so on with the mid-right, mid-left, lower-right, and lower-left.
Give me a 5 mins, I'll make a one your way and see if we are on the same page - hope this is okay ?
If this is correct, I can carry on and do a step by step if you want ?
Okay. I'm doing some (other) work now anyway, so it'll be about a half-hour before I can read and reply. :-)
Umm, no, that's not what I did. :-)
I began with a cube set to the dimensions of the door (see DoorStepOne, below).
Next I used Tessellate by Slice from top edge to bottom edge, and set that line to be 10cm (4") in from the left edge. I then Tessellated by Slice again, and set that line to be 10cm in from the right edge. Those marked the left and right side 'beams' (see DoorStepTwo, below). At that point I made the mistake of deleting the (now) three top and three bottom faces, and using Close to make a single top and single bottom face. This time I'm leaving the 'extra' faces on the top and bottom faces.
I then turned on Z-Symmetry (so changes would work on both the front and back faces) and used Surface Tessellate to add lines to delineate the horizontal 'beams' - at Y=2.5 (for the bottom 'beam'), at Y=8.0 and Y=10.0 (for the doorknob-level 'beam'), at Y=14.25 and Y=15.75 (for the eye-level 'beam'), and at Y=18.85 (for the top 'beam').
I then used Surface Tessellate to add lines between each the horizontal 'beams' at X=-0.75 and X=0.75, to delineate the center vertical 'beams'.
At that point, I had outlined six panels on each side of the door (see DoorPanelsReady). I then used Fast Extrude (as described earlier) to inset-and-step the panels.
I think I see what you've done, DoorPanelsReady is I where you are getting problems. Do you mind if I show you my approach to this rather than try to fix what you have done, it will be a lot quicker in the long run ?
The problem is Ngons on the outer rim of the door. From what I can see the simple fix is to select all faces, go to utilities > triangulate ngons. If that doesn't work, then reinforce the line structure just outside the center panel of the door, which would be as simple as just adding an extra layer of lines, and then triangulate ngons
While it's good to start from scratch with good (and smart) modelling practices, one doesn't always have to be orderly.
You are quite right User.Operator, but I'm a bit OCD. Having strict parents and being in the forces does that to you :)
I don't see any N-gons, user.operator. I just counted, and right now the door has 38 faces:
-- left edge, right edge, top edge (3), bottom edge (3) ... that's 8 edge faces, plus:
-- the front: left beam, right beam, top beam, upper-left panel, top-center beam, top-right panel, eyelevel beam, mid-left panel, mid-center beam, mid-right beam, knob beam, lower-left panel, lower-center beam, lower right panel, bottom beam (that's 15 faces on the front), plus:
-- the back, same as the front (15 more faces).
Right now, all 38 faces are rectangles. For the decorative work on each of the six panels, each FastExtrude inset step will create four more faces ... all quadrilaterals.
Where I went wrong was, again, deleting the three top edge and three bottom edge faces and using Close to create a single top and single bottom face. Each of those faces was surrounded by 8 points. In theory, all 4 front and back lines had the same Z value so they were all in a line ... but if any one of those points got dragged off-line ... the result was an N-gon on the top or bottom edge.
If what you and Wee John are saying is that I have an N-gon anytime Surface Tessellate places more than one point along a line -- as there is with every 'beam' face on the door -- then the only solution I can see would be to always Tessellate by Slice ... so each new 'beam' line wraps all the way around the model. Is that what you and Wee John are saying?
UPDATE: I just did my first panel inset ... and the N-gon problem began. So I guess I do need to Tessellate by Slice every for all of the 'beams'....
In other words, I should have done this:
And apparently that didn't solve the problem either. Again, I have N-gons ... somewhere. I have no idea where, or why....
And Hexagon can't find any either....
So if there are no N-gons, why are those weird shadows there?
The problem is Chris, we all approach these things differently. There are 2 ways I''d start
1. With a single face and extrude the sides (with Symmetry) left, then top. To make the panel, then copy paste that. Weld things together and make more panels ending up with the door in the first picture I posted above. This way the door would be all one object.
2. Make a cube, scale it to make the upright, add tesselations so when it is smoothed it does not loose its shape. Use the upright to make the other parts of the frame. Then finally make the panel and adapt that to fit in the holes. Here the door would be made up of several parts.
I have no idea how you did that first panel, or why you did it that way. I'm not saying it's the wrong way to do it. I'm sure it's the right way to do it. I just have no idea how you did it, or why you did it that way. At this point I need to stop for the night. I need to finish my work and make dinner for the family. Maybe tomorrow it will make sense.
Crissie (not Chris)
When you are using symmetry, you have not taken the face too far back have you? So the front and back penetrate. I think that would cause problems
Nope, I was careful to avoid the front-to-back penetration. I tried the Extrude tool and had the same outcome. Again, Hexagon doesn't find any N-gons, but the surfaces around the panels are clearly flawed. I. Am. Stuck.
Look at the number of vertices on this part...the red circles. And the edges joining them...blue lines. That top panel is actually a hexagon...not a tri/quad.
This is automatically going to create n-gons.
Minimally, you will need to do this...green lines.
The days of modelling to just the minimum number of faces as opposed to the smallest number of faces to get the job done are long past. Don't worry too much about keeping the face count to some very low number. A panel door, without the inserts should be a couple of hundred faces...at least 100 on each side.
The problem could be the Tessellate by Slice tool. Sometimes it misbehaves and does not weld all of the points that it creates. This can lead to strange looking artifacts because what looks like a single point (vertex) might actually be two unwelded points on top of each other.
I sometimes test a model by pulling on various faces to see if any of the seams come undone (followed by an Undo to restore their original position).
Thanks, mjc. I noted that and used Tessellate by Slice (see the image in my later comment) but that still didn't solve the problem. Perhaps de3an is right and the Tessellation by Slice didn't weld the points? But, again, the Utilities>Triangulate Non-Planar Faces tool didn't find any N-gons -- see my previous post and screenshot -- yet the surfaces are obviously distorted.
I'm really baffled.
Maybe I need to Dissociate a panel before I do the Extrude Surface to do the inset work, then Weld it back on after the insets are done?
I just did four Tessellate by Slices on this flattened cube. Two vertical, and two horizontal.
I then pulled a face forward and saw that a vertex was not welded.
You should test your model for the same.
To fix it, do an "Average Weld" with a very small distance threshold (something like 0.001).
Tessellating by Slice, in a different order, produced different unwelded points.
Tessellating by Slice was one problem, de3an. I tested every face as you described, and found one where the seam lifted. I welded those points and fixed that problem ...
... but that wasn't the problem. When I used Extrude to start the inset process, I got the same weird shadows. Just in case Symmetry was the problem, I tried it with Symmetry off. I still got the same weird shadows. And again, Utilities>Triangulate Non-Planar Facets says there are no N-gons.
At this point, all I can guess is that I need to Extract the panel faces, do the insets, and then weld the panels back on.
Okay, this time I Extracted the panel and did the Fast Extrudes to mold it as an independent object. That produced some N-gons, so I went back to the previous save and Extracted the panel again. This time I used Tessellate by Slice to split the panel into four quadrants, because that's where the N-gons were before. Then I did the Fast Extrudes to mold it ... and again I got some N-gons. Rather than start all over yet again, I used Triangulate Non-Planar Facets to fix them.
I tried this with both Extrude and Fast Extrude and got the same results. I can only conclude that both Extrude and Fast Extrude will create N-gons if you offset in all three dimensions at once: pulling in the sides to create a smaller face, and moving the smaller face in or out. I have no idea why, as that seems to be precisely what those tools are designed to do.
I suppose I could start with a flat panel, Tessellate by Slice to create all the faces within the panel, check the seams as de3an suggested above, then shift-select and Z-offset the faces that should be moved in or out. That way I would Fast Extrude on only the last step, to pull the central face back level with the door face.
It's as simple to deal with as I said before.....add a reinforcement layer of lines all the way around the area, and the issue will disappear.
user.operator, do I need to add a reinforcement layer each time I extrude?
I just tried Extracting a panel and tessellating all of its subfaces, without tessellating horizontally and vertically on the panel center, then shift-selecting and Z-offsetting the faces that should be moved in or out. I had the same issue on Z-sloping quadrilaterals with not-right-angled faces at both ends.
The more ways I try this, the more it seems this project is a case study in why I should maybe try some other, less-buggy modeling software....
If the visual issue presents itself, then yeah a reinforcement layer may be necessary. BUT keep in mind, just because something appears a certain way in Hexagon, doesn't mean it will when rendering. Post a file of the model and I'll see if I can come up with a simpler solution, or if it's even an issue in rendering at all. It may be as simple as calculating normals externally, or changing the display mode in hexagon (on the bottom center there are spheres, by default it tries to display things smoothly) . See, model 'normals' have certain angle cut offs that decide at what point a vertice is rendered as a hard edge, or a smooth edge, and this can be an issue for extrusions that are tapered. But the good news is you can typically alter normals at any point, especially in third party renderers, you can even export the model without normals, and it will retain its blockyness....which is what you want with a simple door anyways.
While there are other programs out there, I doubt you'll find any as simple. Hexagon is basically the photoshop of modelling in the way its interface is setup. Programs like blender have a lot of their own quirks, and also have a lot of feature clutter that you'll never use. Once you get the hang of Hexagon, it's pretty easy. But you also must understand that good modelling practices are essential regardless of what program you use to model, otherwise you could get half way done with a model and realize you should have structured it differently from the start...and while these things can be patched up half way through, often it's just quicker and easier to start over the right way.
Thank you so much, user.operator. The file is attached below.
How I created the UpperPanel on the left:
1) Extracted the face from the Door.
2) Tessellated by Slice to create vertical and horizontal midlines.
3) Used Fast Extrude to do the insets.
4) Used Utilities>Triangulate Non-Planar Facets to fix the N-gons.
How I created the UpperPanelWithoutExtrusions:
1) Extracted the face from the Door.
2) Tessellated by Slice to create vertical and horizontal midlines.
3) Tessellated by Slice to frame the insets.
4) Surface Tessellated the diagonals, using the shift key to snap to existing points.
5) Shift-selected the deepest inset faces and set their Z value to -0.270
6) Shift-selected the center faces and set their Z value to -0.220
7) Fast Extruded the center faces to a new Z value of -0.170 (same as the face of the door)
I selected the entire object and tried Utilities>Triangulate Non-Planar Facets. It didn't find any. But the shadows still look odd.
I tried different display modes. They all had the odd shadows. I have no idea how to calculate normals externally.