V4 Glove Clothing distort/streching on Genesis with Autofit
 matt_e8d6faf681
Posts: 0
matt_e8d6faf681
Posts: 0
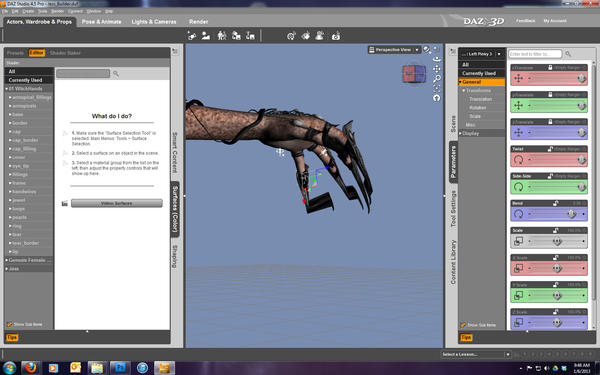
So, I've got Y-Stylez's Katey for V4. In particular I'm working with the Witchy Hands clothing/accessory. Autofit seems to convert the glove over pretty well until I create any type of movement that changes the hand location.
As soon as the spatial position of the hand changes I get distortion and stretching in the fingertips of the glove. This distortion looks exactly like the genesis stretching issue with some V4 poses due to xyz translation - except it's on the clothing piece (http://forumarchive.daz3d.com/viewtopic.php?t=170864).
Anybody encountered an issue like this with similar clothing? Or more hopeful: anybody have a fix?
Screenshot attached.
Daz 3D is part of 
Connect
DAZ Productions, Inc.
7533 S Center View Ct #4664
West Jordan, UT 84084
Licensing Agreement | Terms of Service | Privacy Policy | EULA
© 2024 Daz Productions Inc. All Rights Reserved.
Comments
Hmm.. well I was able to answer my own question after some fiddling.
The answer was to set Autofit with Victoria 4 / None - NOT Victoria 4 / Glove.
The Glove Autofit settings were causing the meshes on the fingertips to go out of wack it seems.
Well, scratch that. Still an issue. Setting the fit item to none just makes it happen with less ranges of movement but it's still a major issue with any finger movement. :(
Unfortunately it is most likely a limitation of Autofit, sometimes using the transfer utility rather than autofit helps.
something in this thread might help you out http://www.daz3d.com/forums/discussion/8783/
Thank you, both. The Transfer Utility produced similar results. I'll check the other thread.
You should be able to use the Group editor and weight painting tool to adjust the rigging - it looks as if the tips of the fingers have been missed, in which case simply selecting the left-behind areas and for the finger 3 bends filling with a weight of 1 should do the job.
Thanks - I'm only just exiting the novice user phase I think - but I will certainly try to parse this and give it a go.
Richard, thanks again for the help. I understand the concept of what you are suggesting but unfortunately lack the working knowledge of the studio to apply it. Can you recommend a starting tutorial to get me going in the right direction?
Before getting into weightpainting and rigging can I ask what settings you have smoothing iterations and collision iterations on?
Also if your smooth type isn't already try changing it to generic and let me know if that helps.
I would say due to the fingers that you would need a very high collision iteration...
Edited to add these settings can be found under the parameters tab. IIRC look under mesh smoothing...can't double check as I'm in the middle of a render.
Have a look at Blondie's rigging tutorial for basic principles http://www.daz3d.com/rigging-original-figures-in-ds4-pro , though there are numerous forum discussions on this - for example one I did on converting the Historical Armour may be helpful http://www.daz3d.com/forums/discussion/10204/
Thanks, Richard - I'll take a look.
@Pendraia - I did an Edit > Figure > Geometry > Apply Smoothing Modifer to get those options under the parameters tab.
They are now set like this: Smoothing (Generic, 2), Collision (Genesis, 2)
I did try upping them but it didn't seem to have an impact (both to 30).
Try moving the weight slider slightly across to the right...does that do anything.
I wish I could check in DS myself with gloves but unfortunately I'm running a render and it's only 12% done. It's taken an hour to do that so it won't finish anytime soon.
Just had a weird thought...normally I would up the collisions but I'm wondering if the fingers being so close together that the higher collision iteration is causing the problem. Unfortunately can't move the fingers all that far apart but try moving them as far as you can and see if that has an impact please?
Which control do you mean when you say "weight slider"?
It's just under the smoothing iterations... and just below it should be a secondary weight slider.
Ahh, found them (hidden parameters).
No, as far as I can tell, weight and all the other hidden ones have absolutely no visible effect.
Seems it's takes quite a while to update. It did change the effect but I think the streching is still a major issue - have to look at it a bit.
So it does indeed have an effect. The mesh is being smoothed out to not look as distorted. Unfortunately - I think Richard's analysis of the situation is correct - the tips aren't moving with the finger joint actions (they do move with ARM translation). So the result is a bizarre tear in the mesh - which smooth can make look less severe but I'm not sure it can correct it.
After looking over the rigging tutorials I may be in over my head but not ready to throw in the towel yet. :)
Of course as I said that the last setting one proved me wrong...
It looks like it can correct the streching some - but not enough with my current settings. Any suggestions on other param configs I should try?
Okay...can you try moving the fingers apart and see what happens?
I think the collision iterations may be the most useful slider to play with...
Is this a free set or a paid for item? If it's a freebie I can try having a look at it myself, tomorrow (maybe, time permitting etc.).
Ok, Richard. Got some pretty good progress. First - This is not a freebie figure.
I read your armor tutorial and found it extremely helpful. It allowed me to find the exact problem AutoFit is introducing. I looked at the Face Groups on both an autofitted and non-autofitted target. The issue is not that the tips are being left off but that they are being mis-assigned. They attached screen shot I believe shows the problem pretty well.
So, after some reading of your tutorial and working with the Group Editor and Weight Brush I was able to get the polygons on the tips assigned correctly. And indeed - they now move as one object independent of the other fingers. My remaining issue is in the initial stretch damage caused by the first AutoFit import. Shown below and circled in green is the state of the glove after the first import without any movement. Fixing the Face Placement and Weight Map doesn't correct this issue but does allow for further stretch damage to be avoided.
I tried using the Transfer Utility to see if I could get it imported without being fit and unfortunately that didn't help.
Any suggestions? I really appreciate the help so far!
And the initial stretch problem:
You might be able to straighten that out with a well-placed DForm, but realistically I think you would need tot ake it into Hexagon - straighten it out using the selection and move functions, then send it back to DS as a morph (you could, and it would be better to, straighten out the base mesh but then you may have to fiddle with the weights again (though you could use the transfer utility to go from the original converted mesh, which you've tweaked, to the smoothed out OBJ) - I think, given that this is the very end of the finger, that a morph will be adequate).
Well, that seemed to work out. It was difficult to re-align them but the end result looks pretty good.
For anyone following in my footsteps - I recommend using the POINT selection tools in Hexagon and then use the simple axis translation tool to move the mis-aligned points.
After I got the Morph back into DAZ I saw it wasn't perfect - but a Smoothing Adjustment with 5 iterations (both smooth and collision) took care of all the imperfections I was unable to correct in Hexagon during the re-alignment.
Also - the re-rigging just seemed complicated. It really wasn't so bad. I HIGHLY recommend Richard's tutorial thread.
Thanks again everyone for all the help. Here's the results:
The incorrectly assigned polygons make sense for what is happening in your screenshot but it seems odd if it's the autofit that it's not doing it with all gloves.
Off to try using V4/none
edited because I just realised I put the image that I did with the push modifier by mistake. Richard is there any way to reduce the amount of push with that function?
Still not able to replicate the problem and I tried with a couple of other pairs of gloves also...
The only time I've come close to an issue is when I clicked on the pose and the glove was selected instead of Genesis.
Just a thought after looking at the fixed shape image would this be something that would need a rigidity map Richard?
It's like they are claws extending off the tops of the finger tips.
I was thinking it was probably any issue with the odd "claws". The polygon mis-align was as follows:
Thumb: OK
Index: Tips downshifted by a fair margin and mapped to Middle
Middle: OK
Ring: Tips mapped to Middle
Pinky: Tips mapped to Ring
It was easy to see all the mistakes in the Weight Map and the Group Editor.
Also - I don't know if this makes a difference or not - but the original mesh doesn't have a "2" segment for the fingers, just 1 and 3 - but autofit maps the end segments of 3 to the 2 when it fits it.
I would imagine that might make a difference...but Richard would know more than me on that.
Just an image of one of the V4\none autofitted gloves.
Not Richard, but...
Yes, the push modifier loads at 1.0 cm and the adjustment is in the Parameters pane...it's called Offset distance.
Not Richard, but...
Yes, the push modifier loads at 1.0 cm and the adjustment is in the Parameters pane...it's called Offset distance.thanks MJC, you and Richard always seem to have the answers I need lately!